Introduction
This manual provides detailed instructions for the proper use, calibration, and maintenance of your Tadeto Digital Soil pH Meter (Model TE027). Designed for precision and ease of use, this device is essential for monitoring pH levels in various applications, including gardening, agriculture, hydroponics, and food testing. Understanding and maintaining optimal pH levels is crucial for plant health and accurate food analysis.
Package Contents
Please verify that all items listed below are included in your package:
- 1 x Digital pH Meter
- 1 x Instruction Manual
- 2 x AAA Batteries
- 1 x Potassium Chloride Powder (for filling solution)
- 1 x Empty Bottle (for filling solution)
- 1 x pH 4.01 Buffer Powder
- 1 x pH 7.00 Buffer Powder
- 1 x pH 10.01 Buffer Powder
- 1 x Protective Cap
- 1 x Zinc Alloy Tip
- 2 x Straws (pipettes)
- 1 x Cleaning Brush

Image: A complete set of Tadeto Digital Soil pH Meter components, including the meter, instruction manual, batteries, various powders for solutions, an empty bottle, protective cap, zinc alloy tip, straws, and a cleaning brush, all presented alongside a black carrying case.
Product Overview
The Tadeto Digital Soil pH Meter is equipped with advanced features for accurate and convenient pH measurement.
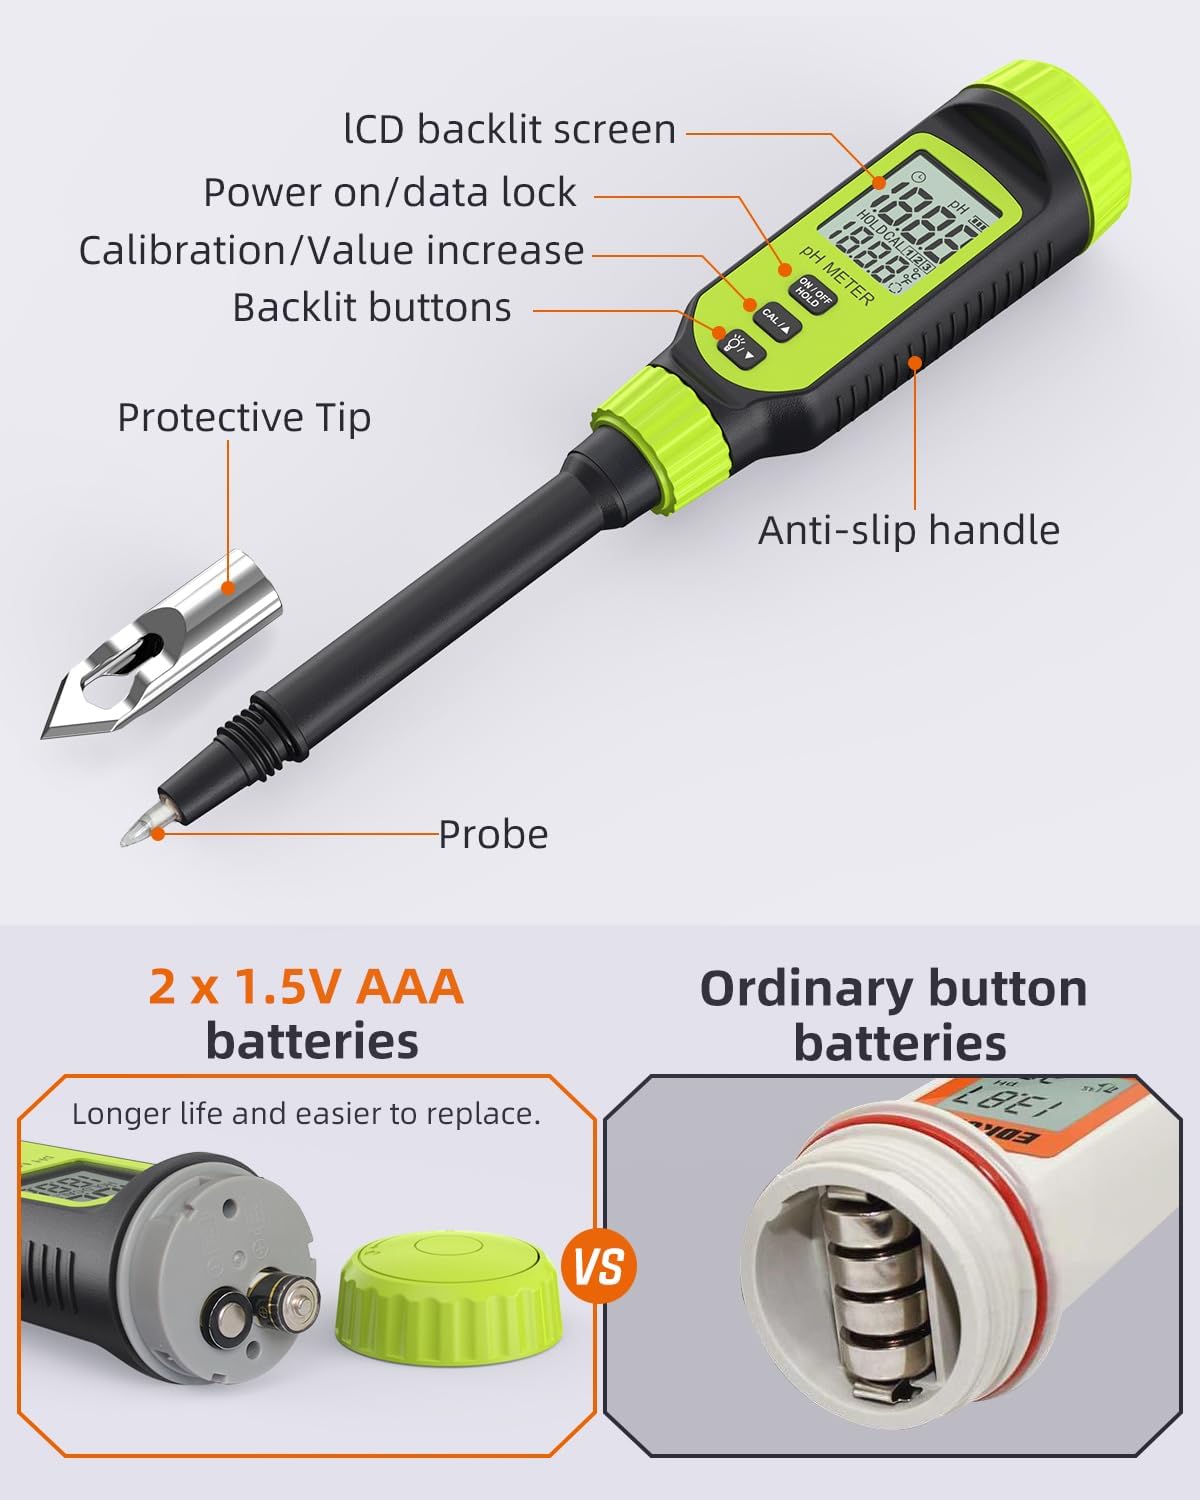
Image: A labeled diagram illustrating the key parts of the pH meter, including the LCD backlit screen, power/data lock button, calibration/value increase buttons, backlit buttons, anti-slip handle, probe, and the detachable protective zinc alloy tip.
Key features include:
- High Precision Sensors: Ensures accurate pH readings with a measurement accuracy of ±0.1pH.
- Zinc Alloy Protective Tip: A hard conical tip designed for measuring harder materials like soil, protecting the delicate electrode.
- LCD Backlight & Temperature Monitoring: A clear backlit screen for readability in low light, displaying real-time temperature.
- Data Hold Function: Allows you to freeze the reading on the screen for easy recording.
- Visual Alarm: The screen lights up red when pH is below 3.5 or above 12, indicating strong acid or alkali conditions.

Image: An infographic showcasing the meter's functionalities, including temperature display, calibration, screen backlighting, electrode protection, data hold, and visual alarm.
Setup
Battery Installation
The Tadeto Digital Soil pH Meter requires 2 AAA batteries (included).
- Unscrew the green cap at the top of the meter to access the battery compartment.
- Insert the 2 AAA batteries, ensuring correct polarity.
- Securely screw the cap back on.
Image: A detailed view of the meter's top section, highlighting the battery compartment designed for two AAA batteries, emphasizing ease of replacement compared to ordinary button batteries.
Zinc Alloy Protective Tip Installation
For measuring harder materials like soil, attach the zinc alloy protective tip to safeguard the glass probe.
- Carefully remove the clear protective cap from the probe.
- Align the zinc alloy tip with the probe and screw it on securely.

Image: A four-panel image demonstrating the installation of the zinc alloy protective tip onto the pH meter, followed by instructions for inserting the probe into material, rinsing after use, and installing the cap with potassium chloride solution.
Initial Preparation and Calibration
To ensure the accuracy of measurements, it is essential to calibrate the pH meter before its first use and periodically thereafter.
Preparing Calibration Solutions
Use the provided buffer powders (pH 4.01, pH 7.00, pH 10.01) to prepare the calibration solutions.
- Dissolve each powder packet in 250ml of distilled water.
- Stir until the powder is completely dissolved.
- Label each solution clearly.
Calibration Procedure
Follow these steps to calibrate your pH meter:
- Turn on the pH meter by pressing the "ON/OFF/HOLD" button.
- Immerse the electrode into the pH 6.86 (or 7.00) buffer solution.
- Press and hold the "CAL/A" button until "CAL" appears on the display. Release the button.
- The meter will automatically recognize the buffer solution and display "CAL" along with the pH value. Wait for the reading to stabilize (usually within a few seconds).
- Rinse the electrode with distilled water and dry it gently.
- Repeat the process for pH 4.01 and pH 9.18 (or 10.01) buffer solutions.
Video: This video demonstrates the calibration process for the Tadeto pH meter using standard buffer solutions (pH 4.01, 7.00, and 10.01). It shows how to prepare the solutions, immerse the probe, and use the calibration function to ensure accurate readings. The video also highlights the meter's use for nutrient solution and food pH measurements, and the installation of the protective tip for soil testing.
Operating Instructions
pH Measurement
Before each measurement, ensure the probe is clean and the meter is calibrated.
Soil pH Measurement
To measure soil pH:
- Ensure the zinc alloy protective tip is securely attached.
- Moisten the soil with distilled water if it is dry.
- Insert the probe vertically into the soil to the desired depth, avoiding excessive force to prevent damage to the probe.
- Wait for the reading to stabilize on the LCD screen.

Image: A composite image showing the digital pH meter in use for three different applications: measuring pH in soil, in a food sample (puree), and in a hydroponic nutrient solution, demonstrating its versatility.
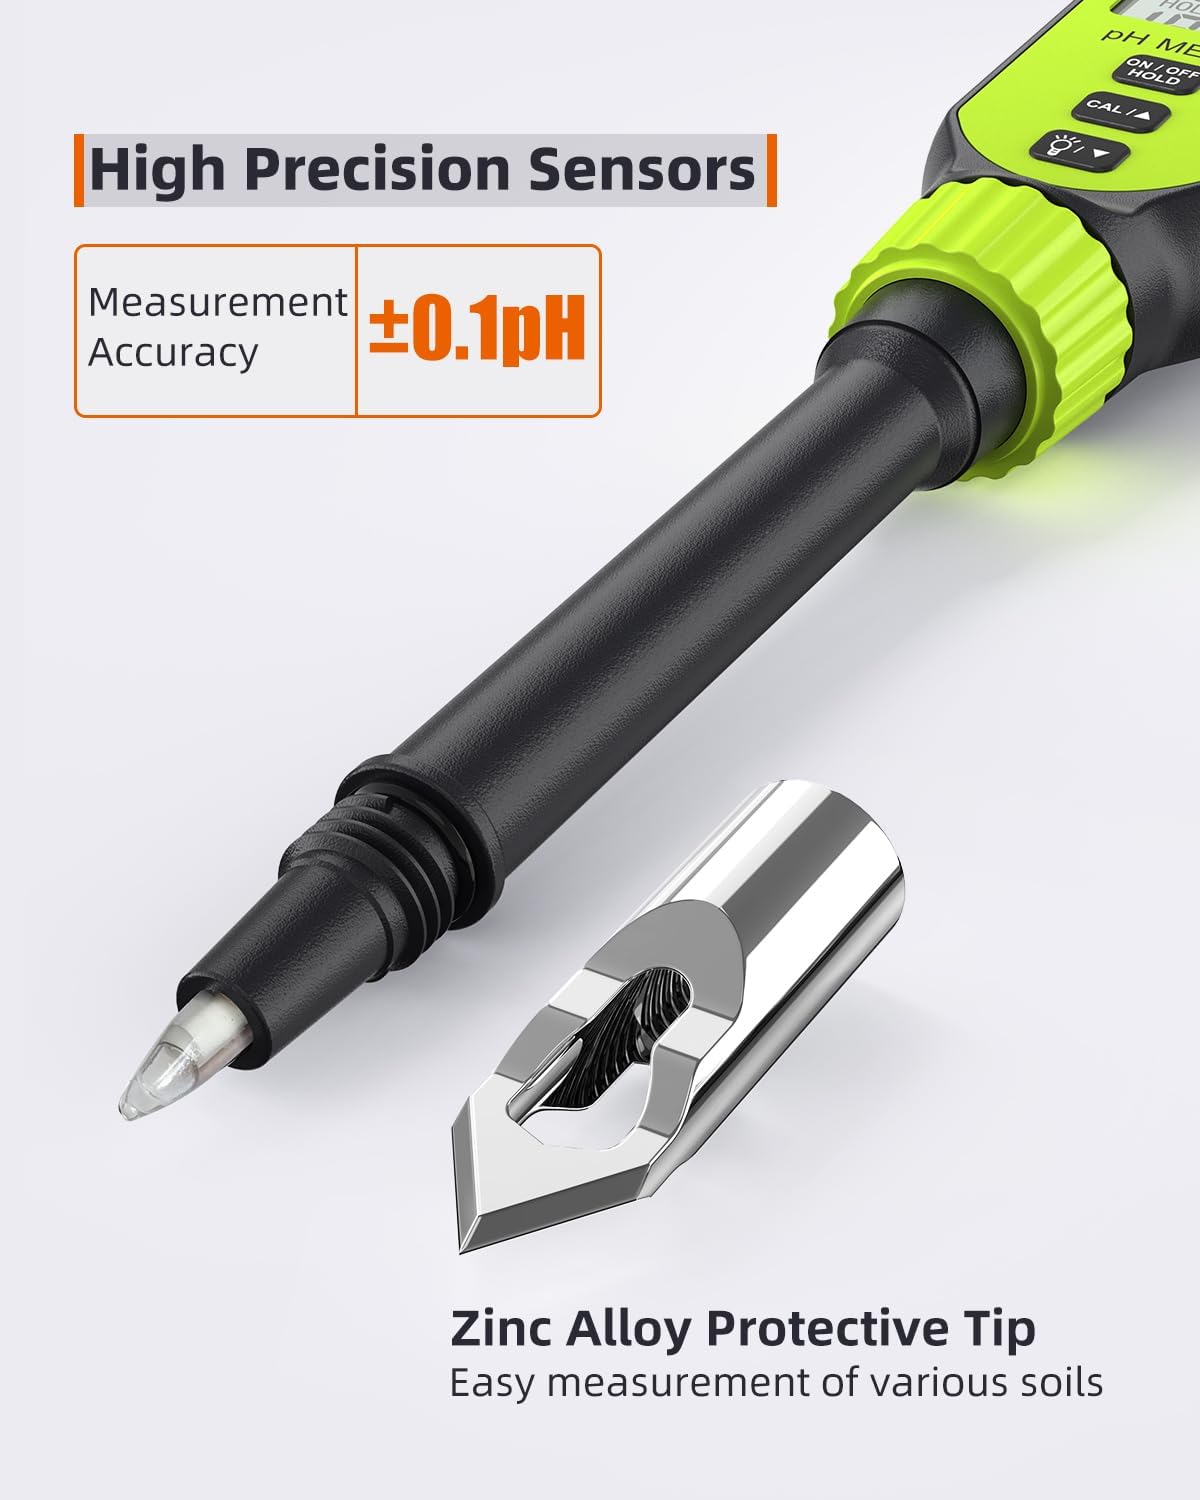
Image: A close-up view of the pH meter's probe and the detachable zinc alloy protective tip, emphasizing its high precision sensors and suitability for easy measurement in various soil types.
Hydroponic Nutrient Solution pH Measurement
To measure hydroponic solution pH:
- Remove the zinc alloy protective tip if attached.
- Immerse the probe directly into the nutrient solution.
- Wait for the reading to stabilize.
Food pH Measurement
To measure food pH:
- For softer foods, the probe can be inserted directly. For harder foods, attach the zinc alloy tip.
- Insert the probe into the food sample.
- Wait for the reading to stabilize.
LCD Display and Functions
The LCD screen provides comprehensive information:
- pH Display Area: Shows the current pH reading.
- Ambient Temperature Display Area: Displays the temperature, which can be switched between Celsius and Fahrenheit.
- Data Hold (HOLD): Appears when the "ON/OFF/HOLD" button is pressed briefly to freeze the reading.
- Calibration Display (CAL): Indicates the meter is in calibration mode.
- Timing Symbol: Indicates measurement in progress.
- Electricity Symbol: Battery level indicator.
Maintenance and Care
Cleaning the Probe
After each use, especially after measuring soil or other viscous substances, clean the probe thoroughly.
- Rinse the probe with distilled water.
- Use the provided cleaning brush to gently remove any surface dirt or residue.
- Ensure the probe is completely clean before storage.
Image: A panel from a multi-step guide showing a hand rinsing the pH meter probe under running water and using a small brush to clean it, emphasizing post-measurement hygiene.
Electrode Moisturization
To maintain the electrode's sensitivity and prolong its lifespan, it must be kept moist.
- Fill the protective cap with a small amount of the potassium chloride (KCl) filling solution.
- Place the cap back onto the probe, ensuring the electrode is submerged in the solution.
Image: A panel from a multi-step guide illustrating the process of filling the protective cap with potassium chloride solution and then securing it onto the pH meter probe to maintain electrode moisture.
Storage
Store the pH meter in its original carrying case in a cool, dry place, away from direct sunlight and extreme temperatures. Ensure the electrode is properly moisturized before storage.
Troubleshooting
| Problem | Possible Cause | Solution |
|---|---|---|
| Inaccurate Readings | Improper calibration; dirty electrode; dry electrode; expired buffer solutions. | Recalibrate the meter using fresh buffer solutions. Clean the electrode thoroughly. Ensure the electrode is kept moist with KCl solution. |
| Display Not Working / No Power | Dead batteries; incorrect battery installation. | Replace batteries with new AAA batteries. Check battery polarity. |
| Slow Response Time | Electrode not fully hydrated; low temperature. | Soak the electrode in KCl solution for several hours. Allow the meter to warm up to room temperature. |
| Red Backlight Alarm | pH reading is extremely acidic (pH < 3.5) or extremely alkaline (pH > 12). | This is an informational alarm. Adjust the pH of your solution/soil as needed. |
Specifications
| Parameter | Value |
|---|---|
| Product Model | TE027 |
| pH Measuring Range | 0.00 - 14.00 pH |
| pH Accuracy | ±0.1 pH |
| pH Resolution | 0.01 pH |
| Temperature Compensation Range | 0 - 50°C (32 - 122°F) |
| Operating Temperature | 0 - 50°C (32 - 122°F) |
| Power Supply | 2 x 1.5V AAA Batteries |
| Display | LCD with Backlight |
| Dimensions | 11.65 x 3.78 x 1.93 inches |
| Item Weight | 10.8 ounces |
Warranty and Support
For warranty information and technical support, please refer to the contact details provided on the product packaging or visit the official Tadeto website. Keep your purchase receipt as proof of purchase.