HOMMPA Nightstand 17
HOMMPA LED Nightstand with Charging Station and 2 Drawers
Model: Nightstand 17
1. Introduction
Thank you for choosing the HOMMPA LED Nightstand. This manual provides essential information for the safe assembly, operation, and maintenance of your new nightstand. Please read these instructions thoroughly before beginning assembly or use to ensure proper function and longevity of the product.

Figure 1: HOMMPA LED Nightstand with blue LED lighting, charging station, and two drawers.
2. Safety Information
- Assembly Required: This product requires assembly. Risk of injury may occur if not assembled correctly. Follow all steps precisely.
- Weight Limit: Do not exceed the maximum weight recommendation of 100 pounds on the top surface.
- Electrical Safety: Ensure all electrical connections for the charging station and LED lights are properly secured and connected to a suitable power source. Do not overload the outlets.
- Placement: Place the nightstand on a flat, stable surface to prevent tipping.
- Children and Pets: Keep small parts and assembly tools away from children and pets during assembly.
3. Package Contents
Before assembly, verify that all components are present and undamaged. The package includes:
- All labeled parts for the nightstand structure
- Assembly hardware (screws, dowels, etc.)
- Necessary assembly tools (e.g., Allen wrench)
- Step-by-step installation manual
- LED light strip and controller
- Power cord with charging station module
4. Specifications
| Feature | Detail |
|---|---|
| Brand | HOMMPA |
| Model Number | Nightstand 17 |
| Product Dimensions (L x W x H) | 17.7" x 15.7" x 26.7" |
| Item Weight | 36.6 Pounds |
| Maximum Weight Recommendation | 100 Pounds |
| Color | White Marble |
| Material Type | Engineered Wood |
| Number of Drawers | 2 |
| Charging Station | 2 AC Outlets (120V/12A), 1 USB Port (5V/2A), 1 Type-C Port (5V/2A) |
| LED Lighting | RGB, 16 Million Colors, 29 Dynamic Modes, Adjustable Brightness, Music Sync, Microphone Sync, Timing Function |
| Control Method | APP and Remote Control |
| UPC | 747302356519 |

Figure 2: Product Dimensions Overview.
5. Setup and Assembly
Assembly typically takes 30-40 minutes. Follow the included step-by-step installation manual. For visual guidance, an installation video may be available from the manufacturer.
5.1 General Assembly Steps
- Unpack: Carefully remove all components from the packaging and lay them out on a clean, soft surface to prevent scratches.
- Identify Parts: Match each part to the corresponding label in the instruction manual.
- Assemble Frame: Connect the main panels using the provided hardware, ensuring all connections are secure.
- Install Drawers: Assemble the drawer boxes and install the drawer slides onto both the drawers and the nightstand frame. Insert the drawers into the frame.
- Integrate Electrical Components: Install the LED light strip into the designated groove. Secure the charging station module to the top panel and route the power cord as instructed. Utilize the wire management cutout for a tidy setup.
- Attach Protective Feet: Secure the protective feet to the bottom of the nightstand.
- Final Check: Ensure all screws are tightened and the nightstand is stable.

Figure 3: Nightstand with drawers open, illustrating storage space.

Figure 4: Close-up of wire management, drawer slides, and protective feet.
6. Operating Instructions
6.1 Charging Station
The integrated charging station provides convenient power access for your electronic devices. It includes:
- 2 AC Outlets: For standard electrical plugs (120V/12A).
- 1 USB Port: For charging USB-compatible devices (5V/2A).
- 1 Type-C Port: For charging Type-C compatible devices (5V/2A).
Simply plug your devices into the appropriate ports. Ensure the nightstand's power cord is connected to a wall outlet.
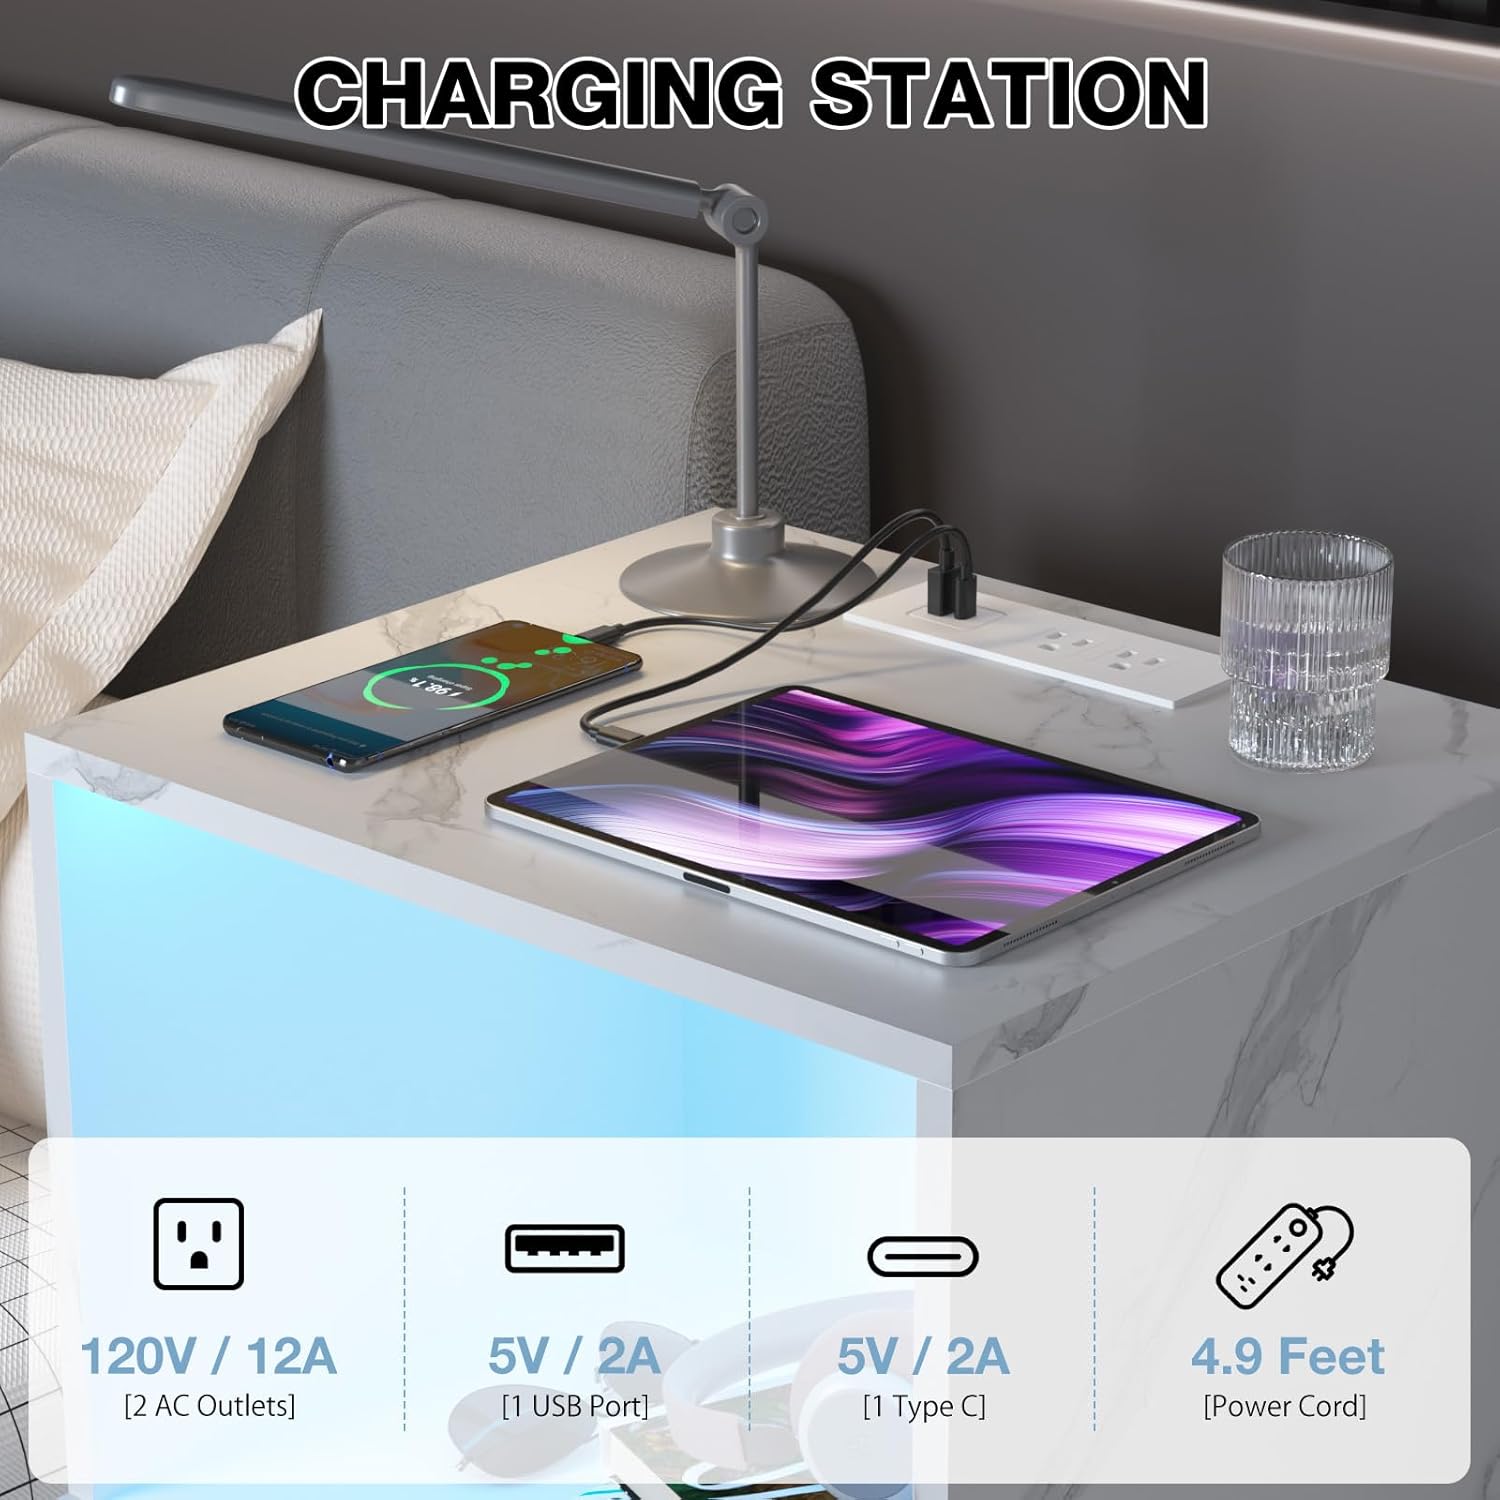
Figure 5: Charging Station Details.
6.2 RGB LED Lighting
The nightstand features intelligent multicolor RGB LED lights controllable via a mobile application or the included remote control.
- Power On/Off: Use the designated button on the remote or within the app.
- Color Selection: Choose from over 16 million colors to customize your lighting.
- Dynamic Modes: Select from 29 pre-set dynamic lighting modes.
- Brightness Adjustment: Adjust the light intensity to 10 different levels.
- Music Sync: The lights can synchronize with music played through your device.
- Microphone Sync: The lights can react to sounds detected by your device's microphone.
- Timing Function: Set schedules for the lights to turn on or off automatically.
Refer to the specific instructions provided with the LED controller for detailed pairing and operation of the APP and remote control.

Figure 6: RGB LED Color Options.

Figure 7: APP and Remote Control Features.

Figure 8: Adjustable LED Brightness Levels.
7. Maintenance
- Cleaning: Wipe the nightstand surfaces with a dry cloth. Avoid abrasive cleaners or harsh chemicals that may damage the finish.
- Electrical Components: Ensure the charging station and LED components are kept dry. Do not expose them to liquids.
- Hardware: Periodically check and tighten any loose hardware to maintain stability.
8. Troubleshooting
8.1 LED Lights Not Working
- Check Power: Ensure the nightstand's power cord is securely plugged into a functional wall outlet.
- Controller Connection: Verify that the LED light strip is properly connected to its controller and the controller is receiving power.
- Remote/App Battery: If using the remote, check its battery. If using the app, ensure your device's Bluetooth is enabled and paired correctly.
8.2 Charging Station Not Functioning
- Power Connection: Confirm the nightstand's power cord is fully inserted into both the nightstand and the wall outlet.
- Device Compatibility: Ensure your device is compatible with the USB or Type-C port, and that the charging cable is functional.
- Overload: Avoid plugging in too many high-power devices simultaneously, which could trip a circuit.
8.3 Drawers Not Sliding Smoothly
- Check Alignment: Ensure the drawer slides are correctly aligned and installed.
- Obstructions: Look for any objects obstructing the drawer's path.
- Hardware: Verify that all screws securing the drawer slides are tight.
9. Warranty and Support
For specific warranty information, please refer to the documentation included with your purchase or contact HOMMPA customer service directly. If you encounter any issues not covered in this manual, or require further assistance, please reach out to the manufacturer's support team.
Contact information for support can typically be found on the product packaging or the official HOMMPA website.
Ask a question about this manual
Ask about setup, troubleshooting, compatibility, parts, safety, or missing instructions. Manuals+ will review the question and use this page’s manual context to help answer it.