1. Important Safety Information
Please read this manual carefully before operating your DEEPOWER A2 Electric Bicycle. Failure to follow instructions and safety guidelines may result in serious injury or damage to the bicycle.
- Always wear a helmet and appropriate safety gear when riding.
- Obey all local traffic laws and regulations.
- Do not ride under the influence of alcohol or drugs.
- Regularly inspect your bicycle for proper function, especially brakes, tires, and battery connections.
- Ensure all quick releases and fasteners are securely tightened before each ride.
- Avoid riding in extreme weather conditions or on excessively rough terrain.
2. Package Contents
Upon unpacking, please verify that all components are present:
- DEEPOWER A2 Electric Bicycle (main frame, rear wheel, battery installed)
- Front Wheel
- Handlebar Assembly
- Seat Cushion and Seat Post
- Pedals (Left and Right)
- Front Fender
- Kickstand
- Battery Charger
- Tool Kit
- User Manual (this document)

This image displays the complete DEEPOWER A2 Electric Bicycle, showcasing its foldable design, fat tires, and integrated components.
3. Setup and Assembly
Follow these steps to assemble your DEEPOWER A2 Electric Bicycle:
3.1 Unpacking the Bicycle
This video demonstrates the complete unpacking process of the DEEPOWER A2 Electric Bicycle from its shipping box, showing how to safely remove the bike and its accessories.
3.2 Installing the Front Wheel
Carefully align the front wheel with the fork. Ensure the brake rotor slides correctly into the brake caliper. Insert the quick-release skewer through the hub and tighten it securely.

This image highlights the front wheel and fork, illustrating the components and their alignment during installation.
3.3 Attaching the Handlebar Assembly
Insert the handlebar stem into the head tube of the frame. Adjust the height to your preference and tighten the quick-release lever and any securing bolts.

This image highlights the handlebar assembly, including the digital display and controls for speed and riding modes.
3.4 Installing the Seat Cushion and Pedals
Insert the seat post into the frame's seat tube. Adjust the seat height for comfortable riding and secure it with the quick-release clamp. Attach the pedals to their respective crank arms (Left and Right are usually marked).

This image illustrates the adjustable seat post, allowing riders to customize the seat height for optimal comfort and pedaling efficiency.
4. Operating Instructions
4.1 Powering On and Off
To power on the bicycle, insert the key into the battery lock and turn it to the "ON" position. Then, press and hold the power button on the display until it lights up. To power off, press and hold the power button again.

This visual guide demonstrates the three simple steps to power on your e-bike: turning the battery key, pressing the display's power button, and twisting the throttle.
4.2 Riding Modes and Speed Control
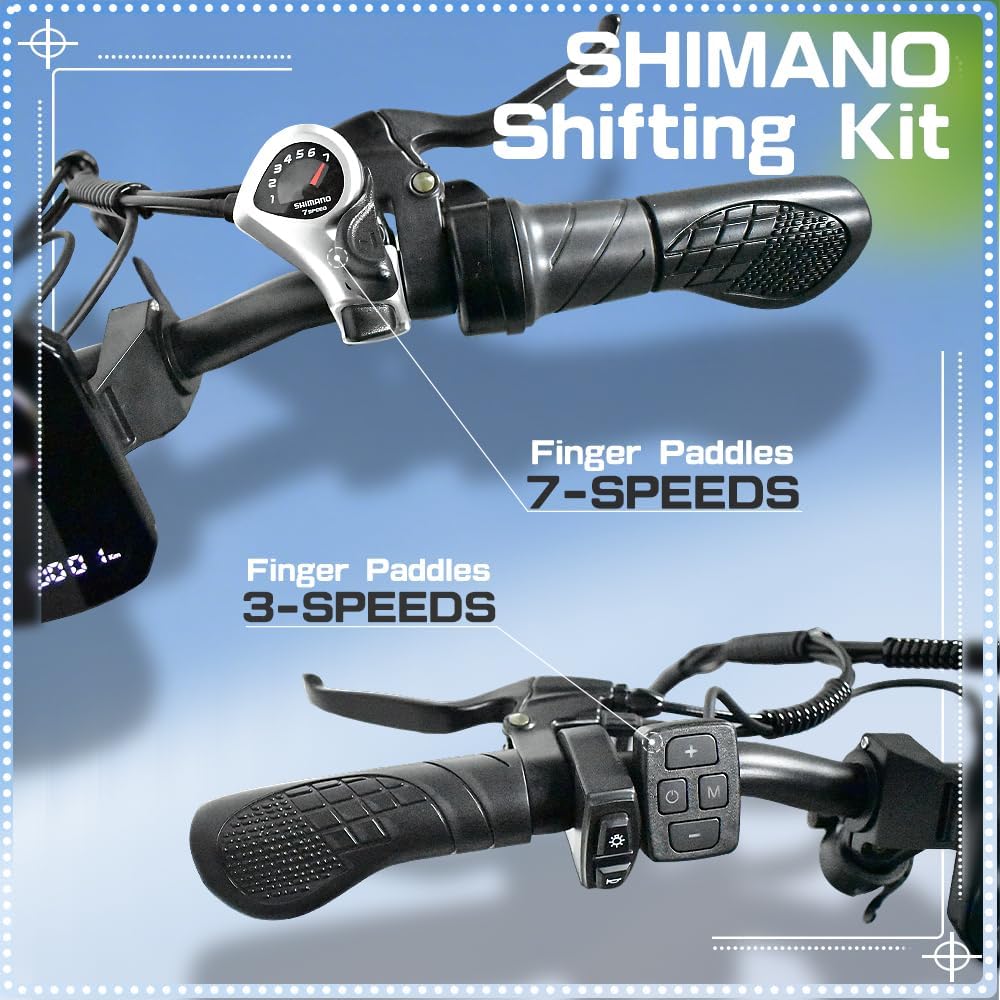
The DEEPOWER A2 offers three riding modes: electric-only, pedal-assist, and pedal-only. Use the controls on the handlebar to switch between modes and adjust the assist level. The 7-speed gears allow for further customization of your riding experience.

This image shows the Shimano 7-speed shifting kit, highlighting the finger paddles for easy gear changes to customize your ride.
4.3 Unlocking Maximum Speed
The bicycle's maximum speed is limited from the factory. To unlock the full speed capability (up to 30MPH), follow the instructions in the video below. This process typically involves a sequence of throttle and brake actions while powering on the display.
This video provides a step-by-step guide on how to unlock the maximum speed of your DEEPOWER A2 Electric Bicycle, detailing the specific actions required with the throttle and brake.
4.4 Using Lights and Horn
The bicycle is equipped with an LED headlight and taillight for enhanced visibility and safety, especially during night rides. The horn provides an audible warning for pedestrians and other riders.
This video demonstrates how to operate the integrated headlight and horn on your DEEPOWER A2 Electric Bicycle, showing the button controls and their functions.
5. Maintenance
5.1 Battery Care
The 48V 20Ah removable battery provides a range of 45-65 miles on a single charge. For optimal battery life, charge it regularly and avoid fully discharging it. Store the battery in a cool, dry place when not in use.

This image illustrates the removable battery pack, showing how it integrates into the bike frame and the mechanism for removal and installation.
This video demonstrates the process of folding the DEEPOWER A2 Electric Bicycle and safely removing its battery, highlighting the key and latch mechanisms.
5.2 Brake Adjustment
The DEEPOWER A2 features front and rear mechanical disc oil brakes. If you notice a "rustling" sound from the brakes or reduced braking performance, they may need adjustment. This typically involves slightly loosening the brake caliper screws, adjusting the caliper position, and then re-tightening.

This image provides a close-up view of the front mechanical disc oil brake, emphasizing its robust design for reliable stopping power.
This video demonstrates how to adjust the brake pads to eliminate rustling sounds and ensure optimal braking performance, showing the loosening and tightening of caliper screws.
5.3 Suspension Fork Maintenance
The adjustable suspension fork provides cushioning for a smooth ride. It can be locked or unlocked depending on the terrain. Regular cleaning and occasional lubrication of the stanchions will help maintain its performance.

This image displays the front suspension fork, highlighting its adjustable and lockable features for adapting to various riding conditions.
This video illustrates how to lock and unlock the front suspension fork, a useful feature for optimizing ride comfort on different terrains.
6. Troubleshooting
| Problem | Possible Cause | Solution |
|---|---|---|
| Bicycle not powering on | Battery not inserted correctly or not charged; power button not pressed long enough. | Ensure battery is fully inserted and locked. Charge the battery. Press and hold the power button for 3-5 seconds. |
| Reduced motor assist or no power | Low battery charge; loose battery connection; motor or controller issue. | Charge the battery. Check battery connection. Contact customer support if issue persists. |
| Brakes making noise or feeling weak | Brake pads misaligned or worn; disc rotor bent. | Adjust brake pads (refer to Section 5.2). Inspect disc rotor for damage. Replace worn pads. |
| Display not showing information | Loose cable connection to display; display malfunction. | Check all cable connections to the display. Contact customer support. |
7. Specifications
| Feature | Detail |
|---|---|
| Motor | 750W Rear Brushless Motor |
| Battery | 48V 20Ah Removable Battery |
| Max Speed | Up to 30MPH (unlocked) |
| Range | 45-65 miles per charge |
| Charging Time | 6-7 hours |
| Tires | 20" x 4.0 Fat Tires |
| Brakes | Front and Rear Mechanical Disc Oil Brakes |
| Gears | 7-Speed Gears |
| Suspension | Front Adjustable Suspension Fork |
| Frame Material | Aluminum |
| Item Weight | 68.1 Pounds (approx. 30.9 kg) |
| Max Load Capacity | 330.69 Pounds (approx. 150 kg) |
This image details the 750W rear brushless motor and the 7-speed driving gear system, highlighting the bike's power and versatility.

This diagram provides detailed dimensions of the DEEPOWER A2 Electric Bicycle, including recommended rider height and various measurements for the bike's frame and components.

This image shows the folded dimensions of the bicycle, along with its weight (68.12 lbs / 30.9 kg) and load capacity (330.69 lbs / 150 kg), emphasizing its portability and robustness.
8. Warranty and Support
Your DEEPOWER A2 Electric Bicycle comes with a 1-year limited warranty from the date of purchase. This warranty covers manufacturing defects in materials and workmanship.
For warranty claims, technical support, or any questions regarding your product, please contact DEEPOWER customer support through the following channels:
- Online Support: Visit the official DEEPOWER store on Amazon.com for FAQs and contact options.
- Email Support: Refer to your purchase documentation for direct email contact.
Please have your model number (A2) and purchase date ready when contacting support.