1. Product Overview
The Suptek Full Motion TV Wall Mount MA01A is designed to securely hold flat screen, LED, and 4K TVs ranging from 32 to 84 inches in size, with a maximum weight capacity of 132 lbs. This mount features dual articulating arms, allowing for a wide range of motion to optimize your viewing experience. It supports VESA mounting patterns from 100x100mm up to 600x400mm.
Key features include adjustable tilt (+5°/-10°), swivel (±45°), and a post-installation leveling adjustment (±4°). The mount can extend up to 17.1 inches from the wall and retract to a slim 2.4 inches, providing flexibility and space-saving benefits. It is suitable for installation on wood studs with a maximum spacing of 16 inches, as well as concrete or brick walls.

Figure 1.1: Overview of the Suptek Full Motion TV Wall Mount MA01A and included accessories, including a bubble level and cable ties.
2. Safety Information and Precautions
Please read this manual thoroughly before installation and use. Incorrect installation or use can lead to serious injury or damage to your TV and property. If you have any questions, contact customer support.
- Weight Capacity: Do not exceed the maximum weight capacity of 132 lbs (60 kg). This mount is intended for use only with the maximum weights indicated.
- TV Size: Ensure your TV size is within the recommended range of 32 to 84 inches.
- VESA Compatibility: Verify your TV's VESA mounting pattern is between 100x100mm and 600x400mm.
- Wall Type: This mount is designed for installation on wood studs (max 16" spacing) or solid concrete/brick walls. DO NOT mount on drywall alone.
- Professional Installation: If you are unsure about the installation process or wall type, consult a qualified professional.
- Tools: Use appropriate tools for installation. Ensure all screws are tightened securely but do not overtighten.
- Cable Management: Ensure all cables are routed safely and do not interfere with the mount's movement.
3. Compatibility Check
Before proceeding with installation, confirm your TV and wall are compatible with this mount.

Figure 3.1: Compatibility requirements for the TV mount, including VESA patterns, cable outlet considerations, TV size and weight, and suitable wall types.
- VESA Pattern: Measure the horizontal and vertical distance between the mounting holes on the back of your TV. This mount supports VESA patterns from 100x100mm (min) to 600x400mm (max).
- TV Weight: Your TV must weigh no more than 132 lbs (60 kg).
- TV Size: The mount is designed for TVs between 32 and 84 inches.
- Cable Outlets: Check for any cable outlets or ports on the back of your TV that might be blocked by the mount's arms or plate.
- Wall Type: Ensure your wall is either wood studs (up to 16 inches apart) or a solid concrete/brick wall.
4. Parts List
Before beginning installation, verify that all parts are present and undamaged. Refer to the included hardware bags, which are pre-labeled for easy identification.

Figure 4.1: Comprehensive view of all components included in the package, organized for easy identification during assembly.
The package includes the main wall mount assembly, TV brackets, various screws, washers, spacers for TV attachment, wall anchors (for concrete/brick), a magnetic bubble level, and cable ties. A detailed list of specific fasteners and components is provided in the physical instruction manual.
5. Setup and Installation
Follow these steps carefully for a secure installation. It is recommended to have two people for installation, especially when handling the TV.

Figure 5.1: Simplified three-step installation process for the TV wall mount.
- Attach Brackets to TV:
- Carefully place your TV face down on a soft, clean surface to prevent scratches.
- Identify the correct screws, washers, and spacers from the labeled bags that fit your TV's VESA holes.
- Attach the two vertical TV brackets to the back of your TV using the selected hardware. Ensure they are securely fastened and evenly spaced.
- Assemble and Attach Wall Plate to Wall:
- Determine the desired height for your TV. Use a stud finder to locate the center of the wood studs if mounting on wood.
- Mark the drilling locations on the wall. Use the provided template if available.
- Drill pilot holes. For wood studs, use self-tapping screws directly. For concrete/brick walls, insert concrete anchors into the drilled holes before securing the wall plate.
- Attach the wall plate assembly to the wall using the appropriate screws. Use the magnetic bubble level to ensure the wall plate is perfectly horizontal before tightening all screws.

Figure 5.2: Illustration of proper mounting methods for wood studs and concrete/brick walls, with a warning against drywall-only installation.
- Hang and Secure TV on Wall Plate:
- With assistance, carefully lift the TV with the attached brackets and hook them onto the wall plate.
- Ensure the TV brackets are properly seated and engaged with the wall plate's hooks.
- Secure the TV to the wall plate using the safety screws or locking mechanisms provided. This prevents accidental dislodgement.
6. Operating Instructions
Once installed, your Suptek Full Motion TV Wall Mount offers various adjustments for optimal viewing.
- Extension and Retraction: Gently pull or push the TV to extend it up to 17.1 inches from the wall or retract it to 2.4 inches. This allows you to save space when not in use or bring the TV closer for viewing.
- Tilt Adjustment: The mount allows for a tilt range of +5° (upwards) to -10° (downwards). This feature is useful for reducing glare from lights or windows and achieving a comfortable viewing angle. Loosen the tilt adjustment knobs, set the desired angle, and then re-tighten the knobs.
- Swivel Adjustment: You can swivel the TV up to ±45° (left or right) to direct the screen towards your seating position. Simply push or pull the TV gently to the desired angle.
- Post-Installation Leveling: If your TV appears slightly unlevel after installation, the mount allows for a ±4° post-installation adjustment. This fine-tuning ensures your TV is perfectly horizontal.
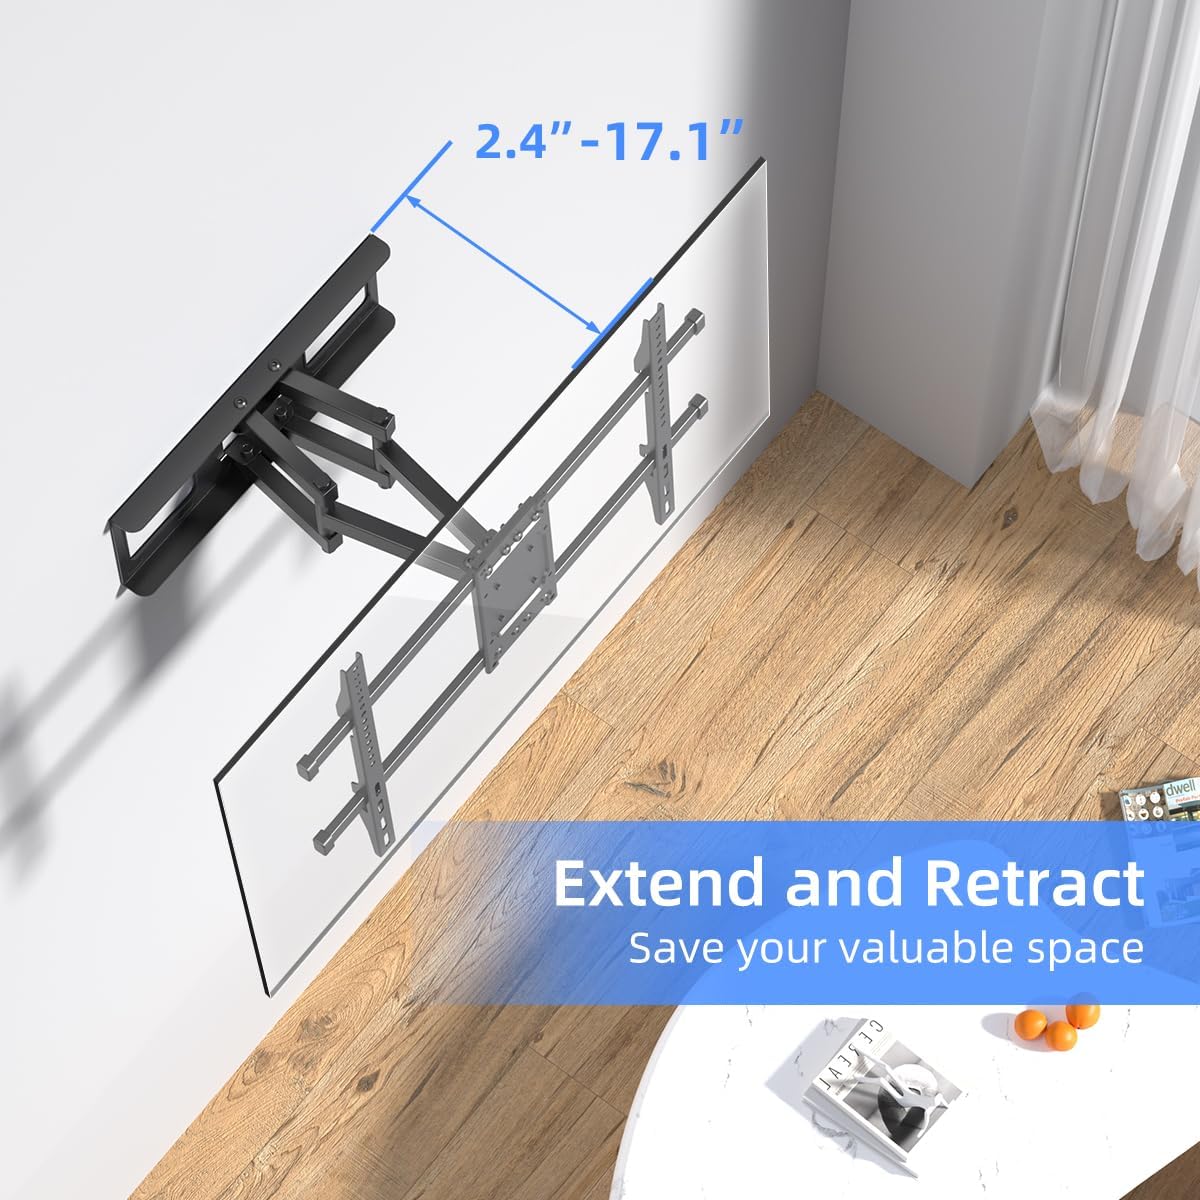
Figure 6.1: Demonstration of the mount's ability to extend and retract, optimizing room space.

Figure 6.2: Illustration of the tilt function, allowing adjustment from +5 degrees to -10 degrees to minimize screen glare.

Figure 6.3: Visual representation of the swivel capability and the post-installation leveling feature for precise alignment.
7. Maintenance
Regular maintenance ensures the longevity and safe operation of your TV wall mount.
- Periodic Checks: Periodically check all screws and bolts to ensure they remain tight. Over time, vibrations or frequent adjustments can cause fasteners to loosen.
- Cleaning: Clean the mount with a soft, dry cloth. Avoid using abrasive cleaners or solvents, as they may damage the finish.
- Lubrication: The articulating arms are designed for smooth movement. If you notice any stiffness, a small amount of silicone-based lubricant can be applied to the pivot points, avoiding contact with electrical components.
- Damage Inspection: Inspect the mount for any signs of damage, bending, or wear. If any damage is observed, discontinue use and contact customer support.
8. Troubleshooting
This section addresses common issues you might encounter.
- TV is not level after installation:
- Use the ±4° post-installation leveling adjustment feature. Refer to Section 6 for details.
- Ensure the wall plate was installed level. If not, you may need to re-adjust the wall plate's position.
- Difficulty moving the TV (tilt/swivel/extension):
- Check if any cables are snagged or interfering with the movement.
- Ensure no screws are overtightened, restricting movement.
- Apply a small amount of silicone-based lubricant to the moving joints if they feel stiff.
- TV feels unstable or wobbly:
- Verify that all mounting screws (both to the TV and to the wall) are securely tightened.
- Ensure the TV's weight does not exceed the mount's maximum capacity.
- Confirm the wall type is appropriate and the anchors/screws are properly installed.
- Missing parts:
- Double-check the packaging. If parts are genuinely missing, contact customer support immediately.
9. Specifications
| Feature | Specification |
|---|---|
| Model Number | MA01A |
| Compatible TV Size | 32 - 84 inches |
| Weight Capacity | Up to 132 lbs (60 kg) |
| VESA Compatibility | 100x100mm to 600x400mm |
| Tilt Angle | +5° / -10° |
| Swivel Angle | ±45° |
| Post-Installation Leveling | ±4° |
| Extension from Wall | 2.4 inches (retracted) to 17.1 inches (extended) |
| Wall Plate Dimensions | Refer to physical manual for exact dimensions |
| Material | Metal |
| Product Weight | Approximately 11.31 lbs |
10. Warranty and Support
The Suptek Full Motion TV Wall Mount MA01A comes with a 1-year warranty from the date of purchase, ensuring your satisfaction with the product. This warranty covers manufacturing defects and material flaws under normal use.
For technical assistance, missing parts, or warranty claims, please contact Suptek customer support:
- Email: after-sales@suptekmount.com
- Online Support: Visit the official Suptek website for FAQs and additional resources.
Please have your product model number (MA01A) and purchase information ready when contacting support.