LAKEMID Record Player Stand with Vinyl Storage - User Manual
Model: B0CF49NCKN
1. Introduction
Thank you for choosing the LAKEMID Record Player Stand with Vinyl Storage. This versatile furniture piece is designed to enhance your living space with its functional storage, integrated charging station, and captivating RGB LED lighting. This manual provides detailed instructions for assembly, operation, and maintenance to ensure you get the most out of your product.
Image: The LAKEMID Record Player Stand, showcasing its design with a record player on top, books with LED lighting, and vinyl records stored in the adjacent stand.
2. Safety Information
Please read all instructions carefully before assembly and use. Keep this manual for future reference.
Ensure all parts are present and undamaged before beginning assembly.
Assemble on a soft, clean surface to prevent scratches.
Do not overtighten screws during assembly.
Keep small parts and packaging materials away from children.
Do not exceed the weight capacity of the shelves. Refer to the Specifications section for details.
Ensure the product is placed on a stable, level surface to prevent tipping.
Only use the provided power adapter for the LED light strip and charging station.
3. Package Contents
Before assembly, verify that all components listed below are included in your package. If any parts are missing or damaged, please contact customer support.
3-Layer Shelf Record Player Table (1 unit)
Steel Vinyl Record Storage Stand (1 unit)
RGB LED Light Strip with IR Remote (1 set)
Integrated Power Strip with 2 Outlets and 2 USB Ports (1 unit)
Assembly Hardware (screws, bolts, etc.)
Assembly Tools (e.g., Allen wrench)
Instruction Manual (this document)
4. Setup and Assembly
The LAKEMID Record Player Stand is designed for effortless assembly. Follow these general steps. For detailed, step-by-step instructions, please refer to the assembly diagram included in your package.
Unpack and Identify Parts: Carefully remove all components from the packaging. Lay them out on a clean, soft surface. Identify each part by comparing it to the parts list in the assembly diagram.
Assemble the Main Frame: Begin by attaching the support bars to the main vertical frames of both the 3-layer shelf and the L-shaped vinyl storage stand. Ensure all connections are secure but do not fully tighten screws until all major components are in place.
Install Shelves: Place the wooden shelves onto the designated supports of the 3-layer unit. Secure them with the provided hardware. For the vinyl storage stand, ensure the L-shaped dividers are correctly oriented.
Attach Power Strip and LED Light: Integrate the power strip into its designated slot on the 3-layer shelf. Adhere the LED light strip to the underside of the shelf as indicated in the diagram, ensuring the cable can reach the power strip.
Final Tightening and Placement: Once all components are assembled, carefully tighten all screws. Attach the adjustable feet to the bottom of both stands. Place the assembled stands in your desired location, ensuring they are stable and level. The two stands can be used together or separately.
Image: Detailed product dimensions and individual shelf weight capacities for both the 3-layer record player stand and the L-shaped vinyl storage stand.
5. Features and Operation
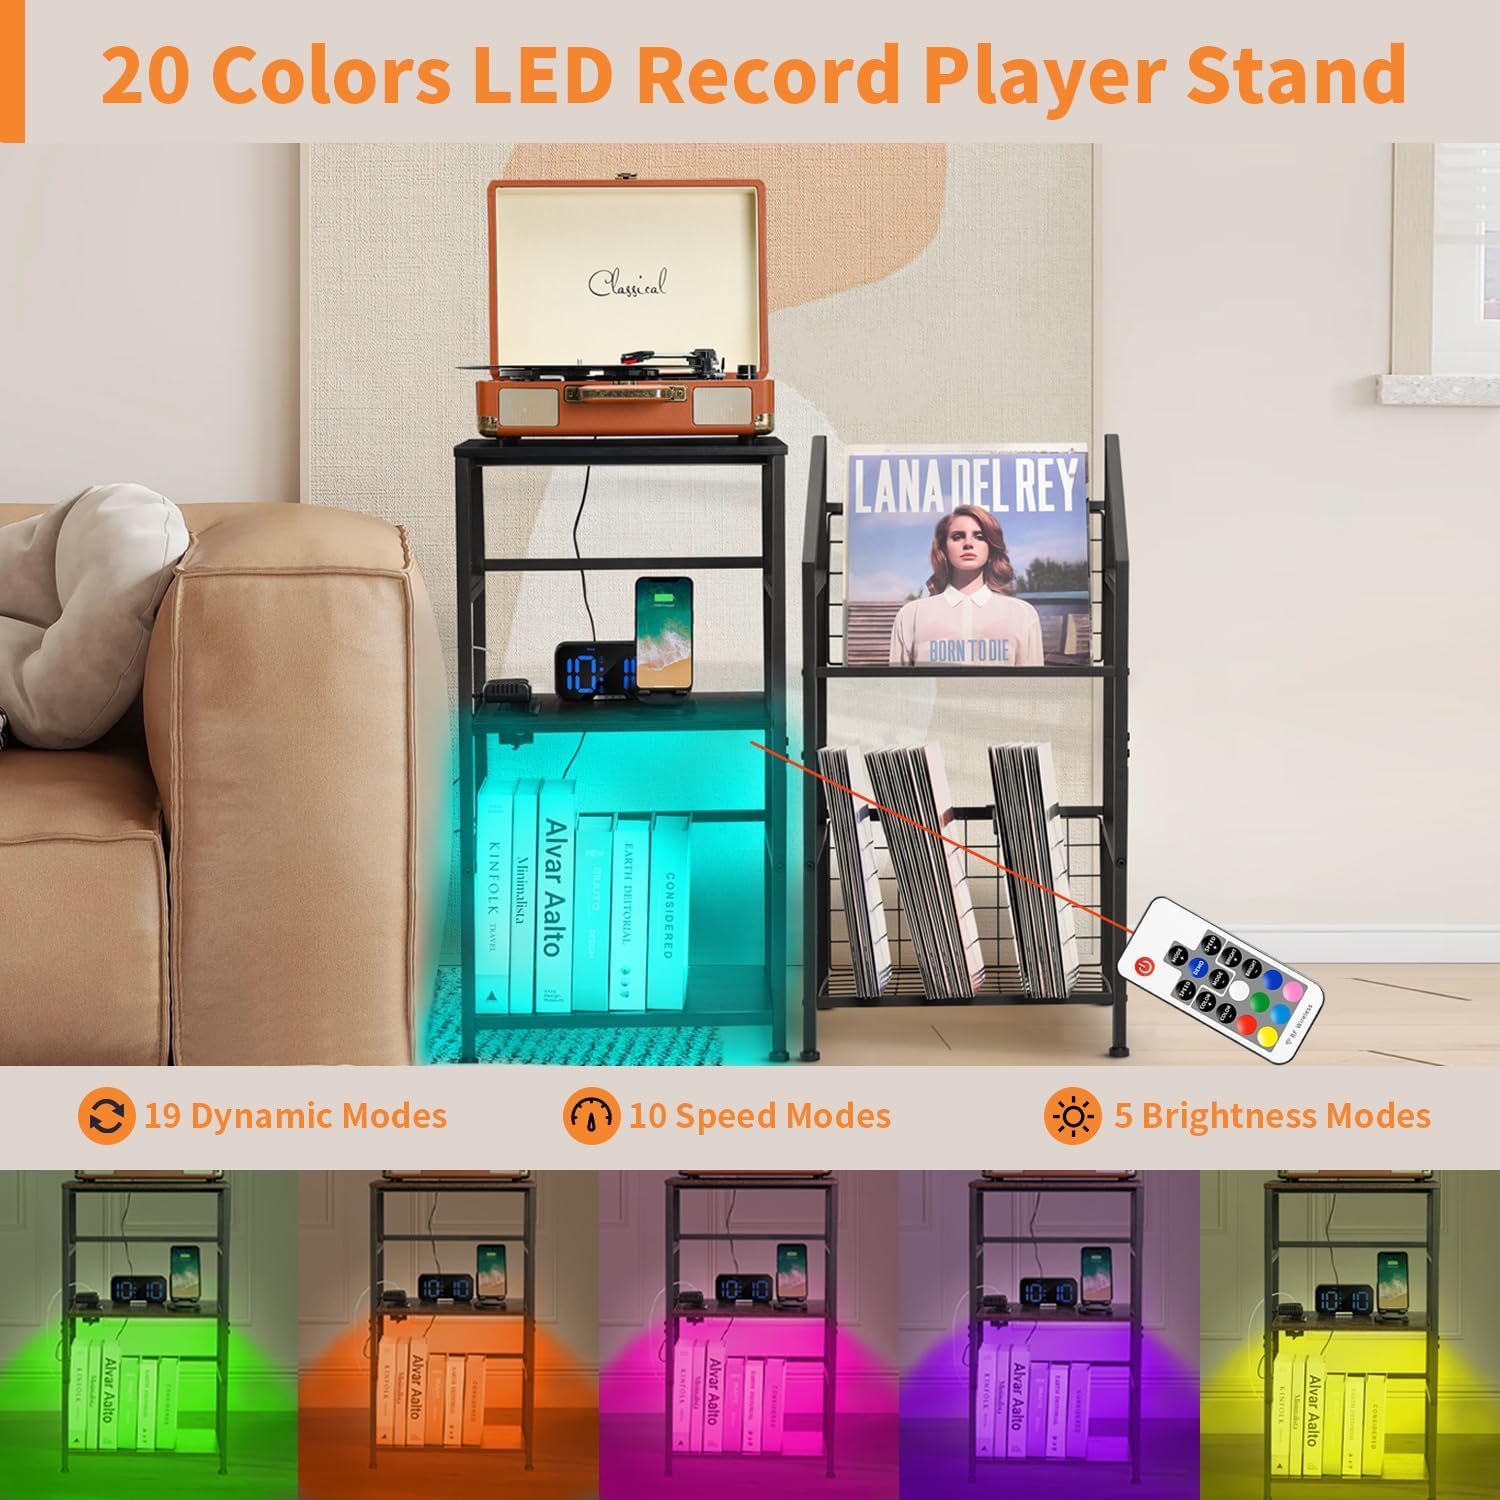
5.1. RGB LED Light Strip
The integrated RGB LED light strip offers customizable illumination to create the perfect ambiance.
Colors: Choose from 20 vibrant colors.
Dynamic Modes: Explore 19 dynamic lighting modes.
Speed: Adjust the speed of dynamic modes with 10 different options.
Brightness: Select from 5 brightness levels.
Operation: Use the included 17-key IR remote control to power on/off, change colors, adjust modes, speed, and brightness. Point the remote directly at the LED receiver for optimal performance.
Image: The record player stand illuminated by the RGB LED light strip, showcasing different color options and the remote control for adjustment.
5.2. Integrated Charging Station
The 3-layer shelf unit includes a convenient power strip with 2 standard outlets and 2 USB ports.
Power Output: Provides constant power for your record player and other devices.
Simultaneous Charging: Charge up to four devices concurrently.
Spacious Design: Outlets and ports are spaced to prevent adapters from blocking each other.
Operation: Plug the stand's power cord into a wall outlet. Connect your record player, phone, tablet, or other electronic devices to the available outlets or USB ports for power and charging.
Image: A close-up view of the smooth wood surface and the integrated power strip, highlighting the 2 outlets and 2 USB ports for charging multiple devices.
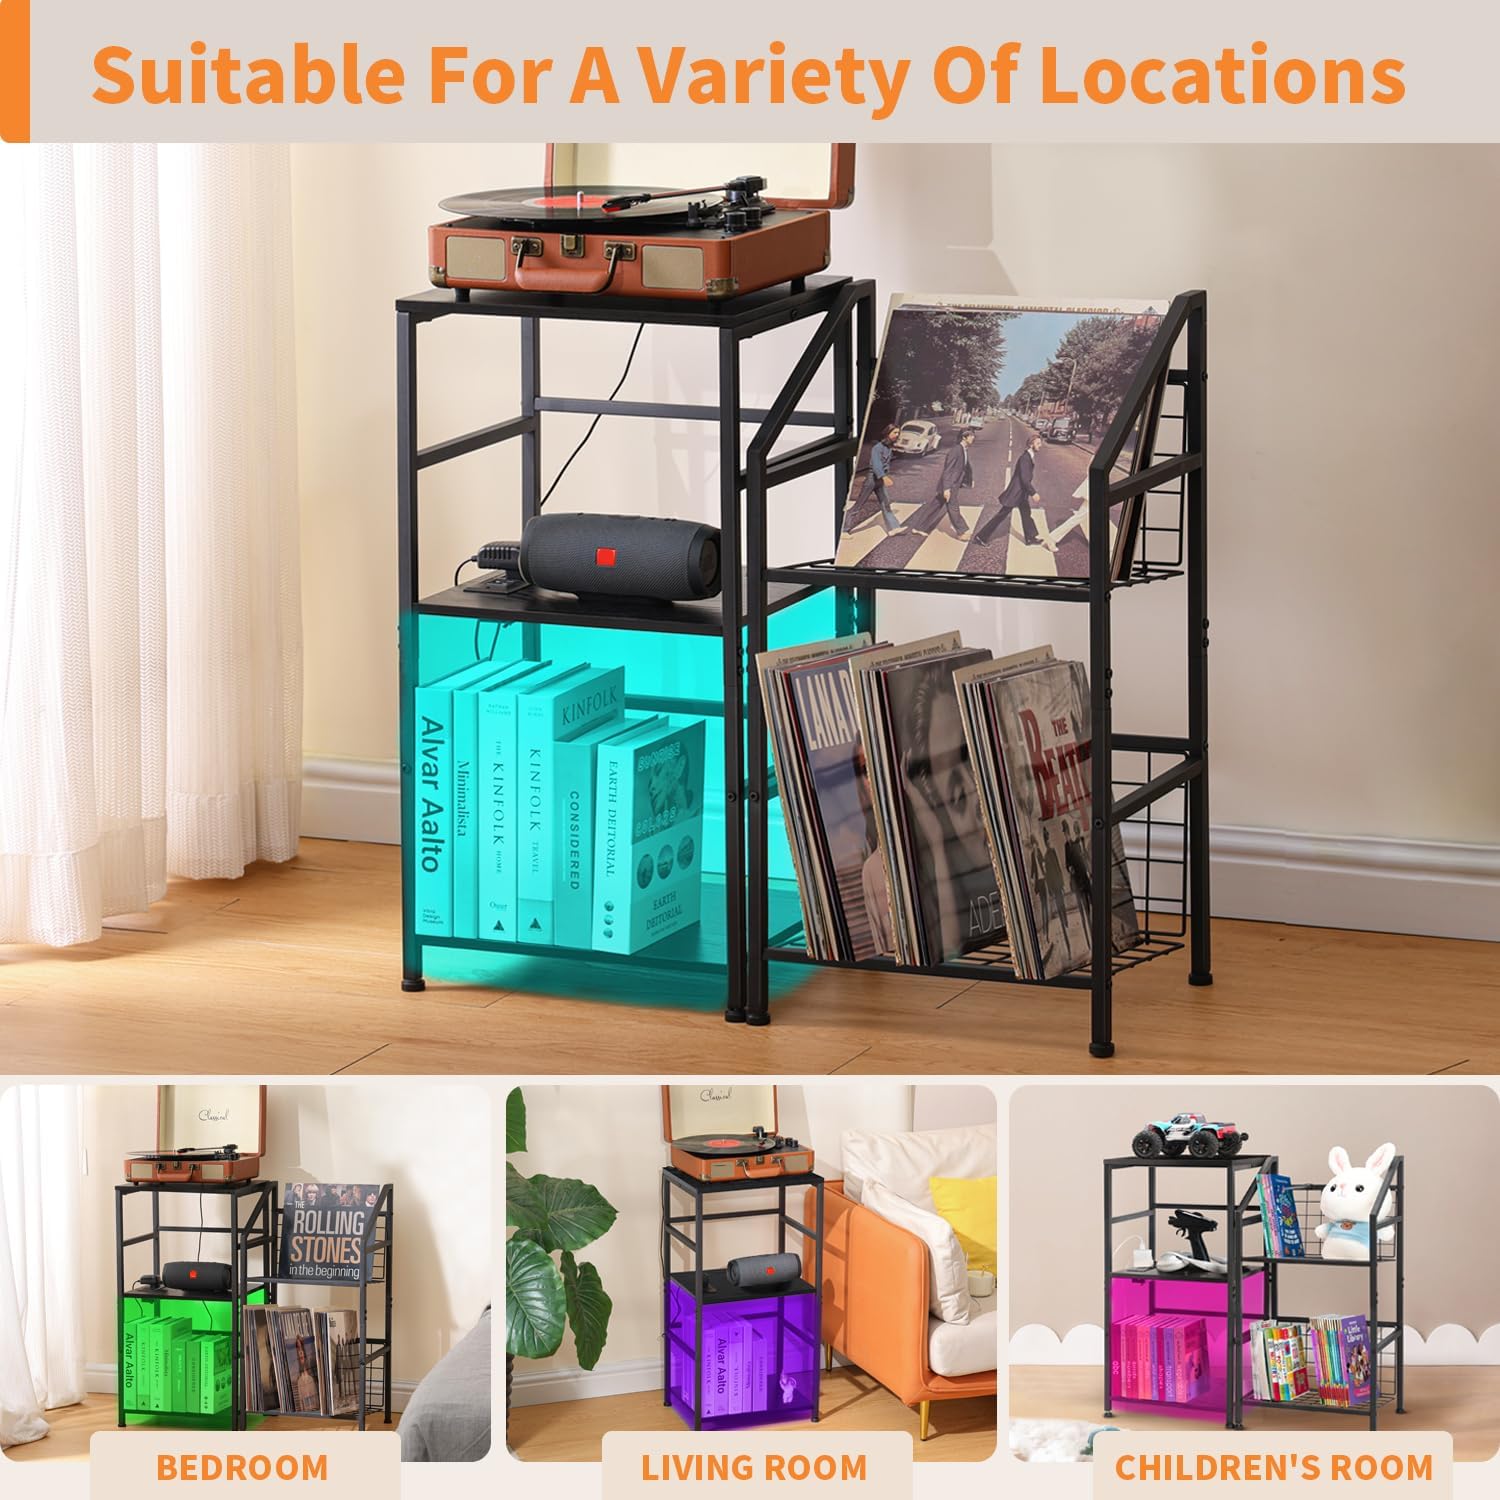
5.3. Versatile Storage and Design
This product combines a 3-layer shelf and a steel vinyl record storage stand, offering flexible storage solutions.
Multi-purpose: Accommodates record players, vinyl records, albums, speakers, books, magazines, CDs, and collectibles.
Flexible Configuration: The two stands can be used together as a cohesive unit or separately in different locations.
Durable Construction: Crafted from sturdy thickened carbon metal and E0 grade particle board.
L-shaped Design: The vinyl storage stand features an L-shaped design with a backward tilt angle steel stand and railing, securely holding records.
Adjustable Feet: Equipped with 4 adjustable feet for stability on uneven surfaces.
Image: The stand demonstrating its capacity to hold a record player, vinyl records, books, and other items, highlighting its multifunctional use.Image: Illustration of the two stand units, showing how they can be combined or used independently, emphasizing the 3-tier cabinet with outlet and LED, and the L-shaped vinyl storage.Image: The record player stand displayed in various room types, including a bedroom, living room, and children's room, demonstrating its adaptability.Image: Close-up details of the L-shaped design for vinyl storage and the adjustable feet for enhanced stability.
6. Maintenance and Care
To ensure the longevity and appearance of your LAKEMID Record Player Stand, follow these simple care instructions:
Cleaning: Wipe surfaces with a dry, soft cloth. Avoid abrasive cleaners or harsh chemicals that may damage the finish.
Spills: In case of spills, wipe immediately with a dry cloth.
Dusting: Regularly dust the surfaces to prevent buildup.
Stability Check: Periodically check all screws and connections to ensure they remain tight. Retighten if necessary.
LED Light: Do not attempt to disassemble the LED light strip or power strip. If issues arise, contact customer support.
7. Troubleshooting
If you encounter any issues with your LAKEMID Record Player Stand, please refer to the following common problems and solutions:
Problem
Possible Cause
Solution
LED light strip not turning on.
Power cord not fully plugged in.
IR remote battery is dead or remote not pointed correctly.
LED strip connection loose.
Ensure the main power cord is securely plugged into a working wall outlet.
Replace the remote battery. Point the remote directly at the LED receiver.
Check the connection between the LED strip and the power source.
Devices not charging via USB/outlets.
Main power cord not plugged in.
Device cable is faulty.
Overload protection activated.
Verify the stand's power cord is plugged into a live outlet.
Try a different charging cable or device to confirm the issue is not with your device.
Unplug all devices, wait a few minutes, then plug them back in one by one. Avoid exceeding the maximum power rating.
Stand feels wobbly or unstable.
Screws are loose.
Uneven floor surface.
Retighten all assembly screws.
Adjust the 4 adjustable feet at the bottom of the stand to level it on uneven floors.
If the problem persists after trying these solutions, please contact LAKEMID customer support for further assistance.
8. Specifications
Feature
Detail
Product Dimensions
11.8"D x 15.3"W x 29.1"H (for each stand)
Material
Thickened Carbon Metal, E0 Grade Particle Board
Finish Type
Powder Coated Steel
Number of Shelves
3 (on record player table)
Special Features
RGB LED Light Strip, 2 Outlets, 2 USB Ports, Adjustable Feet
Assembly Required
Yes
Recommended Uses
Living Room, Bedroom, Study Room
Product Care
Wipe with Dry Cloth
9. Warranty and Support
LAKEMID stands behind the quality of its products. For information regarding warranty coverage, product registration, or technical support, please visit the official LAKEMID store on Amazon or contact their customer service directly through the Amazon platform.
LAKEMID End Table with Charging Station Assembly Instructions Comprehensive assembly guide for the LAKEMID End Table with integrated charging station, including parts list, hardware, and step-by-step instructions for Style A and Style B configurations, plus LED light setup.