Introduction
Thank you for choosing the LUXRILIX Replacement Parts Set for your Shark Matrix Robot Vacuum. This manual provides essential information for the proper installation, maintenance, and troubleshooting of your new HEPA filters, main brush, and side brushes. Following these instructions will help ensure optimal performance and longevity of your robot vacuum.
Product Overview
This replacement parts set is designed to maintain the high cleaning efficiency of your Shark Matrix Robot Vacuum. It includes key components that wear out over time, ensuring your vacuum continues to effectively capture dust, debris, and allergens.

This image displays the complete LUXRILIX Replacement Parts Set. It features two rectangular HEPA filters, a blue and black main brush, six three-armed side brushes, and a small orange cleaning tool.

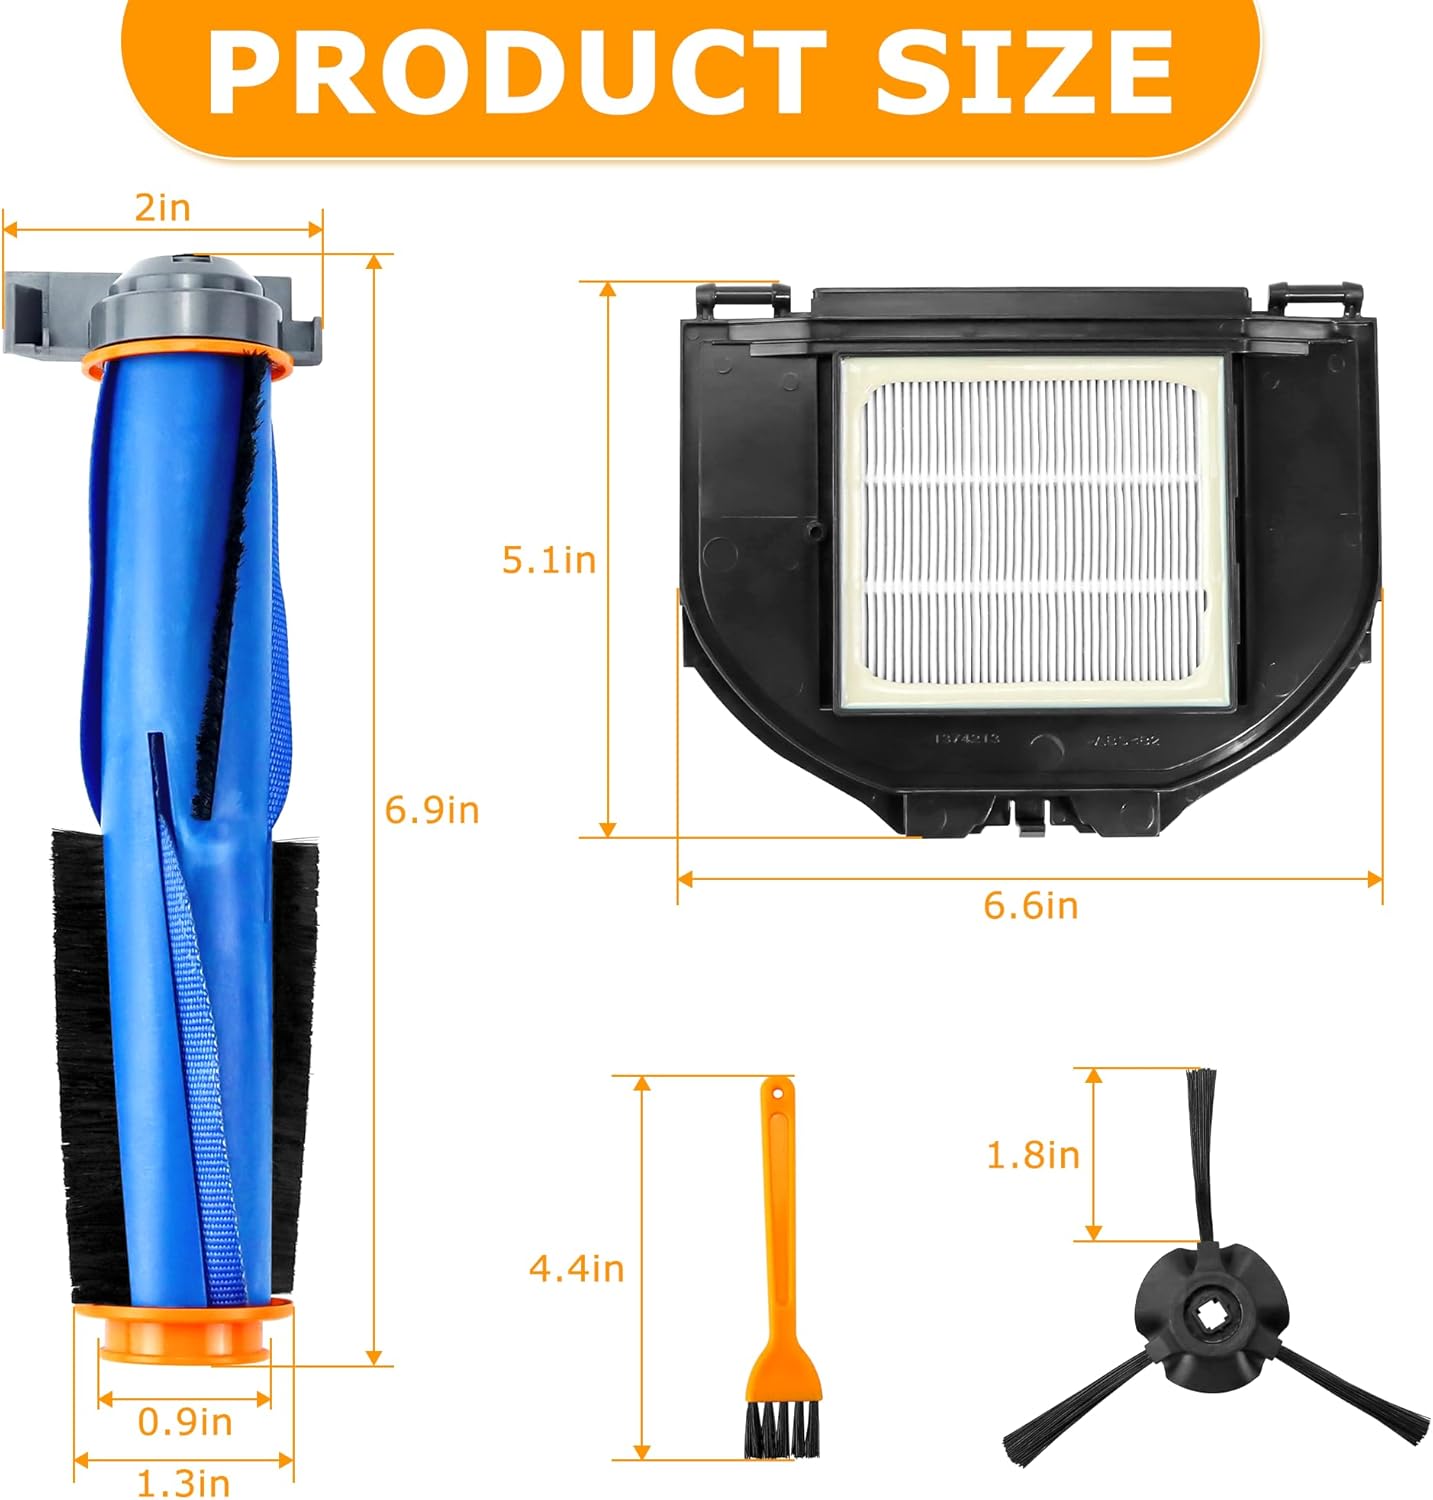
This diagram illustrates the precise dimensions of each component in the replacement set: the main brush, HEPA filter, and side brushes, ensuring compatibility.
Compatible Models
This replacement parts set is compatible with the following Shark Matrix Robot Vacuum models:
- RV2310
- RV2310AE
- AV2310
- AV2310AE
- RV2300
- RV2300S
- RV2320S
- UR2350AE
Please verify your robot vacuum's model number before purchasing to ensure compatibility.

This image highlights the compatibility of these replacement parts with various Shark Matrix Robot Vacuum models, including RV2310, RV2310AE, AV2310, AV2310AE, RV2300, RV2300S, RV2320S, and UR2350AE. Users should verify their vacuum's model number before purchase.
Package Contents
Your LUXRILIX Replacement Parts Set includes the following items:
- 2 x HEPA Filters
- 1 x Main Brush
- 6 x Side Brushes
- 1 x Tool Brush
Setup and Installation
Before installing any replacement parts, ensure your Shark Matrix Robot Vacuum is powered off and unplugged from its charging dock.

This diagram provides a clear visual guide for installing the replacement parts, indicating the correct locations for the side brushes, main brush, and filter on the robot vacuum's underside.
Main Brush Installation
- Flip the robot vacuum over to access its underside.
- Locate the main brush cover, usually secured by tabs or screws.
- Open or remove the cover.
- Carefully lift out the old main brush.
- Insert the new main brush, ensuring it is properly seated in its slot.
- Close or reattach the main brush cover.
Side Brush Installation
- Locate the side brushes on the underside of the vacuum.
- If present, unscrew the retaining screw for each side brush.
- Remove the old side brushes.
- Align the new side brushes with the corresponding posts and press firmly until they click into place, or re-secure with screws if applicable.
This video demonstrates the proper installation of the side brushes onto the Shark Matrix Robot Vacuum. It shows how to align and secure the brushes for optimal performance.
HEPA Filter Installation
- Locate the dust bin on your robot vacuum and remove it.
- Open the dust bin to access the filter compartment.
- Remove the old HEPA filter.
- Insert the new HEPA filter into the compartment, ensuring it fits snugly.
- Close the dust bin and reinsert it into the robot vacuum.
Maintenance
Regular maintenance of your replacement parts is crucial for optimal cleaning performance and extending the lifespan of your robot vacuum. We recommend cleaning these parts regularly and replacing them every 3-6 months, depending on usage.
Cleaning the Main Brush
Periodically remove the main brush and use the included tool brush to remove any tangled hair, fibers, or debris. You can also rinse the main brush with water, ensuring it is completely dry before reinstallation.

This image illustrates the main brush's effectiveness in picking up common household debris such as small particles, hair, and liquid stains from floors.
Cleaning the Side Brushes
Remove the side brushes and clear any accumulated hair or debris. If the bristles become bent during use or transport, you can restore their shape by soaking them in warm water for a few minutes, then shaking off excess water and allowing them to air dry.
This image provides a detailed view of the three-armed side brush, emphasizing its design for efficient edge cleaning.

This visual guide provides four simple steps to restore bent side brushes: 1. Identify the bent brush. 2. Place it in warm water. 3. Allow it to soak for a few minutes. 4. Remove and shake off excess water to straighten the bristles.
Cleaning the HEPA Filter
Tap the HEPA filter gently over a trash can to remove loose dust and debris. For a deeper clean, you can rinse the filter under running water. Ensure the filter is completely air-dried for at least 24 hours before reinserting it into the dust bin. Do not use a brush or other tools to clean the filter, as this may damage the delicate filter material.

This image illustrates the HEPA filter's capability to capture a wide range of airborne particles, including odors, smoke, pollen, lint, pet hair, dander, dust, and dirt, contributing to cleaner air.

This image demonstrates that both the main brush and HEPA filter are washable and reusable. It is crucial to ensure they are completely dry before reinstallation to prevent damage.
Regular Replacement
To maintain optimal cleaning performance, it is recommended to replace the HEPA filters and main brush every 3-6 months, and the side brushes as needed, or when visible wear occurs. This schedule may vary based on usage frequency and environment.
Troubleshooting
If you encounter issues with your replacement parts, please refer to the following common solutions:
- Side brushes not staying attached: Ensure the side brushes are correctly aligned with the posts and firmly pressed into place. If your model uses screws, ensure they are tightened securely.
- Bent side brush bristles: As mentioned in the maintenance section, soak the bent bristles in warm water for a few minutes, then shake off excess water and allow them to air dry to restore their shape.
- Reduced cleaning performance: Check if the main brush or side brushes are tangled with hair or debris. Clean them thoroughly. Also, inspect the HEPA filter for excessive dust buildup and clean or replace it if necessary.
- Unusual noise from vacuum: This could indicate debris caught in the main brush or side brushes. Power off the vacuum, remove and clean the brushes, and check for any obstructions in the brush housing.
Specifications
| Attribute | Value |
|---|---|
| Brand Name | LUXRILIX |
| Model Info | Sharkparts-9 |
| Item Weight | 13.1 ounces |
| Product Dimensions | 6.6 x 1.3 x 6.9 inches |
| Country of Origin | China |
| Material Type | Rubber, Acrylonitrile Butadiene Styrene (ABS) |
| Reusability | Reusable |
Warranty and Support
LUXRILIX offers an after-sales service for this replacement kit. If you are not satisfied with the product within 1 year after purchase, please feel free to contact us. We are committed to resolving any issues you may encounter in a timely manner.
For further assistance or inquiries, please refer to the contact information provided with your original purchase or visit the official LUXRILIX store page on Amazon.