1. Product Overview
Thank you for choosing the Ravas 806 Cordless Stick Vacuum Cleaner. This powerful and versatile cleaning tool is designed to make your home cleaning effortless and efficient. Equipped with a 550W brushless motor and advanced suction technology, it delivers up to 35 Kpa of suction power, making it ideal for tackling hidden dust, pet hair, and various debris on both hard floors and carpets.
Key features include a long-lasting removable battery, an intuitive OLED touchscreen for mode control, an 8-stage high-efficiency filtration system, and a 180° foldable tube with green LED lighting for enhanced visibility in dark areas. Its 8-in-1 multifunctional design allows for comprehensive cleaning across different surfaces and spaces.

Image 1.1: Ravas 806 Cordless Stick Vacuum Cleaner and its various attachments.
2. Package Contents
Please check the box for the following items:
- Ravas 806 Cordless Vacuum Cleaner (Motor Head with Dustbin)
- Electric Floor Brush with Green LED Light
- 180° Folding Tube
- Removable Battery Pack
- Power Adapter
- Wall Mount Tool with Screws & Anchors
- HEPA Filter (x2)
- Sponge Filter (x2)
- Long Handle Brush
- 2-in-1 Brush
- Hook Brush
- Long Flat Brush
- Cleaning Tool (Brush and Blade)
- User Manual

Image 2.1: All included components of the Ravas 806 vacuum cleaner.
3. Assembly and Setup
3.1 Assembly
- Attach the Folding Tube: Insert the top end of the 180° folding tube into the main motor head until it clicks securely.
- Attach the Floor Brush: Connect the bottom end of the folding tube to the electric floor brush until it clicks.
- Install the Battery: Slide the removable battery pack into the slot on the back of the main motor head until it locks into place.
- Attach Accessories: For handheld use, attach desired accessories (e.g., 2-in-1 brush, long flat brush) directly to the main motor head. For extended reach, attach them to the folding tube.
3.2 Charging the Battery
Before first use, fully charge the battery. A full charge takes approximately 4 hours.
- Connect the power adapter to the charging port on the main motor head.
- Plug the adapter into a wall outlet.
- The OLED screen will display the charging status. The battery indicator will show progress.
- Once fully charged, the battery indicator will show full.

Image 3.1: Battery specifications, including 7x2500mAh capacity, 15-60 minutes runtime, and approximately 4 hours charging time.
4. Operating Instructions
4.1 Power On/Off and Suction Modes
- Power On: Press the power button (trigger) on the handle to turn on the vacuum cleaner. It will start in the lowest suction mode.
- Adjust Suction: Use the touch button (marked with '+/-' or fan icon) on the OLED screen to cycle through the suction modes: Low, Medium, and High (up to 35 Kpa).
- Power Off: Press the power button (trigger) again to turn off the vacuum cleaner.
4.2 OLED Touch Screen Display
The OLED screen provides real-time information about the vacuum's status:
- Battery Level: Displays the remaining battery charge.
- Suction Mode: Indicates the current suction power (Low, Medium, High).
- Error Indicators: May show warnings for blocked air duct or tangled floor brush.
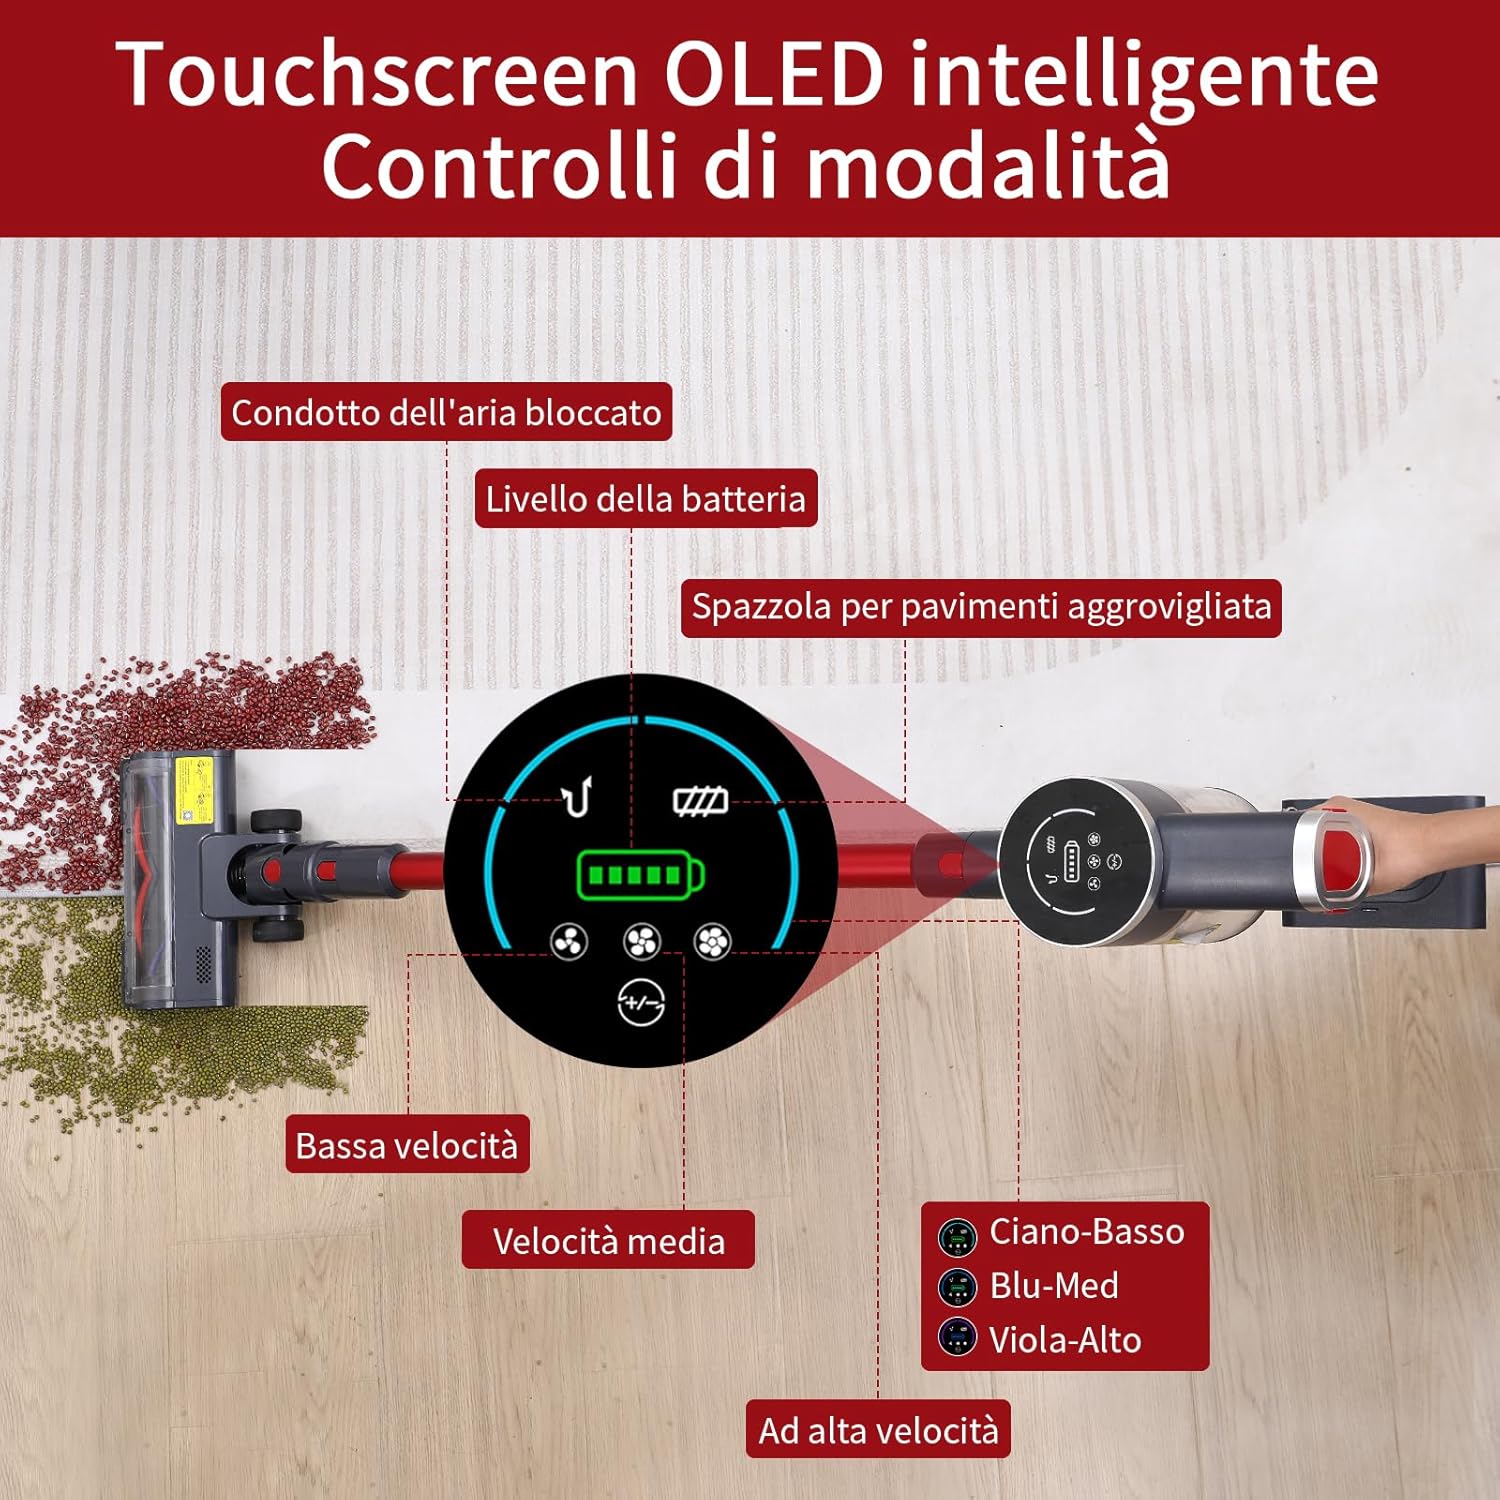
Image 4.1: The intelligent OLED touchscreen displaying battery level, current suction mode, and potential error indicators.
4.3 Using the 180° Foldable Tube and Green LED Light
The 180° foldable tube allows you to easily clean under furniture, beds, and other low-clearance areas without bending down. Simply press the red button on the tube to fold it.
The green LED lights on the electric floor brush illuminate fine dust and debris that might be invisible in normal lighting, ensuring a thorough clean.

Image 4.2: The green LED light on the floor brush highlights fine dust for improved cleaning.
4.4 Versatile Cleaning with 8-in-1 Attachments
The Ravas 806 comes with multiple attachments for various cleaning tasks:
- Electric Floor Brush: For hard floors and low-pile carpets.
- Long Handle Brush: Ideal for high areas, curtains, or delicate surfaces.
- 2-in-1 Brush: Combines a wide nozzle with a brush for upholstery, car interiors, and general dusting.
- Long Flat Brush: Perfect for narrow gaps, crevices, and corners.
- Hook Brush: For specific cleaning needs (e.g., pet hair on fabric).
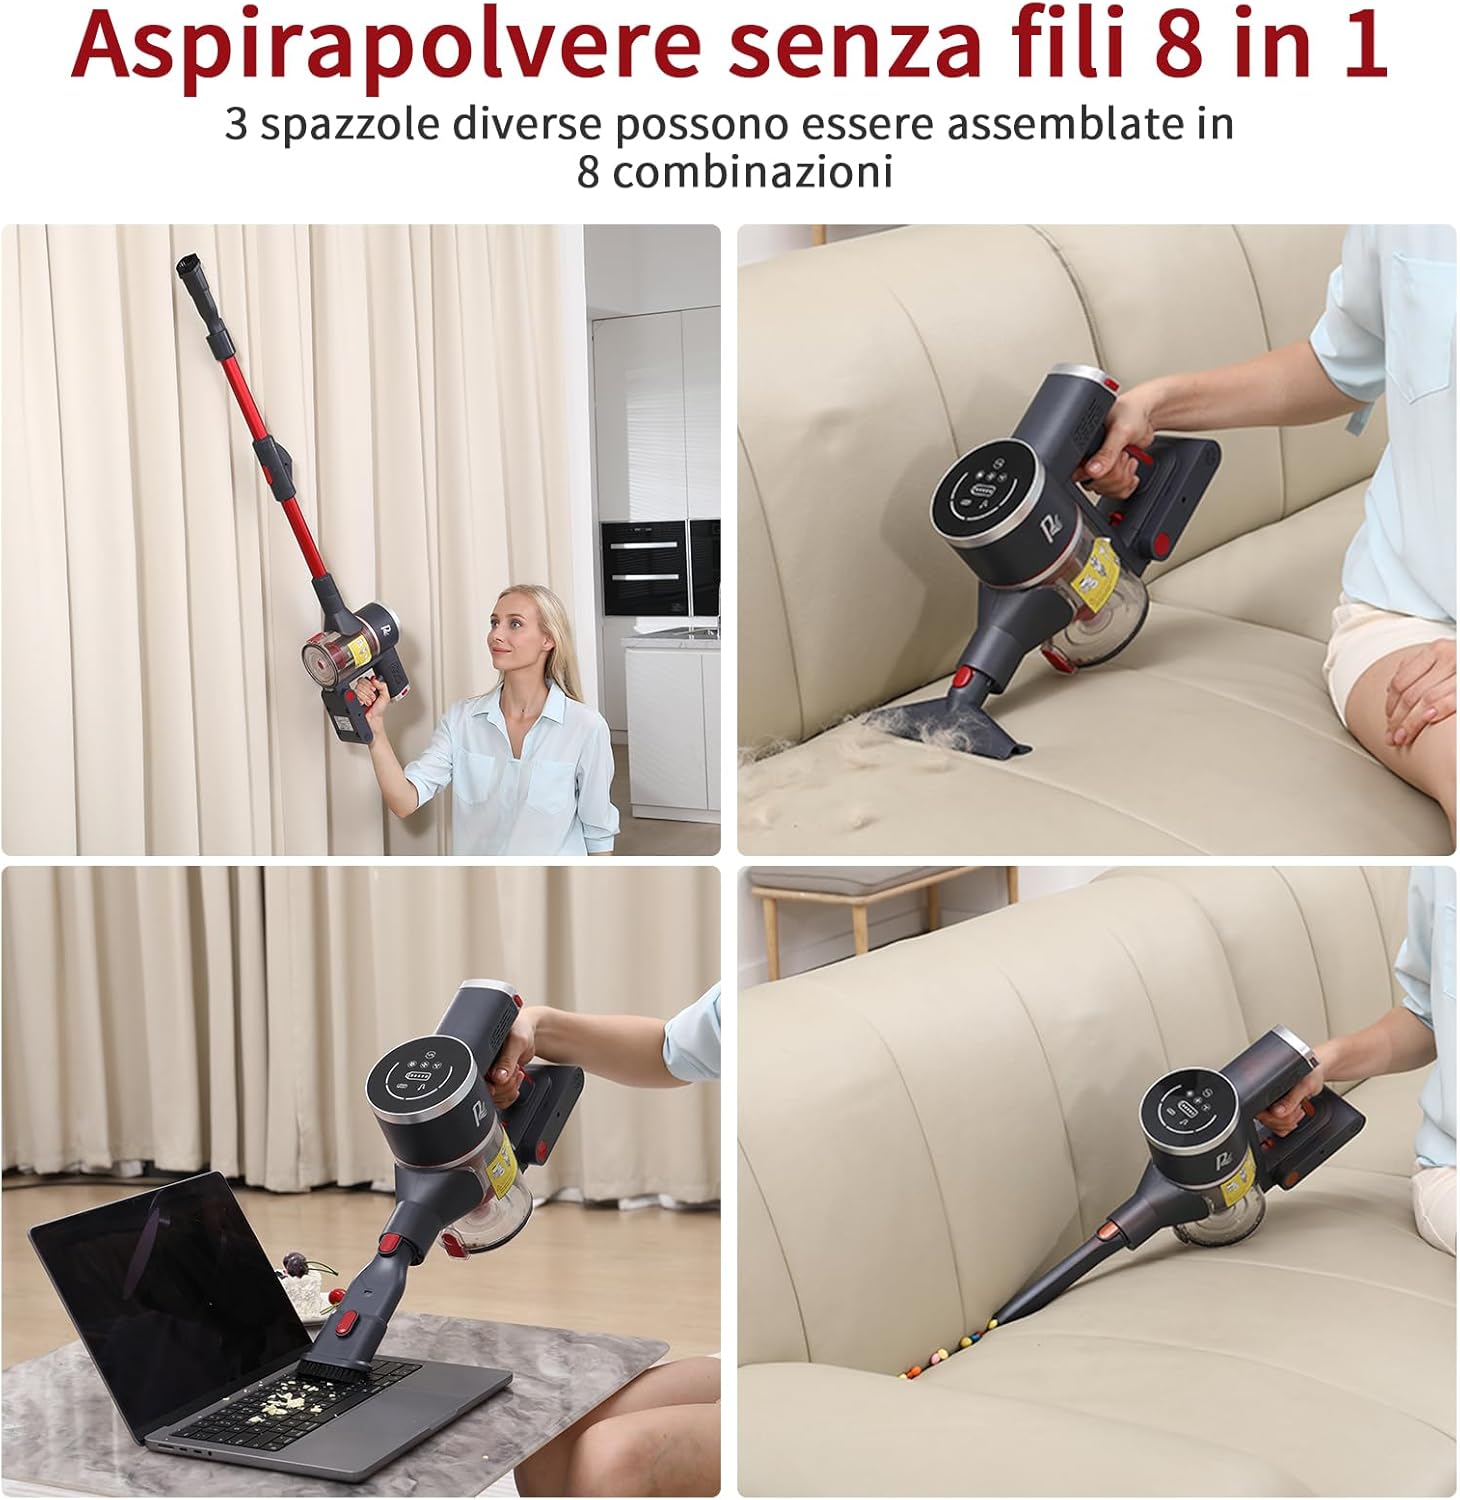
Image 4.3: Examples of the Ravas 806's 8-in-1 versatility for different cleaning scenarios.
5. Maintenance
Regular maintenance ensures optimal performance and extends the lifespan of your vacuum cleaner.
5.1 Emptying the Dustbin
Empty the dustbin after each use or when the MAX line is reached to maintain strong suction.
- Hold the main motor head over a trash can.
- Press the dustbin release button (usually located near the bottom of the dustbin) to open the bottom flap and release the contents.
- Close the flap securely after emptying.
5.2 Cleaning the Filters
The Ravas 806 features an 8-stage filtration system, including HEPA and sponge filters. Clean them regularly to prevent clogging and maintain suction power.

Image 5.1: Exploded view of the 8-stage high-efficiency filtration system.
- Remove Filters: Twist and pull to remove the dustbin from the main motor head. Then, remove the metal, sponge, and HEPA filters from the dustbin.
- Clean Filters: Tap the metal filter and sponge filter to remove loose dust. Rinse the sponge filter and the metal filter under running water until clean. Do NOT wash the HEPA filter with water; use the cleaning tool brush to remove dust.
- Dry Filters: Allow all washable filters to air dry completely for at least 24 hours before reassembling. Ensure they are completely dry to prevent mold and odor.
- Reassemble: Once dry, place the filters back into the dustbin in the correct order and reattach the dustbin to the main motor head.
5.3 Cleaning the Roller Brush
Periodically check the roller brush in the electric floor brush for tangled hair or debris.
- Turn off the vacuum and detach the floor brush.
- Locate the release tab or lock on the side of the brush head and open it to remove the roller brush.
- Use scissors or the cleaning tool's blade to cut and remove any tangled hair or fibers.
- Clean the brush housing.
- Reinsert the roller brush and secure the lock.
6. Troubleshooting
If you encounter issues with your Ravas 806, refer to the table below for common problems and solutions.
| Problem | Possible Cause | Solution |
|---|---|---|
| Vacuum does not turn on | Battery is low or not charged. | Charge the battery fully. |
| Battery not properly installed. | Ensure the battery is securely clicked into place. | |
| Weak suction power | Dustbin is full. | Empty the dustbin. |
| Filters are clogged. | Clean or replace the filters. | |
| Tube or nozzle is blocked. | Check for and remove any blockages in the tube, floor brush, or attachments. | |
| Roller brush not spinning | Hair or debris tangled in the brush. | Clean the roller brush. |
| Floor brush attachment not properly connected. | Ensure the floor brush is securely attached to the tube. | |
| Short battery runtime | Battery not fully charged. | Ensure the battery is fully charged before use. |
| Using high suction mode continuously. | High suction mode consumes more power. Use lower modes for lighter cleaning tasks. |
7. Technical Specifications
| Feature | Specification |
|---|---|
| Brand | Ravas |
| Model Number | 806 |
| Motor Power | 550W Brushless |
| Suction Power | Up to 35 Kpa |
| Battery Capacity | 2500 mAh (7x cells) |
| Voltage | 26 Volts |
| Runtime | Up to 60 minutes (at 15 kPa) |
| Charging Time | Approx. 4 hours |
| Dustbin Capacity | 1.7 Liters |
| Filter Type | 8-Stage HEPA Filtration System |
| Item Weight | 2.8 Kilograms |
| Material | Plastic |
| Color | Red |
| Special Features | OLED Touch Screen, 180° Foldable Tube, Green LED Light, Pet Hair Brush, Hard Floor Brush |
8. Warranty and Support
Ravas is committed to providing high-quality products and excellent customer service. For any questions, concerns, or technical support regarding your Ravas 806 Cordless Stick Vacuum Cleaner, please contact our professional customer service team. We are dedicated to providing you with a satisfactory response and assistance.
Please refer to your purchase documentation for specific warranty details and contact information.


