Introduction
This manual provides comprehensive instructions for the installation, operation, and maintenance of your new HD-1688 Sheng Bang Radio Controlled UK MSF Automatic Atomic Quartz Clock Mechanism. This movement is designed for building or customizing wall clocks, offering automatic time synchronization and daylight saving time adjustments for the UK MSF signal.
Safety Information
- Keep out of reach of small children due to small parts.
- Do not expose the mechanism to extreme temperatures or moisture.
- Use only the specified battery type (1x AA battery).
- Ensure correct battery polarity during installation.
- Do not attempt to disassemble the movement beyond what is described in this manual.
Package Contents
Please verify that all items listed below are present in your package:
- 1x HD-1688 Radio Controlled Quartz Clock Movement
- 1x Black rubber washer
- 1x Metal hanger
- 1x Gold metal washer
- 1x Hex nut
- Clock hands (hour, minute, second) - Note: Hand style and color may vary.
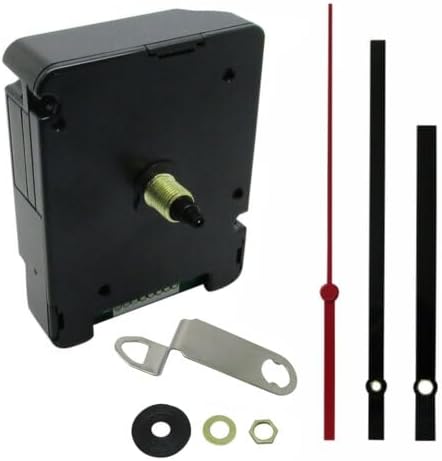
Image: The HD-1688 clock mechanism, along with the included clock hands and various fittings (rubber washer, metal hanger, gold metal washer, hex nut).
Setup Instructions
- Prepare the Clock Face: Ensure your clock face has a central hole suitable for the movement's shaft. The movement is suitable for clock faces up to 6mm thick.
- Install the Movement: Insert the movement's shaft through the central hole of your clock face from the back. Secure it in place using the black rubber washer, gold metal washer, and hex nut on the front side of the clock face. The metal hanger can be attached to the movement for wall mounting.

Image: Close-up of the included fittings: black rubber washer, gold metal washer, hex nut, and metal hanger.
- Remove Alignment Pin: This is a critical step. Locate the silver metal alignment pin on the back of the movement, near the battery compartment. This pin must be pulled out before inserting the battery. Failure to remove this pin will prevent the hands from turning and can cause damage to the movement.

Image: The back of the HD-1688 movement, clearly indicating the silver alignment pin that must be removed before battery insertion. The battery compartment for a single AA battery is also visible.
- Install Battery: Insert one (1) AA battery (not included) into the battery compartment, ensuring correct polarity (+/-).
- Attach Clock Hands: Carefully press the clock hands onto the shafts in the following order:
- Hour hand (shortest)
- Minute hand (longer)
- Second hand (thinnest, usually red)
- Initial Synchronization: Once the battery is inserted and the pin removed, the movement will attempt to receive the MSF radio signal. Place the clock in an area with good signal reception (e.g., near a window, away from electronic interference). The hands will typically move to 12:00 and then begin to set to the correct time automatically. This process can take several minutes.
Operating Instructions
Automatic Time Setting (UK MSF Signal)
The HD-1688 movement is designed to automatically synchronize with the UK MSF radio signal. Once the battery is installed and the movement is powered on, it will search for the signal and set the time accordingly. This ensures highly accurate timekeeping.
Automatic Daylight Saving Time (DST) Adjustment
The movement automatically adjusts for Daylight Saving Time (Spring forward, Autumn back) based on the MSF signal. No manual intervention is required for these changes when operating within the UK MSF signal range.
Manual Time Setting (Outside UK MSF Range)
If you are using the clock mechanism outside the UK MSF signal reception area, or if signal reception is consistently poor, you may need to set the time manually. Refer to the small buttons on the back of the movement (often labeled "MODE" or "RESET") for manual adjustment. Specific manual setting procedures may vary slightly; typically, holding a button will advance the hands, and releasing it will stop them. It is recommended to set the time manually only if automatic synchronization is not possible.
Maintenance
Battery Replacement
When the clock hands stop moving or begin to slow down, it is time to replace the AA battery. Always replace with a fresh, high-quality AA battery. Ensure the alignment pin is not accidentally pushed back in during battery replacement.
Cleaning
To clean the movement, gently wipe the exterior with a dry, soft cloth. Do not use liquid cleaners or immerse the movement in water.
Troubleshooting
| Problem | Possible Cause | Solution |
|---|---|---|
| Hands do not move after battery installation. |
|
|
| Clock shows incorrect time or does not update. |
|
|
| Clock does not adjust for Daylight Saving Time. |
|
|
Specifications
| Feature | Detail |
|---|---|
| Model Number | HD-1688 |
| Movement Type | Quartz, Radio Controlled (UK MSF) |
| Operation Mode | Atomic, Automatic Synchronization |
| Power Source | 1x AA Battery (not included) |
| Movement Dimensions | Height 55mm, Width 55mm, Depth 16mm (excluding shaft length) |
| Total Shaft Length | 16mm |
| Thread Length | 8.5mm |
| Suitable Clock Face Thickness | Up to 6mm |
| Hand Fitting Size | 5.00mm + 3.10mm |
| Compliance | ROHS Approved |
| Item Weight | 3.88 ounces |
| Material | Plastic (Movement), Metal (Frame/Fittings) |
Warranty and Support
Warranty Information
This product is fully tested before dispatch to ensure it arrives in perfect condition. For specific warranty details, please refer to the terms and conditions provided by your retailer or contact Dans Clock Shop directly.
Customer Support
If you encounter any issues or have questions not covered in this manual, please contact the seller or manufacturer for assistance. Provide your product model number (HD-1688) and a detailed description of the issue when seeking support.


