1. Introduction
The HOBBYWING QuicRun WP-8BL150 G2 is a high-performance, waterproof, sensorless brushless Electronic Speed Controller (ESC) designed for 1/8th scale buggies and monster RC cars. This advanced G2 technology ESC ensures seamless integration with your motor, delivering powerful and efficient performance for demanding conditions and various applications.
It is built for rugged durability and features cutting-edge technology to provide an exhilarating experience across different terrains.
2. Key Features
- Extreme Performance: Engineered for high power output and responsiveness.
- Powerful Built-in BEC: Provides stable power to your receiver and servos.
- Efficient Cooling System: Designed to maintain optimal operating temperatures.
- Capacitor Thermal Protection: Safeguards the capacitors from overheating.
- Built-in Capacitor: Integrated design for convenience and reliability.
- IP-67 Waterproof Rating: Offers protection against water and dust ingress, suitable for various environments.
3. Specifications
| Attribute | Value |
|---|---|
| Scale | 1/8th |
| Brushed/Brushless | Brushless |
| Sensored/Sensorless | Sensorless |
| Waterproof Rating | IP-67 |
| Continuous Current | 150A |
| Peak Current | 950A |
| Input Voltage | 3-6S LiPo |
| BEC Output | 6V/7.4V @ 6A |
| Output Connectors | 4.0mm Bullets |
| Dimensions (LxWxH) | 60x48x40.4mm (2.3x1.8x1.59") |
| Weight | 169.5g (5.9oz) |
| Compatible Devices | 1:8 Buggy, Monster Truck |
Note: Specifications are subject to change without prior notice.
4. Product Overview
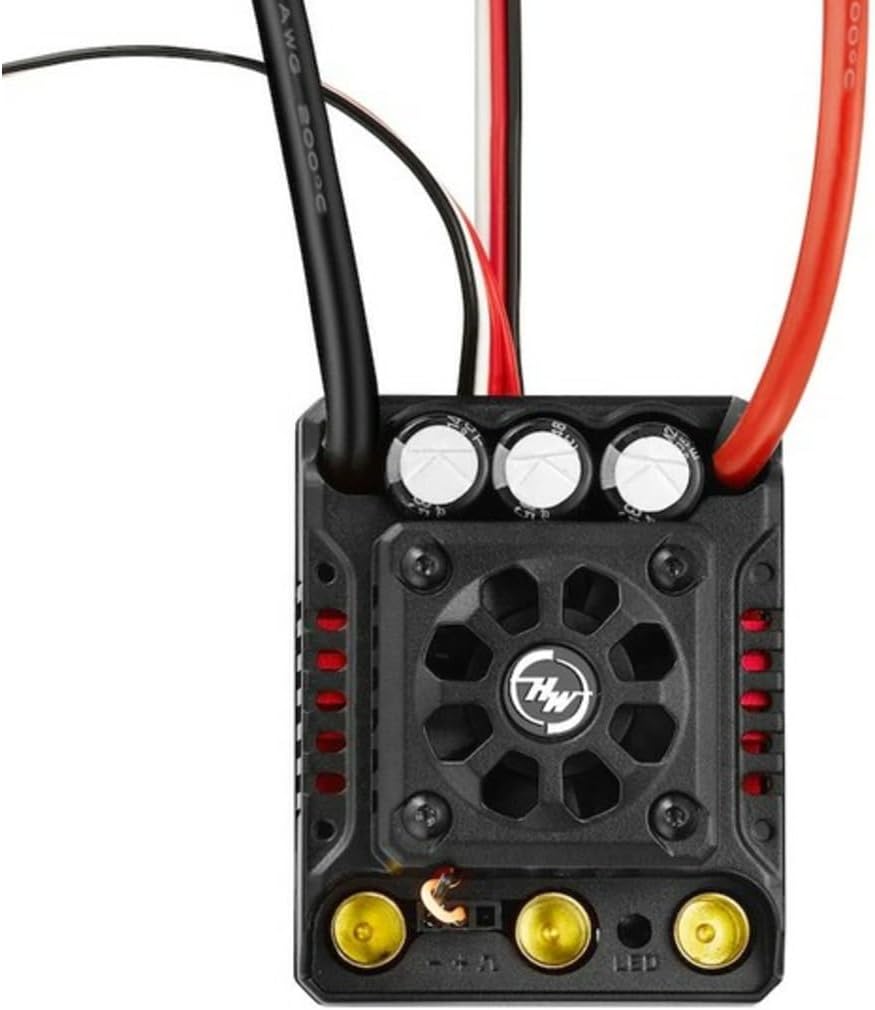
This image displays the top view of the HOBBYWING QuicRun WP-8BL150 G2 ESC. Key components visible include the cooling fan at the center, surrounded by the black casing. Three large capacitors are positioned at the top edge. Various wires, including thick black and red power wires, extend from the unit. At the bottom, three gold-colored bullet connectors for motor connection and a smaller LED indicator are visible. The HW logo is prominently displayed on the fan grill.
5. Setup Guide
Proper setup is crucial for optimal performance and safety. Follow these general steps:
- Mounting the ESC: Securely mount the ESC in your RC vehicle using double-sided tape or screws, ensuring good airflow for cooling.
- Motor Connection: Connect the three motor wires from the ESC to your brushless motor. Ensure correct phasing (A-A, B-B, C-C) for proper rotation. If the motor spins in the wrong direction, swap any two of the three motor wires.
- Battery Connection: Connect your LiPo battery pack (3-6S) to the ESC's battery input connectors. Ensure polarity is correct.
- Receiver Connection: Plug the ESC's throttle cable (usually a black, red, white wire) into the throttle channel (CH2) of your RC receiver.
- Calibration: Perform throttle range calibration according to the ESC's specific instructions (refer to the detailed manual if available from Hobbywing's official site). This typically involves turning on the transmitter, then the ESC, and setting neutral, full throttle, and full brake points.
- Initial Test: With the vehicle off the ground, slowly apply throttle to ensure the motor spins correctly and smoothly.
Always refer to the detailed instruction manual provided by HOBBYWING for specific wiring diagrams and calibration procedures.
6. Operating Instructions
Once the ESC is properly installed and calibrated, operating your RC vehicle is straightforward:
- Power On: Turn on your transmitter first, then connect the battery to the ESC. The ESC will typically emit a series of beeps indicating battery cell count and readiness.
- Driving: Use the throttle trigger on your transmitter to control the speed and direction of your vehicle. Forward motion is achieved by pushing the trigger forward, and braking/reverse by pulling it back.
- Overheat Protection: The ESC features built-in thermal protection. If the ESC or motor becomes too hot, the power output may be reduced or cut off to prevent damage. Allow components to cool down before resuming operation.
- Low Voltage Cutoff (LVC): The ESC will reduce or cut power when the battery voltage drops below a safe level to protect the LiPo battery from over-discharge. Stop operation immediately when LVC is activated.
- Power Off: Always disconnect the battery from the ESC first, then turn off your transmitter.
7. Maintenance
Regular maintenance helps prolong the life and performance of your ESC:
- Cleaning: After each use, especially in dusty or wet conditions, clean the ESC with a soft brush or compressed air to remove dirt and debris. Ensure the cooling fan is free of obstructions.
- Inspection: Periodically inspect all wires and connectors for signs of wear, fraying, or corrosion. Ensure all connections are secure.
- Storage: Store the ESC in a cool, dry place away from direct sunlight and extreme temperatures. Disconnect all batteries before storage.
- Firmware Updates: Check the HOBBYWING official website for any available firmware updates for your ESC model. Updates can improve performance or add new features.
8. Troubleshooting
If you encounter issues, refer to the following common troubleshooting steps:
| Problem | Possible Cause | Solution |
|---|---|---|
| ESC does not power on. | Battery not connected, battery discharged, faulty connection. | Check battery connection, charge battery, inspect wires and connectors. |
| Motor does not spin or stutters. | Incorrect motor wiring, ESC not calibrated, motor faulty. | Verify motor wire connections, recalibrate ESC, test motor with another ESC if possible. |
| ESC overheats. | Poor airflow, gearing too high, motor overloaded, fan obstructed. | Ensure proper ventilation, adjust gearing, check motor condition, clean fan. |
| Vehicle runs slowly or cuts out. | Low Voltage Cutoff (LVC) activated, battery weak, poor connection. | Recharge battery, replace old battery, check all power connections. |
| No response from transmitter. | Transmitter off, receiver not bound, ESC not connected to receiver. | Turn on transmitter first, re-bind receiver, ensure ESC is plugged into CH2. |
For more detailed troubleshooting or persistent issues, contact HOBBYWING customer support.
9. Warranty and Support
HOBBYWING products are manufactured to high standards and undergo rigorous testing. For information regarding warranty coverage, terms, and conditions, please refer to the official HOBBYWING website or contact your local distributor.
For technical support, product inquiries, or service requests, please visit the official HOBBYWING support page or contact their customer service department. Keep your purchase receipt as proof of purchase for warranty claims.
Official Website: www.hobbywing.com