FEKOTS RC-53T&RC-28R
Universal Ceiling Fan Remote Control Kit Instruction Manual
Brand: FEKOTS | Model: RC-53T&RC-28R
1. Introduction and Overview
This instruction manual provides detailed information for the installation, operation, and maintenance of your FEKOTS Universal Ceiling Fan Remote Control Kit. This kit is designed to provide convenient control over your ceiling fan's speed and light functions.

Figure 1: FEKOTS Universal Ceiling Fan Remote Control Kit components.
2. Product Features
- Universal Compatibility: Designed to work with most major 3-speed AC ceiling fans, including brands like Harbor Breeze, Hunter, Hampton Bay, Litex, Home Decorators Collection, and Honeywell.
- Independent Control: Separately controls ceiling fan speed (HI, MED, LOW, OFF) and light brightness (dimmer and on/off).
- Simplified Pairing: The kit is factory-paired by default for direct installation and use, eliminating complex setup.
- Powerful Receiver: Features a rated power of 240W, exceeding general capacity, allowing for more light bulbs and extended receiver lifespan. Utilizes 2 upgraded relays for improved dimming function compared to thyristors.
- No Reverse Button: Compatible with fans that have a built-in reverse switch.
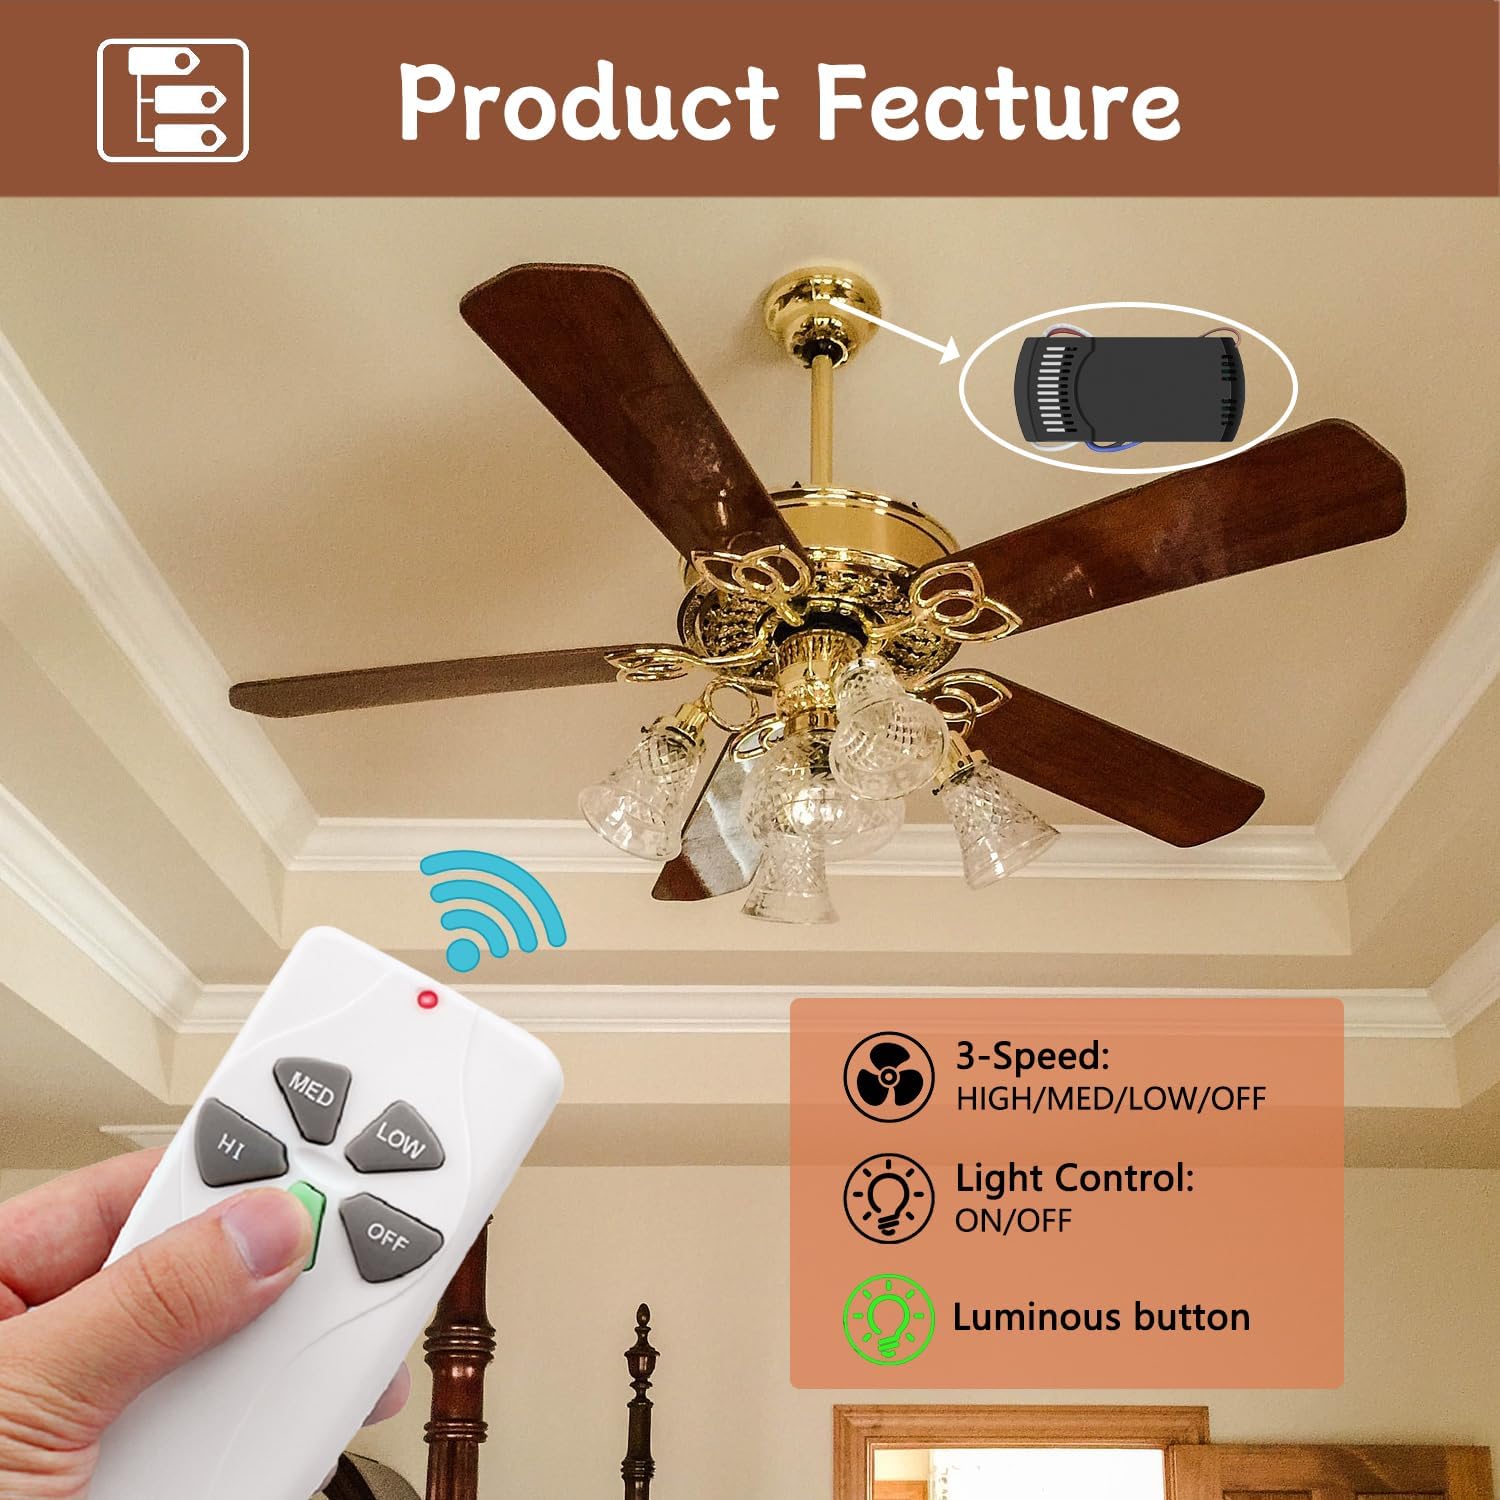
Figure 2: Illustration of 3-speed fan control and light control features.
3. Compatibility
This universal remote control kit is compatible with most 3-speed AC ceiling fans. It is suitable for most downrod style fans. It is not recommended for use with hugger style fans or solid-state fans. The light control function supports LED, CFL, Halogen, and Incandescent lamps.

Figure 3: Compatibility overview for fan types and light bulbs.
4. Packing List
The FEKOTS Universal Ceiling Fan Remote Control Kit includes the following components:
- Remote Control (1)
- Receiver (1) - Dimensions: 4.65 x 2.09 x 1.18 inches
- Wall Mount Holder (1)
- User Guide (1)
- Wire Nuts (6)
- Screws (2)
Note: A 9V battery for the remote control is not included and must be purchased separately.

Figure 4: Contents of the FEKOTS Universal Ceiling Fan Remote Control Kit.
5. Setup and Installation
Before beginning installation, ensure the power to the ceiling fan is turned off at the circuit breaker to prevent electrical shock.
5.1. Wiring the Receiver
- Disconnect Power: Turn off the power to the ceiling fan at the main circuit breaker. Verify power is off using a voltage tester.
- Access Wiring: Carefully remove the canopy of your ceiling fan to expose the wiring.
- Disconnect Existing Wiring: Disconnect the existing wiring from the ceiling fan. Note the color coding of the wires.
- Connect Receiver: Connect the receiver wires to the corresponding ceiling fan and household wires using the provided wire nuts. Refer to the wiring diagram below.
- AC 110-120V 60Hz (Household Power): Connect the white wire from the receiver to the white (neutral) household wire. Connect the red wire from the receiver to the black (hot) household wire.
- To Ceiling Fan: Connect the white wire from the receiver to the white (neutral) fan wire. Connect the blue wire from the receiver to the blue (light) fan wire. Connect the black wire from the receiver to the black (fan motor) fan wire.
- Secure Receiver: Carefully tuck the receiver into the fan's canopy, ensuring no wires are pinched.
- Reattach Canopy: Securely reattach the fan canopy.

Figure 5: Disconnecting existing ceiling fan wiring.

Figure 6: Connecting the receiver to the fan wiring.
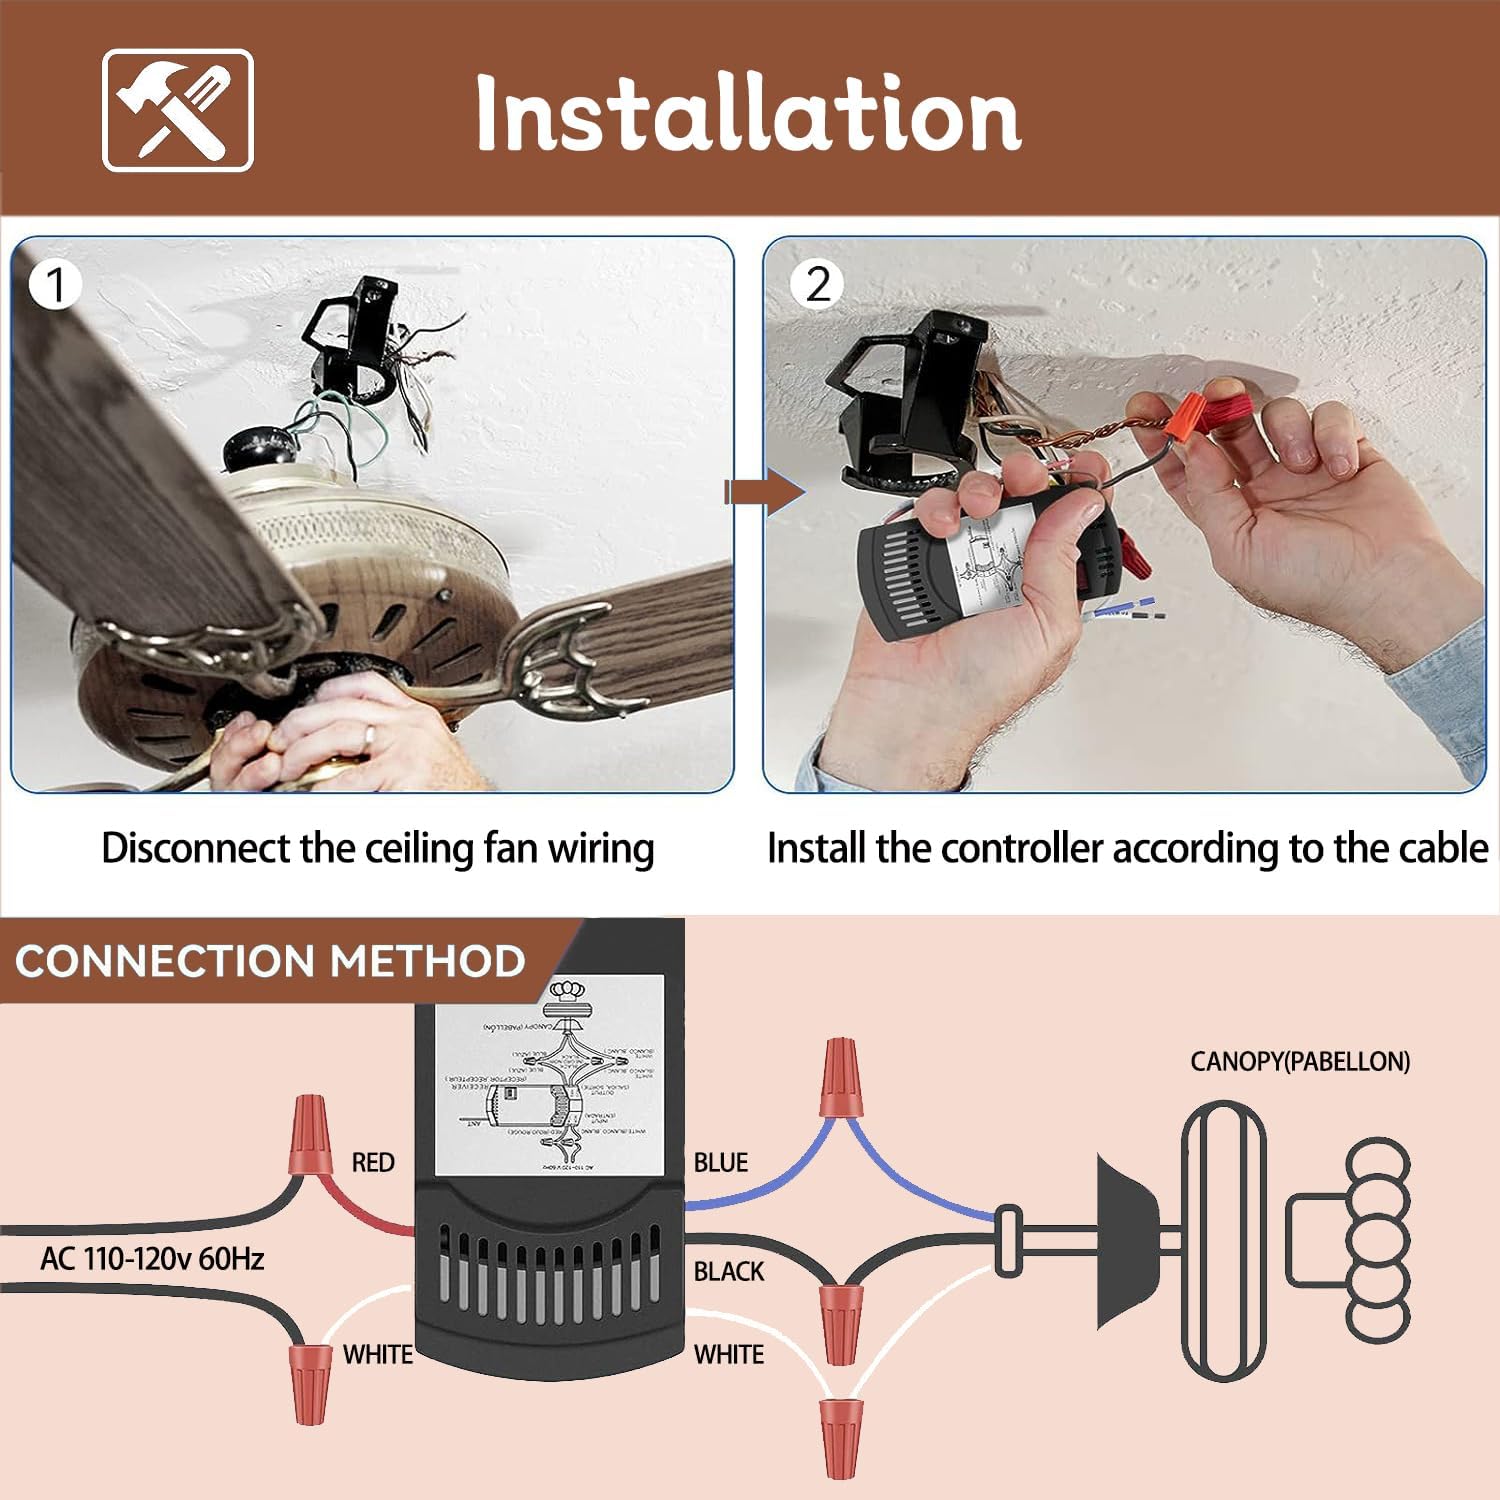
Figure 7: Wiring Diagram for Receiver Installation.
5.2. Remote Pairing (If Needed)
The remote control and receiver are factory-paired by default. If re-pairing is necessary (e.g., after replacing components or if interference occurs), follow these steps:
- Power Cycle: Turn off the wall control switch or the power from the electric box for 5 seconds.
- Re-enable Power: Turn the power back on.
- Press "LEARN" Button: Within 30 seconds of restoring power, press and hold the "LEARN" button located inside the receiver (often accessible through a small opening or by removing the battery cover on some remotes).
- Confirmation: The pairing is complete when the fan light flashes twice.

Figure 8: Location of the "LEARN" button for remote pairing.
6. Operating Instructions
The remote control provides intuitive operation for your ceiling fan and light. Insert a 9V battery into the remote control before use.
| Button | Function |
|---|---|
| HI | Sets fan speed to High. |
| MED | Sets fan speed to Medium. |
| LOW | Sets fan speed to Low. |
| OFF | Turns the fan off. |
| Light Button (Bulb Icon) |
|
The light button features a luminous design for easy visibility in the dark.
7. Maintenance
To ensure optimal performance and longevity of your remote control kit, follow these simple maintenance guidelines:
- Cleaning: Wipe the remote control and receiver with a soft, dry cloth. Do not use abrasive cleaners or solvents.
- Battery Replacement: Replace the 9V battery in the remote control when its performance diminishes. Ensure correct polarity when inserting the new battery.
- Environmental Conditions: Avoid exposing the remote and receiver to extreme temperatures, high humidity, or direct sunlight.
- Professional Inspection: If you experience persistent issues or suspect damage to the receiver, consult a qualified electrician.
8. Troubleshooting
If you encounter issues with your FEKOTS Universal Ceiling Fan Remote Control Kit, please refer to the following common troubleshooting steps:
| Problem | Possible Cause | Solution |
|---|---|---|
| Fan/Light not responding to remote. |
|
|
| Fan operates, but light does not. |
|
|
| Fan speeds are incorrect or inconsistent. |
|
|
If the problem persists after trying these steps, please contact customer support.
9. Specifications
| Product Dimensions | 5.71 x 4.84 x 1.57 inches |
| Item Weight | 7.4 ounces |
| Model Number | RC-53T&RC-28R |
| Batteries Required | 1 x 9V battery (not included) |
| Manufacturer | FEKOTS |
| Brand | FEKOTS |
| Special Feature | Backlit, Universal ceiling fan remote Control Kit |
| Color | White |
| Max Number of Supported Devices | 10 |
| Compatible Devices | 3-Speed AC Ceiling Fan |
10. Warranty and Support
For warranty information and customer support, please refer to the documentation included with your product or visit the official FEKOTS website. You can also contact FEKOTS customer service through the retailer where the product was purchased.
FEKOTS Store: https://www.amazon.com/stores/FEKOTS/page/37153F60-D63D-4D4E-B759-D1BBDA02C867