1. Introduction
The SoloGood BGUAD CQ3 Balance Charger is a versatile and powerful multi-port charging solution designed for a wide range of battery types. With four independent charging ports, it allows for simultaneous charging of different batteries, optimizing efficiency for hobbyists and professionals alike. This manual provides essential information for safe and effective operation of your CQ3 charger.

Figure 1.1: The BGUAD CQ3 charger is suitable for a variety of applications, including RC vehicles, golf carts, and lawn mowers.
2. Key Features
- Multi-Battery Compatibility: Supports LiPo, LiHV, LiFe (1-6s), NiMH/NiCd (1-15 batteries), Pb/SLA, and smart batteries.
- Four Independent Ports: Allows simultaneous charging of four different battery types or configurations.
- Powerful Charging Capabilities: Each port delivers up to 100W of power and 10A of current, totaling 400W/40A.
- "Pre Charging" Function: Enables recovery of over-discharged lithium batteries.
- Intelligent Safety Features: Includes temperature cutoff to prevent overheating and reverse polarity protection.
- Built-in Cooling Fan: Automatically activates upon power-on to maintain optimal operating temperature.
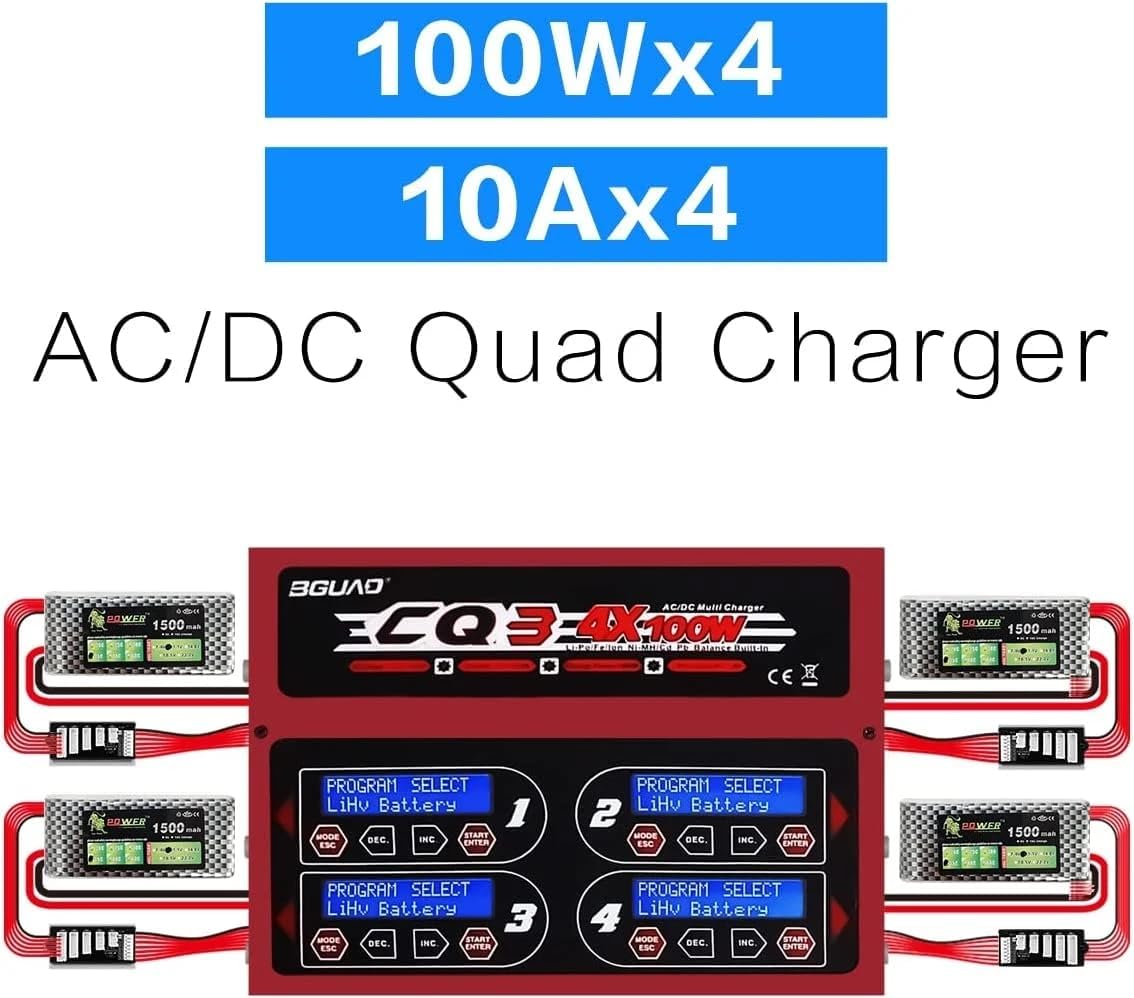
Figure 2.1: The CQ3 features four independent charging channels, each with dedicated controls and display.
3. Technical Specifications
| Parameter | Value |
|---|---|
| Product Dimensions | 8.7 x 9.5 x 2.7 inches (22.1 x 24.1 x 6.9 cm) |
| Item Weight | 4.84 pounds (2.2 Kilograms) |
| Output Voltage | 18 Volts (DC) |
| Max Charge Power | 100W x 4 channels (400W total) |
| Max Charge Current | 10A x 4 channels (40A total) |
| Supported Battery Types | LiPo/LiHV/LiFe (1-6s), NiMH/NiCd (1-15 cells), Pb/SLA, Smart Batteries |
4. Package Contents
Upon opening the package, please verify that all components are present and in good condition:
- BGUAD CQ3 Balance Charger Unit
- AC Power Cable
- Charging Cables (with various connectors, e.g., XT60)
- JST_XH Adapter Boards (for balance charging)
- User Manual (this document)

Figure 4.1: Overview of the BGUAD CQ3 charger and its included accessories.
5. Setup Instructions
Follow these steps to set up your BGUAD CQ3 charger for the first time:
- Placement: Place the charger on a stable, non-flammable surface, away from direct sunlight, heat sources, and flammable materials. Ensure adequate ventilation around the unit.
- Power Connection: Connect the AC power cable to the charger's power input port and then plug it into a suitable wall outlet. The internal cooling fan will automatically start upon power-on, which is normal.
- Connect Charging Cables: Plug the main charging cables (e.g., XT60 connectors) into the corresponding output ports on the front of the charger (Ports 1, 2, 3, 4).
- Connect Balance Boards: For LiPo/LiHV/LiFe batteries, connect the JST_XH adapter boards to the balance ports next to each main output port.
- Connect Batteries: Connect your batteries to the main charging cables and their respective balance leads to the balance boards. Ensure correct polarity.

Figure 5.1: Proper connection of power and charging cables to the CQ3 charger.
Visual Setup Guide:
Video 5.1: This video demonstrates the physical setup and connection process for the CQ3 charger, including power and battery connections.
6. Operating Instructions
The CQ3 charger features intuitive controls for each of its four channels. Each channel has its own display and control buttons (MODE/ESC, DEC, INC, START/ENTER).
General Operation Steps:
- Select Program: Press the MODE/ESC button to cycle through different battery types (LiPo, NiMH, etc.) and charging modes (Charge, Balance Charge, Fast Charge, Storage, Discharge).
- Adjust Parameters: Use the DEC and INC buttons to adjust parameters such as charge current (Amps) and battery cell count (S for LiPo/LiHV/LiFe).
- Confirm and Start: Once the desired battery type and parameters are set, press and hold the START/ENTER button for a few seconds to confirm and begin the charging process. The charger will perform a battery check before starting.
- Monitor Progress: The display will show real-time charging status, including current, voltage, and elapsed time.
- Stop Charging: To stop a charging process at any time, press the MODE/ESC button.
Specific Battery Types:
- LiPo/LiHV/LiFe: Always use the balance charge mode for these battery types to ensure cell voltage equalization and prolong battery life. Ensure the balance lead is connected.
- NiMH/NiCd: These batteries typically use peak detection for charging termination. The charger will automatically detect the full charge.
- Pb/SLA: Used for lead-acid batteries. Set the correct voltage and current.
Video 6.1: This video provides a detailed demonstration of the CQ3 charger's operation modes, including selecting battery types and initiating charging processes.
7. Maintenance
Proper maintenance ensures the longevity and optimal performance of your CQ3 charger:
- Cleaning: Regularly wipe the charger's exterior with a soft, dry cloth. Do not use solvents or abrasive cleaners.
- Ventilation: Ensure the cooling fan and ventilation openings are free from dust and obstructions.
- Storage: When not in use, store the charger in a cool, dry place, away from direct sunlight and extreme temperatures.
- Cable Inspection: Periodically inspect all cables and connectors for signs of wear, damage, or corrosion. Replace any damaged components immediately.
8. Troubleshooting
| Problem | Possible Cause | Solution |
|---|---|---|
| Charger fan is noisy upon startup. | Normal operation; the fan automatically starts for cooling. | This is expected behavior. If the noise persists or is unusually loud during standby, ensure ventilation is clear. If the issue continues, contact customer support. |
| Charger stops charging unexpectedly. | Temperature cutoff activated; battery or charger overheating; incorrect battery type/settings; reverse polarity. | Allow the charger and battery to cool down. Verify battery type and charging parameters are correctly set. Check all connections for correct polarity. Ensure adequate ventilation. |
| Display shows "Battery Check" or error message. | Poor connection; incorrect cell count detected; battery fault. | Ensure all connections (main and balance) are secure. Verify the cell count setting matches the battery. Inspect the battery for damage. |
9. Safety Information
Always adhere to the following safety guidelines when operating the BGUAD CQ3 charger:
- Never leave charging batteries unattended.
- Charge batteries on a non-flammable surface, away from flammable materials.
- Ensure proper ventilation during charging to prevent heat buildup.
- Do not charge damaged, swollen, or leaking batteries.
- Always connect the balance lead for LiPo/LiHV/LiFe batteries during charging.
- Verify battery type, cell count, and charging current settings before starting any charge cycle.
- Keep the charger and batteries out of reach of children and pets.
- Disconnect the charger from the power source when not in use.
10. Warranty and Support
SoloGood provides a limited warranty for the BGUAD CQ3 Balance Charger against defects in materials and workmanship under normal use. For warranty claims, technical support, or any inquiries, please contact SoloGood customer service through the retailer where the product was purchased or visit the official SoloGood website for contact information.
Please retain your proof of purchase for warranty purposes.