Product Overview
The ZEZEFUFU MK610 is a 2.4GHz 6-channel DSM2 spread spectrum receiver designed for use with JR and SPEKTRUM compatible remote control transmitters. It offers reliable and interference-free signal operation, ensuring stable performance for various RC applications including cars, trucks, buggies, and boats.
Key Features
- Reliable, interference-free 2.4GHz signal operation.
- Quick and extremely stable performance.
- Easy and fast binding process with strong signal distance.
- Compatible with JR and SPEKTRUM remote control systems.
- High-speed 11ms operation when paired with capable transmitters.
- Compact design with short 30mm antennas for convenient mounting.

Image: The MK610 receiver shown with its included bind plug. This view highlights the compact size and antenna placement.
Safety Information
Please read and understand all safety precautions before operating this product. Failure to do so may result in damage to the product, property, or serious injury.
- Power Source: Ensure the receiver is powered by a suitable power source within its specified voltage range. Incorrect voltage can damage the unit.
- Connections: Always double-check all connections to ensure they are secure and correctly polarized before applying power.
- Antenna Placement: Position antennas away from conductive materials and at 90-degree angles to each other for optimal signal reception.
- Environment: Avoid operating the receiver in environments with excessive moisture, dust, or extreme temperatures.
- Interference: Be aware of potential sources of 2.4GHz interference in your operating area, such as Wi-Fi routers or other radio control systems.
- Age Recommendation: This product is recommended for users aged 16 years and up.
Package Contents
The following items are included in your package:
- 1 x MK610 2.4GHz 6-Channel DSM2 Spread Receiver
- 1 x Bind Plug

Image: The MK610 receiver and the red "REMOVE BEFORE USE" bind plug, illustrating the complete package contents.
Setup
Follow these steps to properly install and connect your MK610 receiver:
- Mounting: Securely mount the receiver in your RC model using double-sided tape or a suitable mounting method. Ensure it is protected from vibrations and potential impacts.
- Antenna Placement: Position the two 30mm antennas at approximately 90-degree angles to each other. This helps to ensure optimal signal reception regardless of the model's orientation. Avoid bending the antenna tips sharply or placing them near large metal objects.
- Connecting Servos/ESCs: Connect your servos, Electronic Speed Controller (ESC), and other components to the corresponding channels on the receiver. The channels are labeled:
- AUX1: Auxiliary Channel 1
- GEAR: Gear Channel
- RUDD: Rudder Channel
- ELEV: Elevator Channel
- AILE: Aileron Channel
- THRO: Throttle Channel
- BATT: Battery/Power Input
- Power Connection: Connect the power source (typically from your ESC or a separate battery eliminator circuit - BEC) to the BATT port. Ensure correct polarity.

Image: A detailed view of the MK610 receiver's port labels (AUX1, GEAR, RUDD, ELEV, AILE, THRO, BATT) for correct component connection.
Binding Procedure
The binding process establishes a secure communication link between your MK610 receiver and your DSM2 compatible JR or SPEKTRUM transmitter.
- Transmitter Preparation: Turn on your JR or SPEKTRUM transmitter and ensure it is in binding mode or ready to bind. Refer to your transmitter's manual for specific instructions.
- Insert Bind Plug: With the receiver powered OFF, insert the included bind plug into the "BATT" port on the MK610 receiver.
- Apply Power: Apply power to the receiver (e.g., connect the ESC or BEC). The receiver's LED should begin to flash rapidly, indicating it is in binding mode.
- Initiate Binding on Transmitter: Follow your transmitter's instructions to initiate the binding process.
- Binding Confirmation: Once binding is successful, the receiver's LED will turn solid, indicating a successful link.
- Remove Bind Plug: Disconnect power from the receiver, then remove the bind plug from the "BATT" port. It is crucial to remove the bind plug before normal operation.
- Test: Reconnect power to the receiver (without the bind plug) and turn on your transmitter. Verify that all controls respond correctly before operating your model.
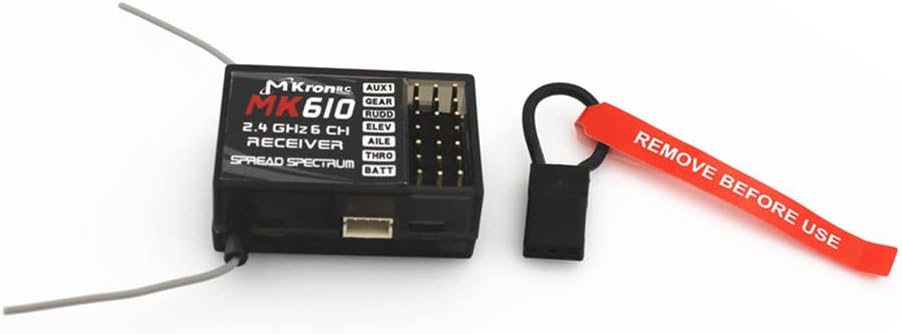
Image: The MK610 receiver with the bind plug inserted into the BATT port, demonstrating the first step of the binding procedure.
Operation
After successful binding, the receiver is ready for operation. Always perform a range check before the first flight or drive of the day.
- Power On: Turn on your transmitter first, then power on your RC model (receiver).
- LED Indicator: The receiver's LED should be solid, indicating a strong link with the transmitter. If it is flashing, re-check connections or re-bind.
- Control Check: Verify that all control surfaces (ailerons, elevator, rudder), throttle, and auxiliary functions respond correctly and in the proper direction to your transmitter inputs. Adjust servo directions on your transmitter if necessary.
- Range Check: Perform a thorough range check according to your transmitter's manual to ensure reliable signal reception at a safe distance.
- Power Off: Always power off your RC model (receiver) first, then turn off your transmitter.
Maintenance
Proper maintenance ensures the longevity and reliable performance of your MK610 receiver.
- Cleaning: Keep the receiver clean and free from dust, dirt, and moisture. Use a soft, dry brush or cloth for cleaning. Avoid using solvents or harsh chemicals.
- Inspections: Regularly inspect the receiver, antennas, and all connections for any signs of wear, damage, or corrosion.
- Antenna Care: Ensure antennas are not kinked, cut, or damaged. Damaged antennas can significantly reduce range and reliability.
- Storage: Store the receiver in a dry, cool environment away from direct sunlight and extreme temperatures when not in use.
Troubleshooting
If you encounter issues with your MK610 receiver, refer to the following common problems and solutions:
| Problem | Possible Cause | Solution |
|---|---|---|
| Receiver LED not lighting up. | No power or incorrect power connection. | Check battery connection, polarity, and ensure the power source is functional. |
| Receiver LED flashing rapidly. | Receiver in binding mode or not bound. | Perform the binding procedure as described in the "Binding Procedure" section. |
| Receiver LED flashing slowly or intermittently. | Signal loss or interference. | Check antenna placement, ensure transmitter is on and charged, move away from potential interference sources. Perform a range check. |
| No control response after binding. | Incorrect servo/ESC connections, bind plug still inserted, or transmitter settings. | Verify all connections are correct. Ensure the bind plug is removed. Check transmitter channel assignments and servo directions. Re-bind if necessary. |
| Erratic or "glitching" control. | Interference, low receiver voltage, or damaged components. | Check battery voltage. Ensure antennas are undamaged and properly positioned. Avoid operating near strong RF sources. Inspect for physical damage to the receiver or wiring. |
Specifications
Detailed technical specifications for the MK610 receiver:
- Model: MK610
- Channels: 6
- Frequency: 2.4GHz
- Technology: DSM2 Spread Spectrum
- Compatibility: JR and SPEKTRUM DSM2 compatible transmitters
- Antenna Length: 30mm (short)
- High-Speed Operation: 11ms (with capable transmitters)
- Dimensions: 1.18 x 0.75 x 0.39 inches (approx. 30 x 19 x 10 mm)
- Weight: 0.352 ounces (approx. 10 grams)
- Recommended Age: 16 years and up
Warranty & Support
For warranty information and technical support, please refer to the retailer or manufacturer's official website where you purchased the product. Keep your proof of purchase for any warranty claims.
Manufacturer: ZEZEFUFU