GGM Gastro GGM Gastro - TKVH900
GGM Gastro TKVH900 Table Refrigerated Display Case User Manual
Model: TKVH900
1. Introduction
This manual provides essential information for the safe and efficient operation, installation, and maintenance of your GGM Gastro TKVH900 Table Refrigerated Display Case. Please read this manual thoroughly before operating the appliance and retain it for future reference. This appliance is designed for commercial use to display and keep food products chilled within a temperature range of 2°C to 10°C.

Figure 1: Front view of the GGM Gastro TKVH900 Table Refrigerated Display Case, showcasing its black finish and clear glass panels with two internal shelves.
2. Safety Instructions
Always observe the following safety precautions to reduce the risk of fire, electric shock, injury, or damage to the appliance.
- Ensure the power supply matches the specifications on the appliance's rating label (230 V / 1 N/PE / 50 Hz).
- Do not operate the appliance with a damaged power cord or plug. Contact qualified service personnel for repairs.
- Always unplug the appliance before cleaning or performing any maintenance.
- Do not block ventilation openings. Ensure adequate air circulation around the unit.
- This appliance contains refrigerant. Disposal must be carried out by authorized personnel in accordance with local regulations.
- Do not store explosive substances such as aerosol cans with a flammable propellant in this appliance.
- Avoid placing hot food directly into the display case; allow it to cool to room temperature first.
- Handle glass components with care to prevent breakage and injury.
- Keep children away from the appliance.
3. Product Description and Features
The GGM Gastro TKVH900 is a compact and efficient table-top refrigerated display case designed for commercial food presentation. Its robust construction and clear glass panels ensure optimal visibility of displayed items.
Key Features:
- Capacity: 160 Liters
- Temperature Range: Adjustable from 2°C to 10°C
- Cooling System: Ventilated for even temperature distribution
- Temperature Control: Digital display and control for precise settings
- Shelves: Two adjustable glass shelves for flexible display options
- Doors: Two rear sliding glass doors for easy access
- Insulation: Double-glazed glass panels for improved thermal efficiency
- Lighting: Integrated interior lighting to enhance product visibility
- Noise Level: Designed for extremely quiet operation
- Construction: Durable black finish with clear glass on all sides

Figure 2: Side view illustrating the two adjustable glass shelves inside the display case.

Figure 3: Interior front view of the display case, highlighting the spacious display area and internal lighting.
4. Setup and Installation
4.1 Unpacking
- Carefully remove the appliance from its packaging.
- Inspect the unit for any signs of shipping damage. Report any damage to your supplier immediately.
- Remove all protective films and packaging materials from the interior and exterior.
4.2 Placement
- Place the display case on a stable, level, and sturdy surface capable of supporting its weight when fully loaded.
- Ensure adequate ventilation around the unit. Maintain a minimum clearance of 10 cm (4 inches) from walls or other objects on all sides, especially the rear where the compressor is located.
- Avoid placing the appliance in direct sunlight, near heat sources (e.g., ovens, radiators), or in areas with high humidity.
- The ambient temperature should be within the recommended operating range for commercial refrigeration units.

Figure 4: External dimensions of the display case: 900mm width, 560mm depth, and 730mm height.
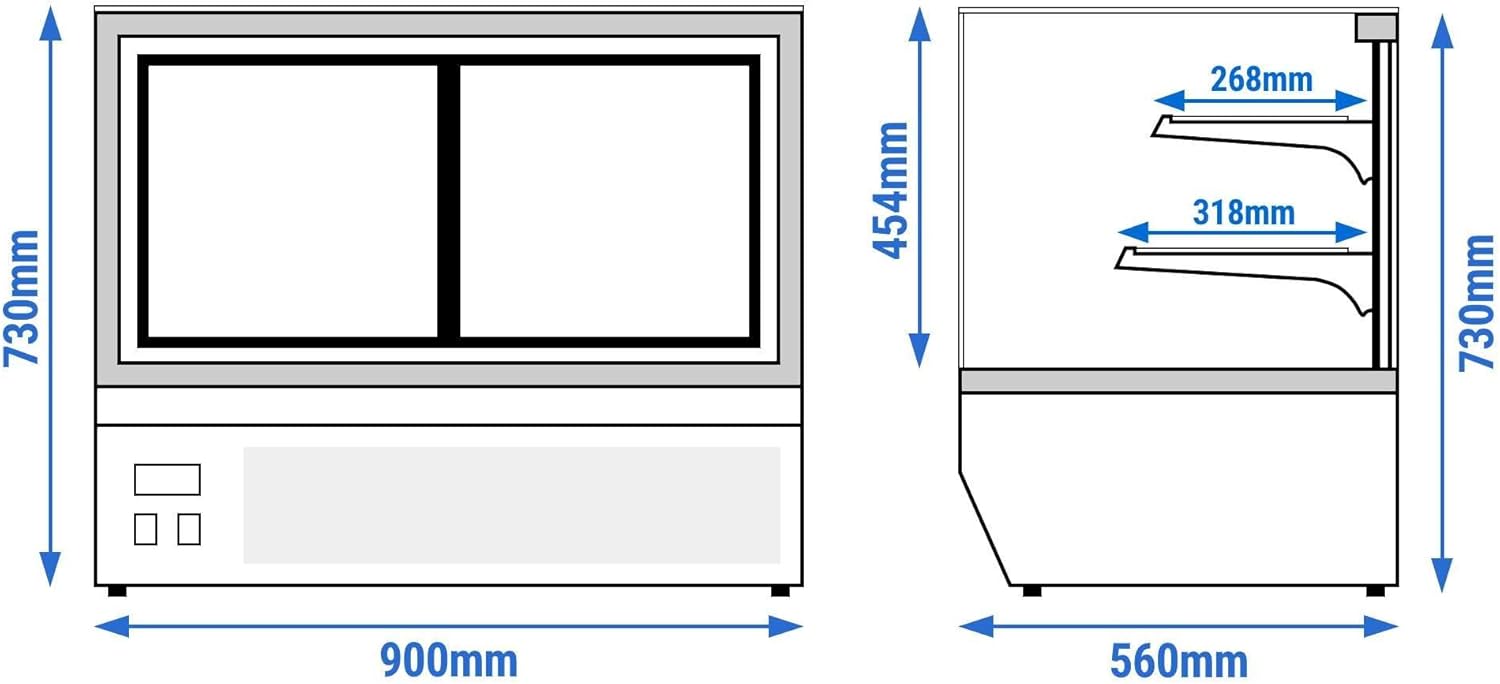
Figure 5: Technical drawing providing detailed internal and external measurements for installation planning.
4.3 Electrical Connection
- Before plugging in, allow the appliance to stand upright for at least 2-4 hours to allow the refrigerant to settle.
- Connect the appliance to a properly grounded electrical outlet. Do not use extension cords or adapters.
- Ensure the electrical circuit is protected by a suitable circuit breaker.
5. Operation
5.1 Initial Start-up
- After connecting to power, switch on the main power switch, usually located at the rear or side of the unit.
- The digital display will show the current internal temperature.
- Allow the unit to run empty for several hours (e.g., 2-4 hours) to reach the desired operating temperature before loading products.
5.2 Temperature Control
- The display case features a digital temperature controller. Refer to the specific controller's instructions for detailed programming.
- Typically, there are "SET" or "MODE" buttons to enter the temperature setting mode, and arrow keys (up/down) to adjust the desired temperature.
- Confirm your setting by pressing "SET" or waiting for the display to revert to the current temperature.
- The recommended operating temperature range is 2°C to 10°C.

Figure 6: Rear view of the display case, showing the digital temperature control panel and power switches.
5.3 Loading Products
- Ensure products are pre-chilled before placing them in the display case to maintain optimal temperature and efficiency.
- Do not overload the shelves, as this can obstruct air circulation and lead to uneven cooling.
- Arrange products to allow for proper airflow around them.
- Keep the sliding doors closed as much as possible to maintain internal temperature and reduce energy consumption.

Figure 7: The display case in a typical commercial environment, showcasing various food items on its shelves.
6. Maintenance and Cleaning
Regular cleaning and maintenance are crucial for the longevity and efficient operation of your display case.
6.1 Daily Cleaning
- Wipe down the exterior surfaces with a soft cloth dampened with mild soap and water.
- Clean the glass panels with a glass cleaner and a lint-free cloth to ensure maximum visibility.
- Remove any spills or food debris from the interior surfaces and shelves.
6.2 Weekly/Monthly Cleaning
- Always unplug the unit before deep cleaning.
- Remove all products and shelves. Clean shelves thoroughly with warm soapy water, rinse, and dry completely before returning them.
- Wipe down the interior with a mild disinfectant solution suitable for food contact surfaces.
- Clean the condenser coil (located at the rear or bottom of the unit) using a brush or vacuum cleaner to remove dust and debris. A dirty condenser can significantly reduce cooling efficiency and increase energy consumption. This should ideally be done monthly or quarterly depending on the environment.
- Check and clean the drain pan (if accessible) to prevent water overflow.
6.3 Important Notes:
- Do not use abrasive cleaners, scouring pads, or sharp objects, as they can damage surfaces.
- Do not spray water directly onto the unit, especially near electrical components.
- The unit features an automatic defrost system. Do not attempt to manually defrost with sharp objects.
7. Troubleshooting
Before contacting service, please check the following common issues:
| Problem | Possible Cause | Solution |
|---|---|---|
| Appliance does not turn on. | No power supply; power cord unplugged; circuit breaker tripped. | Check power connection; check circuit breaker; test outlet with another device. |
| Unit not cooling sufficiently. | Temperature setting too high; condenser coil dirty; blocked ventilation; doors not closed properly; too much hot product loaded. | Adjust temperature setting; clean condenser coil; ensure proper clearance; check door seals; allow hot products to cool before loading. |
| Excessive noise. | Unit not level; loose components; fan obstruction. | Ensure unit is level; check for loose parts; inspect fan for obstructions (unplug first). |
| Water pooling inside or outside. | Blocked drain tube; drain pan overflowing. | Clear drain tube; empty/clean drain pan. |
If the problem persists after checking these points, please contact qualified service personnel or your supplier.
8. Technical Specifications
| Specification | Value |
|---|---|
| Model Number | GGM Gastro - TKVH900 |
| Brand | GGM Gastro |
| Capacity | 160 Liters |
| Temperature Range | 2°C to 10°C |
| Product Dimensions (W x D x H) | 900 mm x 560 mm x 730 mm |
| Power | 200 W |
| Electrical Connection | 230 V / 1 N/PE / 50 Hz |
| Number of Shelves | 2 (Glass) |
| Door Type | 2 Sliding Glass Doors (rear access) |
| Defrost System | Automatic |
| Color | Black |
| Installation Type | Freestanding |
| Cooling Method | Compressor, Ventilated |
| Compliance | CE-marked, complies with EU regulations and European food standards. |
9. Warranty and Support
For warranty information, please refer to the terms and conditions provided at the time of purchase or contact your supplier directly. GGM Gastro products are manufactured to high standards, and support is available for technical assistance and spare parts.
For service or inquiries, please contact your authorized GGM Gastro dealer or visit the official GGM Gastro website for contact details.
GGM Gastro Official Website: www.ggmgastro.com
Ask a question about this manual
Ask about setup, troubleshooting, compatibility, parts, safety, or missing instructions. Manuals+ will review the question and use this page’s manual context to help answer it.