Introduction
This manual provides comprehensive instructions for the installation, operation, and maintenance of the Somfy Electronic Control Unit, model 9020207 (2MCC6). This unit is designed to control Somfy Freevia 280, 300, and 600 motorizations, ensuring reliable and efficient operation of your gate or garage door system.
Please read this manual carefully before proceeding with installation or operation to ensure proper functionality and safety.
Safety Information
Always observe the following safety precautions to prevent injury or damage to the equipment:
- Installation and maintenance should only be performed by qualified personnel.
- Disconnect power to the control unit before performing any wiring or maintenance.
- Ensure all electrical connections comply with local regulations and standards.
- Do not expose the control unit to moisture or extreme temperatures.
- Keep children and pets away from the gate/door area during operation.
Product Overview
The Somfy Electronic Control Unit (Model 9020207) is a compact and robust device designed for seamless integration with Somfy Freevia motorizations. It features various connection terminals and control indicators for easy setup and diagnostics.
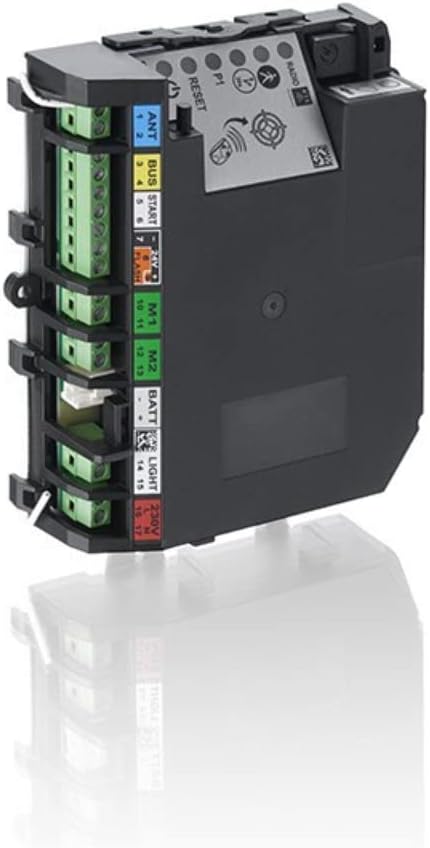
Figure 1: Somfy Electronic Control Unit (Model 9020207)
This image displays the Somfy Electronic Control Unit, highlighting its various connection points and control elements. On the left side, green terminal blocks are visible for wiring. Adjacent to these, labels indicate specific connections: "ANT" (Antenna) for terminals 1-2, "BUS" for terminals 3-4, "START" for terminals 5-6, "FLASH" for terminals 7-9, "M1" for terminals 10-11, "M2" for terminals 12-13, "BATT" (Battery) for terminals 14-15, "LIGHT" for terminals 16-17, and "230V" for power input. On the top right, indicators and buttons are visible, including "RADIO", "P1", and "RESET" buttons, along with several LED indicators for status and diagnostics.
Key Components:
- Connection Terminals: Clearly labeled ports for antenna, bus communication, start command, flashing light, motor connections (M1, M2), battery, auxiliary light, and 230V power supply.
- Control Buttons:
- RESET: Used for factory reset or specific programming sequences.
- P1: Primary programming button.
- Indicators: LEDs for power, radio signal, and operational status.
Setup and Installation
1. Pre-installation Checks:
- Verify that the power supply is disconnected before starting any wiring.
- Ensure the control unit is mounted in a dry, protected location, away from direct sunlight and excessive vibrations.
- Confirm compatibility with your specific Somfy Freevia motorization model (280, 300, or 600).
2. Wiring Instructions:
Refer to Figure 1 for terminal locations. Use appropriate gauge wiring for all connections.
- 230V Power Supply (Terminals 16-17): Connect the main 230V AC power supply to these terminals. Ensure proper polarity (Live and Neutral).
- Motor Connections (M1: 10-11, M2: 12-13): Connect your Freevia motorization's motor wires to the M1 and M2 terminals as per your motor's specific wiring diagram.
- Antenna (ANT: 1-2): Connect the external antenna for optimal radio signal reception.
- BUS (3-4): For connecting Somfy BUS accessories (e.g., safety photocells, keypads).
- START (5-6): For connecting external command devices such as push buttons or key switches to initiate gate/door operation.
- FLASH (7-9): For connecting a flashing warning light.
- Battery (BATT: 14-15): If using a backup battery system, connect it here. Observe correct polarity.
- Light (LIGHT): For connecting an auxiliary light.
3. Initial Power-Up:
Once all wiring is complete and secured, restore power to the control unit. Observe the LED indicators for initial status. Refer to the troubleshooting section if any error indicators are present.
Operating Instructions
Basic Operation:
- Remote Control: Once programmed, use your Somfy remote control to open, stop, or close the gate/door.
- External Command: Activate the gate/door via connected push buttons or key switches connected to the START terminals.
Programming Remote Controls:
To program a new remote control or re-program an existing one:
- Press and hold the P1 button on the control unit until the "RADIO" LED blinks.
- Within 10 seconds, press the desired button on your remote control. The "RADIO" LED will illuminate steadily to confirm successful pairing.
- Test the remote control's functionality.
Factory Reset:
To reset the control unit to its factory default settings, press and hold the RESET button for approximately 5 seconds until all LEDs flash, then release. This will erase all programmed remote controls and settings.
Maintenance
Regular maintenance ensures the longevity and optimal performance of your Somfy Electronic Control Unit and motorization system.
- Annual Inspection: Annually inspect all wiring connections for signs of wear, corrosion, or looseness. Tighten any loose terminals.
- Cleaning: Keep the control unit free from dust and debris. Use a soft, dry cloth for cleaning. Do not use liquid cleaners.
- Battery Check (if applicable): If a backup battery is connected, check its charge and condition periodically. Replace if necessary.
- System Test: Periodically test the gate/door operation, including safety features like photocells, to ensure they are functioning correctly.
Troubleshooting
This section provides solutions to common issues you might encounter.
| Problem | Possible Cause | Solution |
|---|---|---|
| Gate/Door does not respond to remote control. | Remote control not programmed or battery low. | Re-program the remote control (see Operating Instructions). Replace remote control battery. |
| Motor does not operate. | No power to the control unit; wiring issue; motor fault. | Check 230V power supply. Verify all wiring connections (M1, M2). Consult a qualified technician if motor fault is suspected. |
| Flashing light not working. | Incorrect wiring; faulty bulb/LED. | Check FLASH terminal wiring. Replace the flashing light unit if necessary. |
| System operates intermittently. | Poor antenna connection; radio interference. | Check ANT terminal connection. Ensure antenna is clear of obstructions. Minimize sources of radio interference. |
If the problem persists after attempting these solutions, contact Somfy customer support or a certified technician.
Specifications
- Model Number: 9020207 (2MCC6)
- Manufacturer: SOMFY
- Compatibility: Somfy Freevia 280, 300, 600 Motorizations
- Power Supply: 230V AC
- Weight: Approximately 0.6 grams
- First Available Date: July 26, 2023
Warranty and Support
Somfy products are covered by a manufacturer's warranty. For specific warranty terms and conditions, please refer to the documentation provided with your purchase or visit the official Somfy website.
For technical support, spare parts, or service inquiries, please contact your authorized Somfy dealer or visit the Somfy support portal: