Muse M17CB
Muse M17CB Dual PLL FM/MW Digital Alarm Clock Radio User Manual
Model: M17CB | Brand: Muse
Important Safety Instructions
Please read these instructions carefully before operating the unit and retain them for future reference.
- Do not expose this appliance to dripping or splashing water.
- Do not place objects filled with liquids, such as vases, on the appliance.
- Ensure proper ventilation. Do not block any ventilation openings.
- Do not install near any heat sources such as radiators, heat registers, stoves, or other apparatus (including amplifiers) that produce heat.
- Only use attachments/accessories specified by the manufacturer.
- Unplug this appliance during lightning storms or when unused for long periods.
- Refer all servicing to qualified service personnel. Servicing is required when the apparatus has been damaged in any way.
Product Overview
The Muse M17CB is a compact dual PLL FM/MW digital alarm clock radio designed for reliable timekeeping and audio playback. It features a clear 0.9-inch white LED display with a dimmer function and a 24-hour time format. Users can set two independent alarms, choosing to wake up to either the radio or a buzzer. The digital tuner allows for 6 preset stations (3 FM and 3 MW) for quick access to your favorite broadcasts. Additional functions include SNAP, SLEEP, and SNOOZE for enhanced user convenience.
Front View

Image Description: This image displays the front of the Muse M17CB alarm clock radio. It features a prominent 0.9-inch white LED display showing "12:00". Above the display are various control buttons and two rotary knobs. The buttons include P.1, P.2, P.3, DIM., O/SOURCE, and a large SNOOZE button. The left rotary knob is for VOLUME, and the right is for TUNING/SET. A small "muse" logo tag is visible on the left side.
Top Panel Controls

Image Description: This image provides a top-down view of the Muse M17CB alarm clock radio, highlighting the control panel. It shows two large rotary knobs for Volume and Tuning/Set, along with several push buttons: P.1, P.2, P.3 (for radio presets), DIM. (dimmer), O/SOURCE (power/source selection), and a large circular SNOOZE button. The layout is clear and intuitive.
Rear Panel Connections

Image Description: This image shows the rear panel of the Muse M17CB alarm clock radio. It clearly displays the "AC~" power input socket, the "FM ANT." wire antenna, and an "AUX IN" 3.5mm jack for connecting external audio devices. A speaker grille is also visible on the right side.
Setup
Power Connection
- Unpack the Muse M17CB unit and all accessories.
- Connect the AC power cord to the "AC~" input on the rear of the unit.
- Plug the other end of the power cord into a standard wall outlet.
- The LED display will light up, indicating the unit is receiving power.
Antenna Setup
- For optimal FM reception, fully extend the FM wire antenna located at the back of the unit.
- Adjust the position of the antenna for the best possible signal reception.
Operating Instructions
Setting the Time
- Ensure the unit is powered on.
- Press and hold the TUNING/SET knob for approximately 2 seconds until the hour digits flash on the display.
- Rotate the TUNING/SET knob to adjust the hour.
- Press the TUNING/SET knob once to confirm the hour; the minute digits will flash.
- Rotate the TUNING/SET knob to adjust the minutes.
- Press the TUNING/SET knob again to confirm the minutes and exit time setting mode.
- The time is displayed in 24-hour format.
Setting the Alarm (Alarm 1 and Alarm 2)
The unit features two independent alarms (Alarm 1 and Alarm 2).
- Press the P.1 button (for Alarm 1) or P.2 button (for Alarm 2) once. The alarm icon and hour digits will flash.
- Rotate the TUNING/SET knob to adjust the alarm hour.
- Press the TUNING/SET knob to confirm the hour; the minute digits will flash.
- Rotate the TUNING/SET knob to adjust the alarm minutes.
- Press the TUNING/SET knob to confirm the minutes. The alarm source (radio or buzzer) will flash.
- Rotate the TUNING/SET knob to select either Radio or Buzzer as the alarm sound.
- Press the TUNING/SET knob to confirm the alarm source. The alarm volume will flash (if radio is selected).
- Rotate the VOLUME knob to set the desired alarm volume (for radio alarm).
- Press the TUNING/SET knob to save the alarm settings. The corresponding alarm icon will appear on the display, indicating the alarm is active.
To deactivate an alarm, press the corresponding P.1 or P.2 button until the alarm icon disappears from the display.
Radio Operation (FM/MW)
- Press the O/SOURCE button to turn on the radio. Press it repeatedly to cycle between FM, MW, and AUX modes.
- Rotate the TUNING/SET knob to manually tune to a desired frequency.
- To auto-scan for stations, press and hold the TUNING/SET knob for 2 seconds. The radio will scan and stop at the next available station.
Setting and Recalling Presets (P.1, P.2, P.3)
- To Store a Preset: Tune to the desired station. Press and hold one of the preset buttons (P.1, P.2, or P.3) for 2 seconds until the display confirms the preset is saved.
- To Recall a Preset: Briefly press the desired preset button (P.1, P.2, or P.3) to tune to the stored station.
Dimmer Function
Press the DIM. button repeatedly to adjust the brightness of the LED display to your preference (e.g., High, Medium, Low, Off).
Snooze Function
When an alarm sounds, press the large SNOOZE button to temporarily silence the alarm. The alarm will sound again after approximately 9 minutes.
Sleep Function
The sleep function allows you to fall asleep to the radio, which will automatically turn off after a set period.
- While the radio is playing, press the P.3 button (often doubles as SLEEP function) repeatedly to cycle through available sleep timer durations (e.g., 90, 60, 30, 15 minutes, or OFF).
- The radio will automatically turn off after the selected duration.
SNAP Function
The specific operation of the SNAP function is not detailed in the provided product description. Please refer to the full printed manual included with your device for instructions on using the SNAP feature.
Auxiliary Input (AUX IN)
Connect an external audio device (e.g., MP3 player, smartphone) to the AUX IN jack on the rear of the unit using a 3.5mm audio cable. Press the O/SOURCE button repeatedly until "AUX" appears on the display to switch to auxiliary input mode. Audio from the connected device will play through the alarm clock's speaker.
Maintenance
- Cleaning: Use a soft, dry cloth to clean the exterior of the unit. Do not use abrasive cleaners, waxes, or solvents.
- Storage: If the unit is not used for an extended period, unplug it from the power outlet and store it in a cool, dry place.
- Avoid Moisture: Keep the unit away from water and high humidity.
Troubleshooting
| Problem | Possible Cause | Solution |
|---|---|---|
| No power / Display off | Power cord not properly connected. | Ensure the AC power cord is securely plugged into the unit and a working wall outlet. |
| Poor radio reception | FM antenna not extended or positioned correctly. | Fully extend and adjust the position of the FM wire antenna for better reception. Try moving the unit to a different location. |
| Alarm does not sound | Alarm not activated or set incorrectly. | Verify that the alarm icon is displayed. Recheck alarm time and source settings. Ensure alarm volume is not set to minimum if radio alarm is selected. |
| Display too bright/dim | Dimmer setting needs adjustment. | Press the DIM. button repeatedly to cycle through brightness levels. |
Specifications
- Model: M17CB
- Display: 0.9-inch White LED with Dimmer
- Time Format: 24-hour
- Tuner: Digital FM/MW PLL
- Presets: 6 (3 FM + 3 MW)
- Alarms: Dual Alarm (Radio or Buzzer)
- Functions: SNAP, SLEEP, SNOOZE
- Power Source: AC Power
- Dimensions: 13 cm (Length) x 11 cm (Width) x 6.5 cm (Height)
- Color: Turquoise
- Material: Resin or Plastic
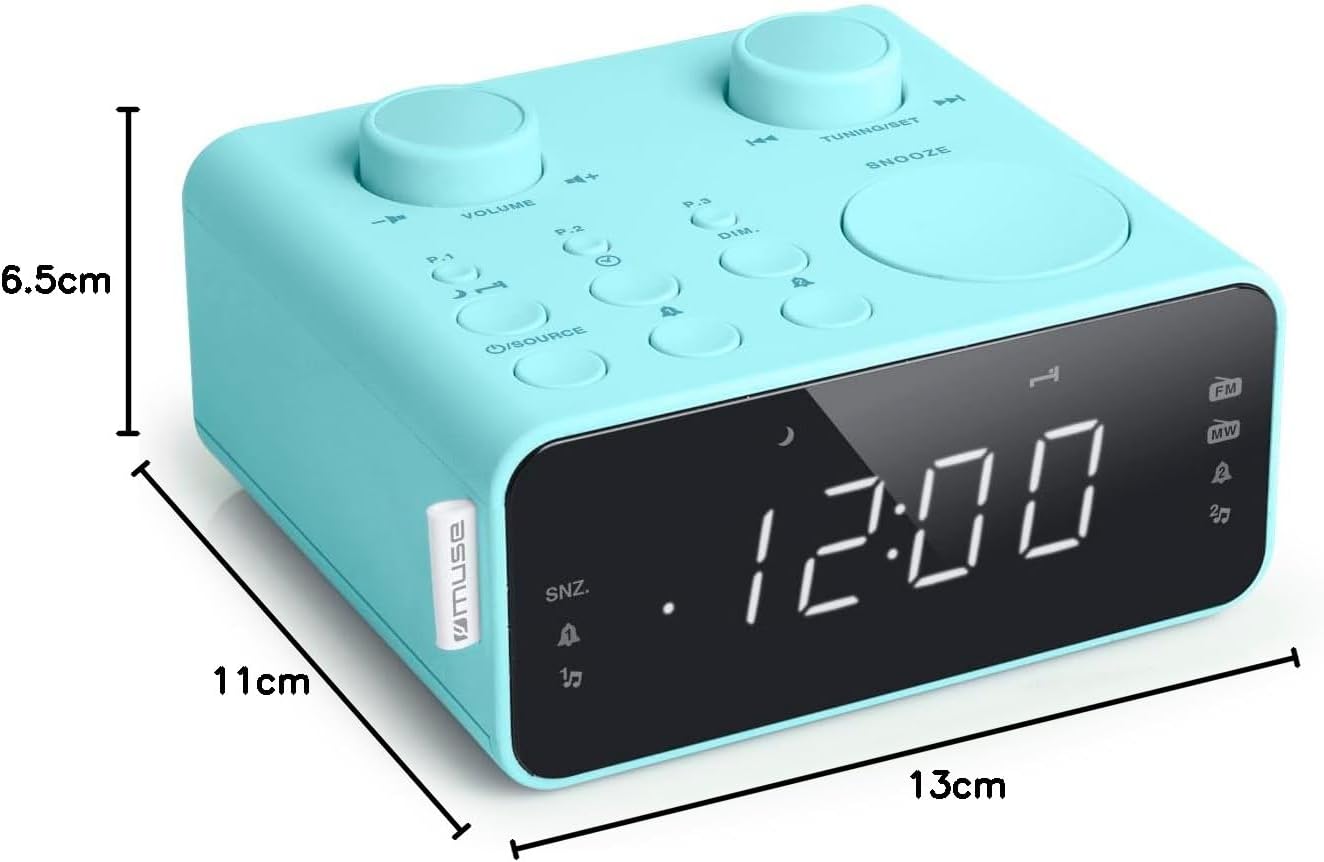
Image Description: This image illustrates the dimensions of the Muse M17CB alarm clock radio. It shows the unit with measurements indicating a length of 13cm, a width of 11cm, and a height of 6.5cm.
Warranty and Support
For warranty information and technical support, please refer to the warranty card included with your product or visit the official Muse website. Keep your purchase receipt as proof of purchase.
The product includes a user manual (as indicated by "Pièces incluses: Manuel du propriétaire").
Related Documents - M17CB
 |
Muse S (Gen 2) Starter Guide: Sleep & Meditation Setup Comprehensive starter guide for the Muse S (Gen 2) EEG headband. Learn how to fit your device, set up sleep tracking, navigate meditation features, and optimize your rest. |
 |
MUSE M-087 R Portable PLL 2-Band Radio User Manual User manual for the MUSE M-087 R portable PLL 2-band radio, detailing its features, operation, setup, technical specifications, and safety guidelines. |
 |
MUSE M-10 CPK Dual Alarm Clock Radio User Manual Comprehensive user manual for the MUSE M-10 CPK dual alarm clock radio, covering setup, operation, alarm functions, radio listening, sleep timer, and safety instructions. |
 |
Muse M-17 LG Dual Alarm Clock Radio PLL - Features and Specifications Explore the Muse M-17 LG, a versatile dual alarm clock radio featuring a 0.9-inch white LED display with dimmer, FM/MW PLL tuner with 6 presets, and multiple alarm functions including snooze and sleep. Get detailed product and packaging specifications. |
 |
MUSE M-197 BT Bluetooth Clock Radio with PLL FM The MUSE M-197 BT is a versatile Bluetooth clock radio featuring PLL FM tuning, dual alarms, NFC pairing, and a white LED display. It streams music, offers nature sounds, and includes temperature and calendar functions. |
 |
Muse M-175 WI: 10W Wireless Charging PLL Clock Radio with FM Tuner Discover the Muse M-175 WI, a versatile PLL clock radio featuring 10W fast wireless charging, dual alarms, FM radio with presets, and a clear 0.9" LED display. Perfect for modern bedside tables. |
Ask a question about this manual
Ask about setup, troubleshooting, compatibility, parts, safety, or missing instructions. Manuals+ will review the question and use this page’s manual context to help answer it.