Sharper Image 1213014311
Sharper Image Toy Remote Control Xtreme Airwave Drone User Manual
Brand: Sharper Image | Model: 1213014311
Introduction
Discover the thrill of drone flying with the Sharper Image X-Treme Airwave Drone. This high-performance remote control drone is designed for both beginners and advanced users, offering easy control and exciting stunt capabilities. This manual provides essential information for setup, operation, maintenance, and troubleshooting to ensure a safe and enjoyable flying experience.
Important Safety Information
Choking Hazard - Small Part. Not for Children under 3 years. Colors and styles may vary. Adult supervision required.
- Always operate the drone in open, clear areas, away from people, animals, and obstacles.
- Do not fly near power lines, trees, or water.
- Ensure the drone's battery is fully charged before each flight.
- Never attempt to modify or repair the drone or its components.
- Keep fingers, hair, and loose clothing away from rotating propellers.
- Store the drone and remote control in a cool, dry place when not in use.
Package Contents

The package includes all necessary components for immediate use, except for the remote control batteries. Please verify that all items listed below are present and in good condition upon unboxing.
- 1x Sharper Image X-Treme Airwave Drone
- 1x Wireless Remote Control
- 4x Replacement Rotor Blades
- 1x USB-C Charging Cable
- 1x Built-in 3.7V 200mAh Li-Po Rechargeable Battery (non-replaceable)
Note: The remote control requires 3 AAA 1.5V batteries (not included).
This image illustrates the drone, its remote, and the included accessories, along with a note about the required AAA batteries for the remote control.
Setup Guide
1. Charging the Drone Battery
The drone is equipped with a built-in rechargeable Li-Po battery. Before first use, fully charge the drone.
- Connect the small end of the included USB-C charging cable to the drone's charging port.
- Connect the large end of the USB-C charging cable to a USB power source (e.g., computer USB port, USB wall adapter).
- The charging indicator light on the cable will illuminate during charging and turn off when charging is complete.
- Charging typically takes approximately 60-90 minutes. Do not overcharge.
Important: Disconnect the charging cable once the battery is fully charged to prevent damage.
2. Installing Remote Control Batteries
The remote control requires 3 AAA 1.5V batteries (not included).
- Locate the battery compartment on the back of the remote control.
- Using a small Phillips head screwdriver, open the battery compartment cover.
- Insert 3 AAA batteries, ensuring correct polarity (+ and -).
- Replace the battery compartment cover and secure it with the screw.
3. Pairing the Drone and Remote Control
Follow these steps to establish a connection between the drone and its remote control:
- Place the drone on a flat, level surface.
- Turn on the drone by sliding the power switch (usually located on the underside or side of the drone). The drone's LED lights will begin to flash.
- Turn on the remote control by pressing the power button. The remote's indicator light will flash.
- Push the left joystick (throttle) all the way up, then pull it all the way down.
- The drone's LED lights and the remote's indicator light will turn solid, indicating successful pairing.
- The drone is now ready for flight.
Operating Instructions
Basic Controls

The remote control features a 2.4 GHz frequency for long-range flights and intuitive controls.
- Left Joystick (Throttle): Controls altitude (up/down) and rotation (left/right).
- Right Joystick (Directional): Controls forward/backward and left/right movement.
- One-Button Take-Off/Landing: Initiates automatic take-off or landing.
- Speed Button: Toggles between beginner and expert flight modes.
- Stunt Button: Activates stunt maneuvers.
- Trim Buttons: Used to fine-tune drone stability if it drifts.
This image displays the drone alongside its remote control, highlighting the ergonomic design and button layout for easy understanding of the basic controls.
One-Button Take-Off and Landing
The X-Treme Airwave Drone features an easy one-button operation for take-off and landing.
- To Take-Off: After pairing, press the One-Button Take-Off/Landing button. The drone will automatically ascend to a stable hovering height.
- To Land: During flight, press the One-Button Take-Off/Landing button again. The drone will slowly descend and land automatically.
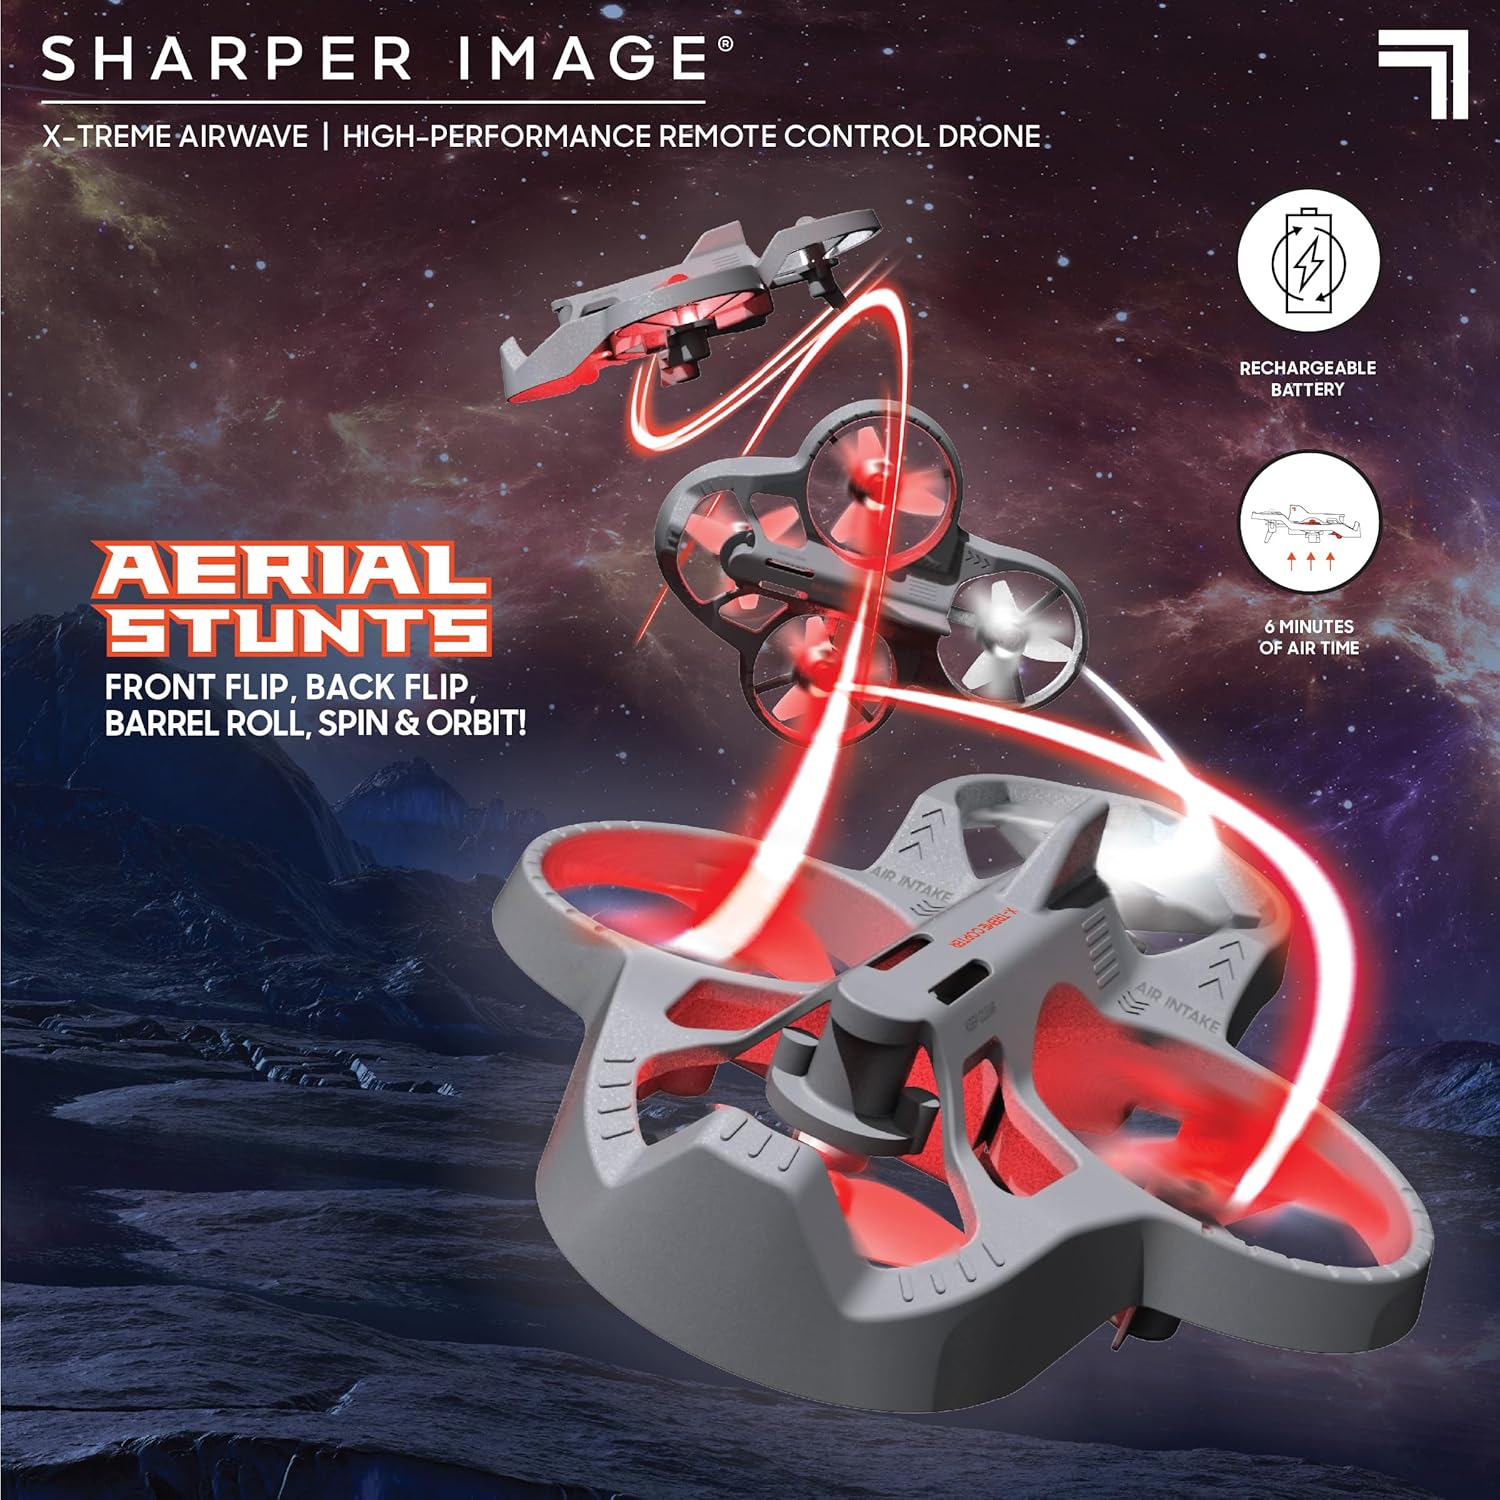
This image demonstrates the drone's agility, showcasing it in mid-air performing various aerial maneuvers, emphasizing its stunt capabilities.
Flight Modes (Beginner & Expert)
The drone offers two distinct flight modes to accommodate different skill levels:
- Beginner Mode: Ideal for new pilots, offering more stable and less responsive controls for easier learning.
- Expert Mode: Provides increased responsiveness and agility for experienced pilots to perform more dynamic maneuvers.
Press the Speed Button on the remote control to switch between these modes. The remote will typically indicate the current mode (e.g., with a beep or light change).
Performing Stunts
Elevate your piloting skills with impressive stunts:
- Flips (Front, Back, Left, Right): While flying, press the Stunt Button once, then quickly push the right joystick in the desired flip direction (forward, backward, left, or right).
- Barrel Rolls: Similar to flips, but often involves a more continuous rotation. Consult the specific instructions for your model if it has a dedicated barrel roll function.
- Spins and Orbits: These advanced maneuvers may require specific joystick combinations or dedicated buttons. Practice in an open area.
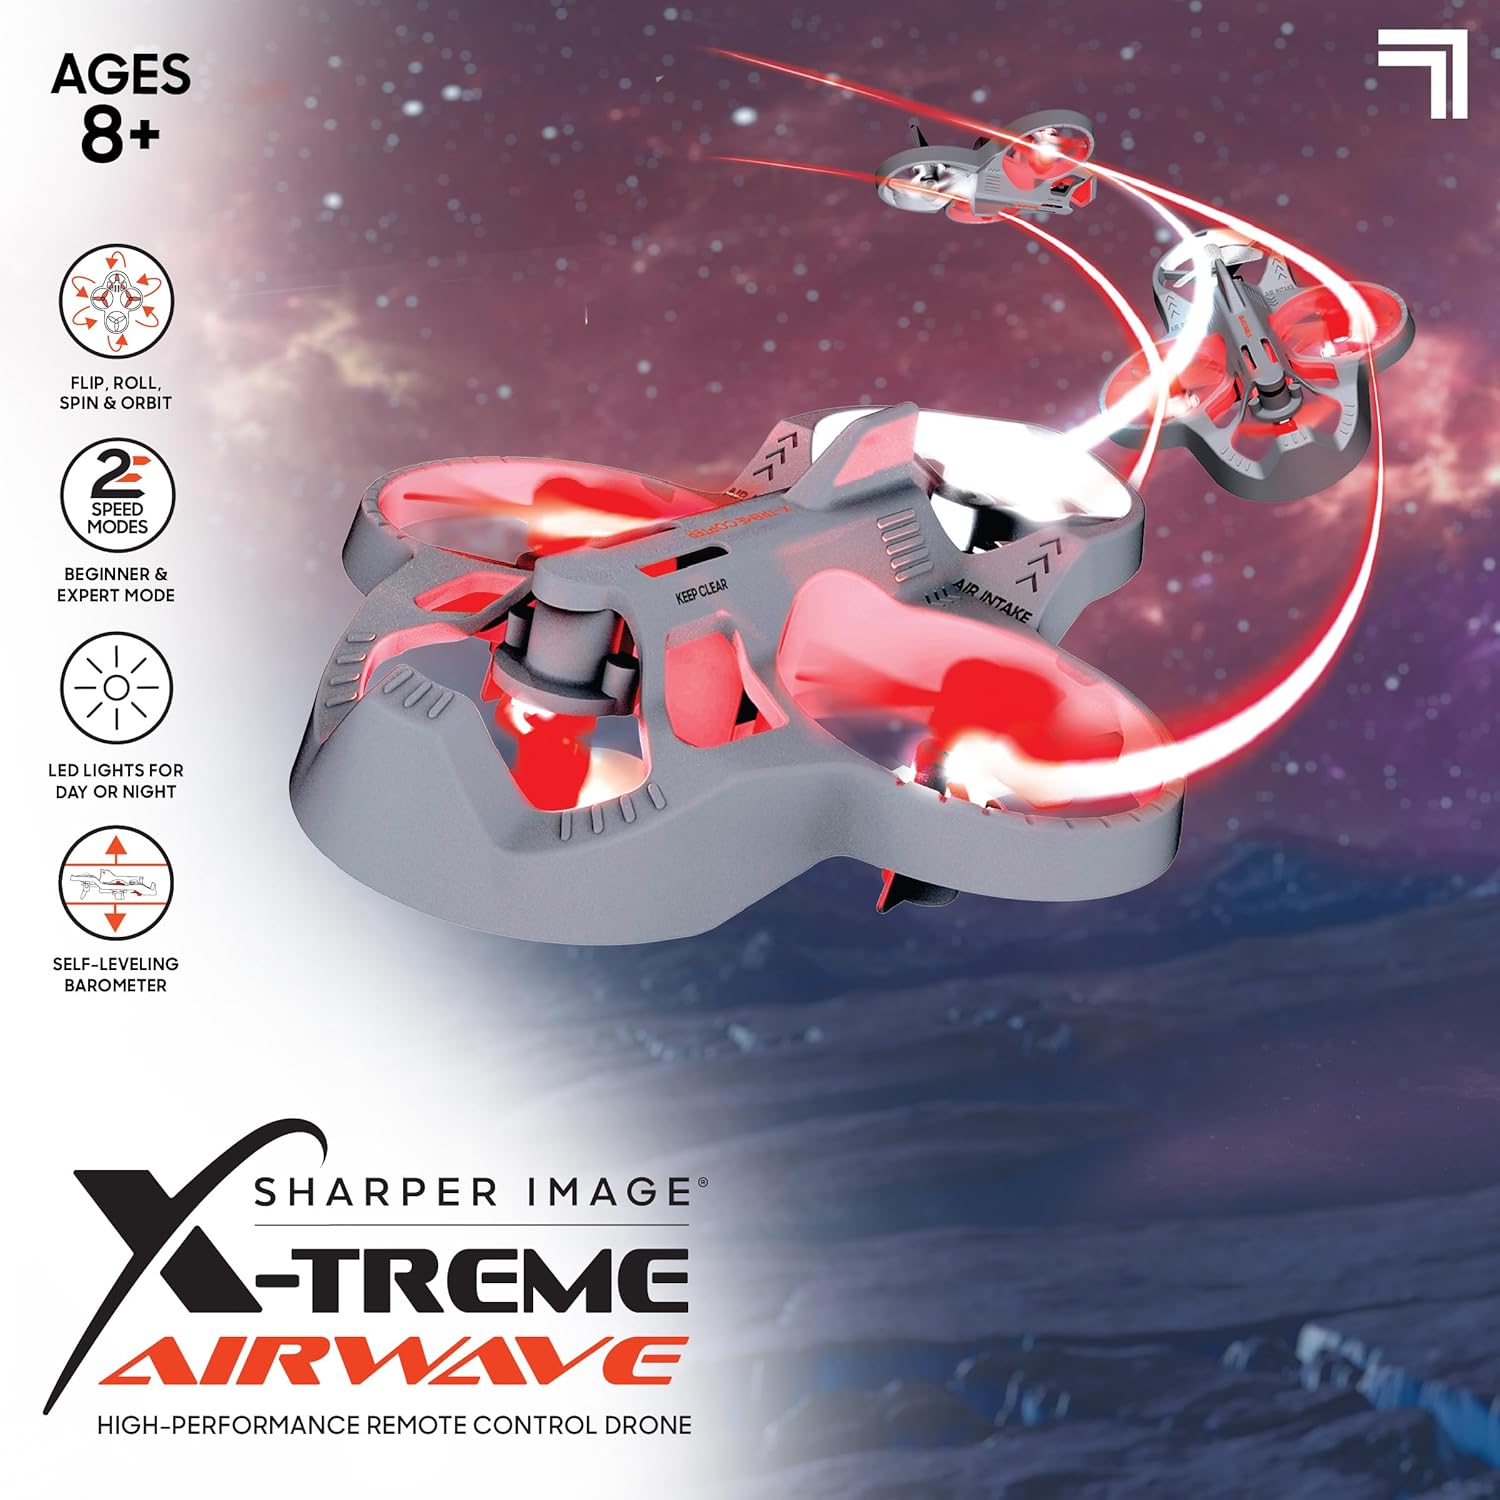
This image visually details the drone's key features, such as its ability to perform flips, rolls, spins, and orbits, along with its two speed modes and LED lights for enhanced visibility.
LED Headlights
The drone is equipped with bright LED headlights, allowing for exciting nighttime play and enhanced visibility during flight. These lights typically activate automatically when the drone is powered on.
Maintenance
Cleaning
- Gently wipe the drone's body with a clean, dry cloth to remove dust and debris.
- Avoid using water or liquid cleaners, as they can damage electronic components.
- Ensure propellers are free of hair, dust, or other obstructions.
Propeller Replacement
If a propeller is damaged, replace it with one of the included spare blades.
- Carefully remove the damaged propeller by gently pulling it upwards from its motor shaft.
- Note the orientation of the propeller (some may be marked 'A' or 'B' and correspond to specific motor positions).
- Press the new propeller firmly onto the motor shaft until it is secure.
- Ensure the new propeller spins freely without obstruction.
Battery Care and Storage
- Always fully charge the drone battery before each flight.
- Do not leave the battery charging unattended for extended periods.
- If the drone will not be used for a long time, store the battery with a partial charge (around 50%) to prolong its lifespan.
- Store the drone and remote control in a cool, dry environment, away from direct sunlight and extreme temperatures.
Troubleshooting
| Problem | Possible Cause | Solution |
|---|---|---|
| Drone does not respond to remote. | Not paired; Remote batteries low; Drone battery low. | Re-pair drone and remote; Replace remote batteries; Charge drone battery. |
| Drone drifts during flight. | Needs calibration; Uneven surface at take-off; Propeller damage. | Perform calibration (refer to specific remote instructions); Take off from a level surface; Check and replace damaged propellers. |
| Drone has short flight time. | Battery not fully charged; Old battery. | Ensure full charge before flight; Battery lifespan decreases over time. |
| Propellers are not spinning. | Obstruction; Motor issue; Not powered on. | Check for obstructions; Ensure drone is powered on and paired. |
Specifications
| Model Name | Xtreme Airwave |
| Model Number | 1213014311 |
| Product Dimensions | 26.67 x 14.22 x 7.11 cm; 340 g |
| Material Type | Plastic |
| Drone Battery | Built-in 3.7V 200mAh Li-Po (Rechargeable) |
| Remote Control Battery | 3 AAA 1.5V batteries (not included) |
| Remote Control Type | 2.4 GHz Radio Control |
| Recommended Age | 8 - 15 years (Manufacturer recommended) |
| Special Features | Weather resistant, shock resistant, LED lights, One-button take-off/landing, Self-leveling barometer |

This image provides a visual reference for the drone's compact size, specifically highlighting its approximate 4-inch width.
Warranty and Support
For warranty information and customer support, please refer to the official Sharper Image website or contact their customer service department. Keep your purchase receipt as proof of purchase.
- Manufacturer: THREE SIXTY GROUP
- Brand Store: Visit the Sharper Image Store on Amazon
- For further assistance, please contact the retailer or manufacturer directly.