Introduction
This instruction manual provides detailed guidance for the safe and proper installation and use of the MOUNTUP MU0041-B Wall Plate Mounting Kit and MU0041 TV Mounting Hardware Kit Bundle. This bundle includes essential components for securely mounting your television to a wall, offering versatility for various wall types and TV models. Please read all instructions carefully before beginning installation.
Safety Information
- Read all instructions: Ensure you understand all steps before installation. If you have any doubts, consult a qualified professional.
- Wall Integrity: Verify that the wall structure can safely support the combined weight of the TV mount, TV, and all hardware.
- Tools: Use appropriate tools for the job. Ensure they are in good working condition.
- Personal Protective Equipment: Wear safety glasses and gloves during installation.
- Children and Pets: Keep children and pets away from the work area during installation.
- Over-tightening: Do not over-tighten screws, as this can damage the hardware or the wall.
- Electrical Wires/Pipes: Before drilling, check for hidden electrical wires, gas lines, or water pipes in the wall. Use a stud finder with wire detection if available.
Package Contents: MU0041-B Wall Plate Mounting Kit
This kit provides the necessary hardware for securing a TV wall mount to concrete or wood stud walls.

Image: Overview of the MU0041-B Wall Plate Mounting Kit components, including lag bolts, washers, concrete wall anchors, and a bubble level.

Image: Detailed breakdown of the 19 pieces included in the MU0041-B kit: 6 M8*65mm Lag Bolts, 6 M8 Washers, 6 Concrete Wall Anchors, and 1 Bubble Level.
Components List:
- M8*65mm Lag Bolts (6 pcs): Used for securing the wall plate to wood studs or with concrete anchors.
- M8 Washers (6 pcs): Distribute the load of the lag bolts and prevent damage to the mounting surface.
- Concrete Wall Anchors (6 pcs): Designed for secure installation into solid concrete or brick walls.
- Bubble Level (1 pc): Assists in ensuring the wall plate is mounted perfectly horizontal.

Image: Close-up of an M8*65mm lag bolt, highlighting its rustproofed zinc layer and 2.56-inch length.

Image: Illustration demonstrating the compatibility and secure fit between a lag bolt and a concrete wall anchor.

Image: The included bubble level, featuring both vertical and horizontal indicators to ensure accurate and level mounting.
Package Contents: MU0041 TV Mounting Hardware Kit
This kit provides a comprehensive assortment of screws, washers, and spacers to attach your TV to a wall mount, ensuring compatibility with various TV models and VESA patterns.

Image: A comprehensive assortment of TV mounting hardware, including various sizes of M4, M5, M6, and M8 screws, washers, and spacers, neatly organized in a clear storage case.
Components List:
- TV Screws: Includes M4, M5, M6, and M8 screws in various lengths (e.g., M4x10mm, M5x15mm, M6x20mm, M8x25mm) to fit different TV VESA mounting holes.
- Washers: Various sizes of washers (e.g., M4/M5, M6/M8) to ensure a snug fit and protect the TV's mounting surface.
- Spacers: Different lengths of spacers (e.g., H5mm, H15mm) to accommodate curved TVs, provide clearance for cables, or adjust screw length.
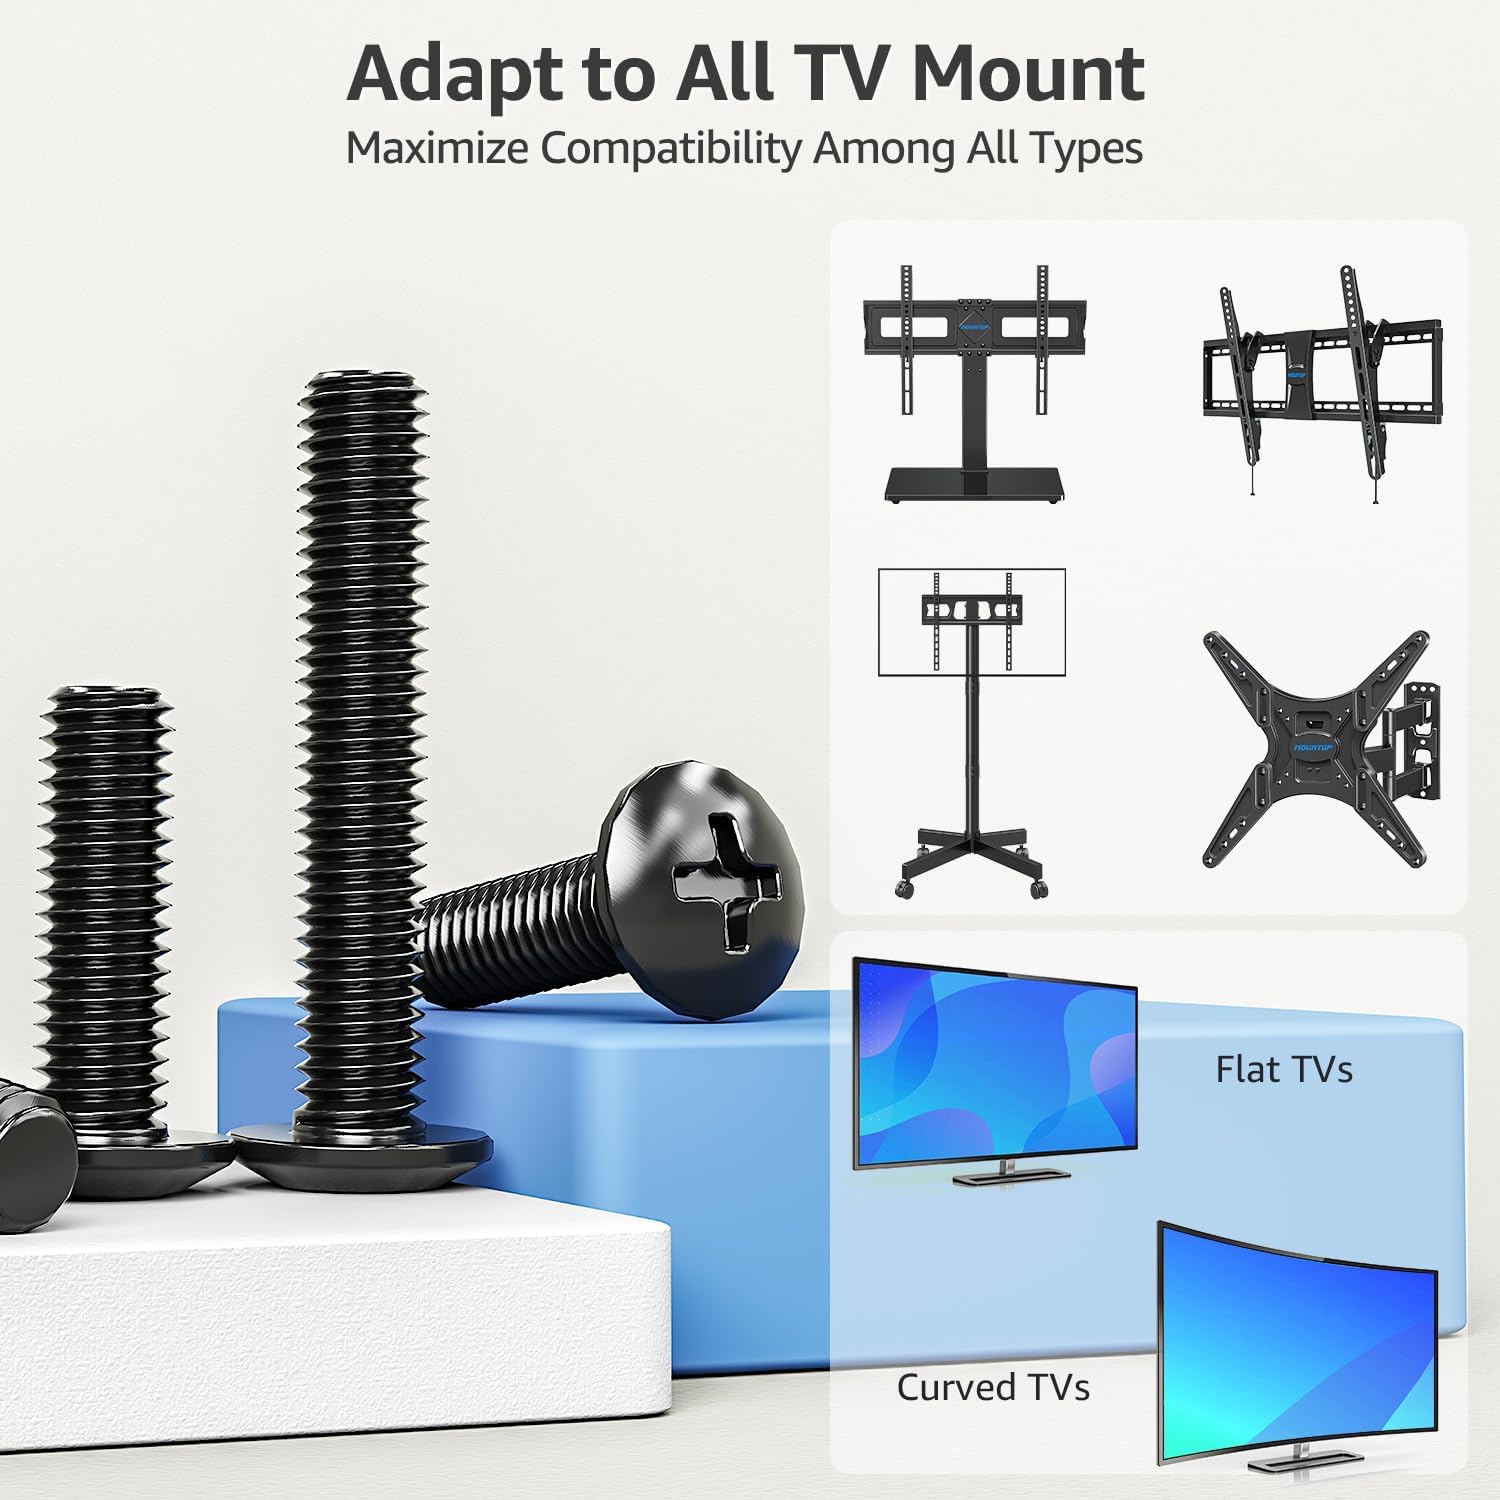
Image: This diagram illustrates how the hardware kit is designed to adapt to a wide range of TV mount types, including fixed, tilt, full-motion, and stand mounts, compatible with both flat and curved televisions.
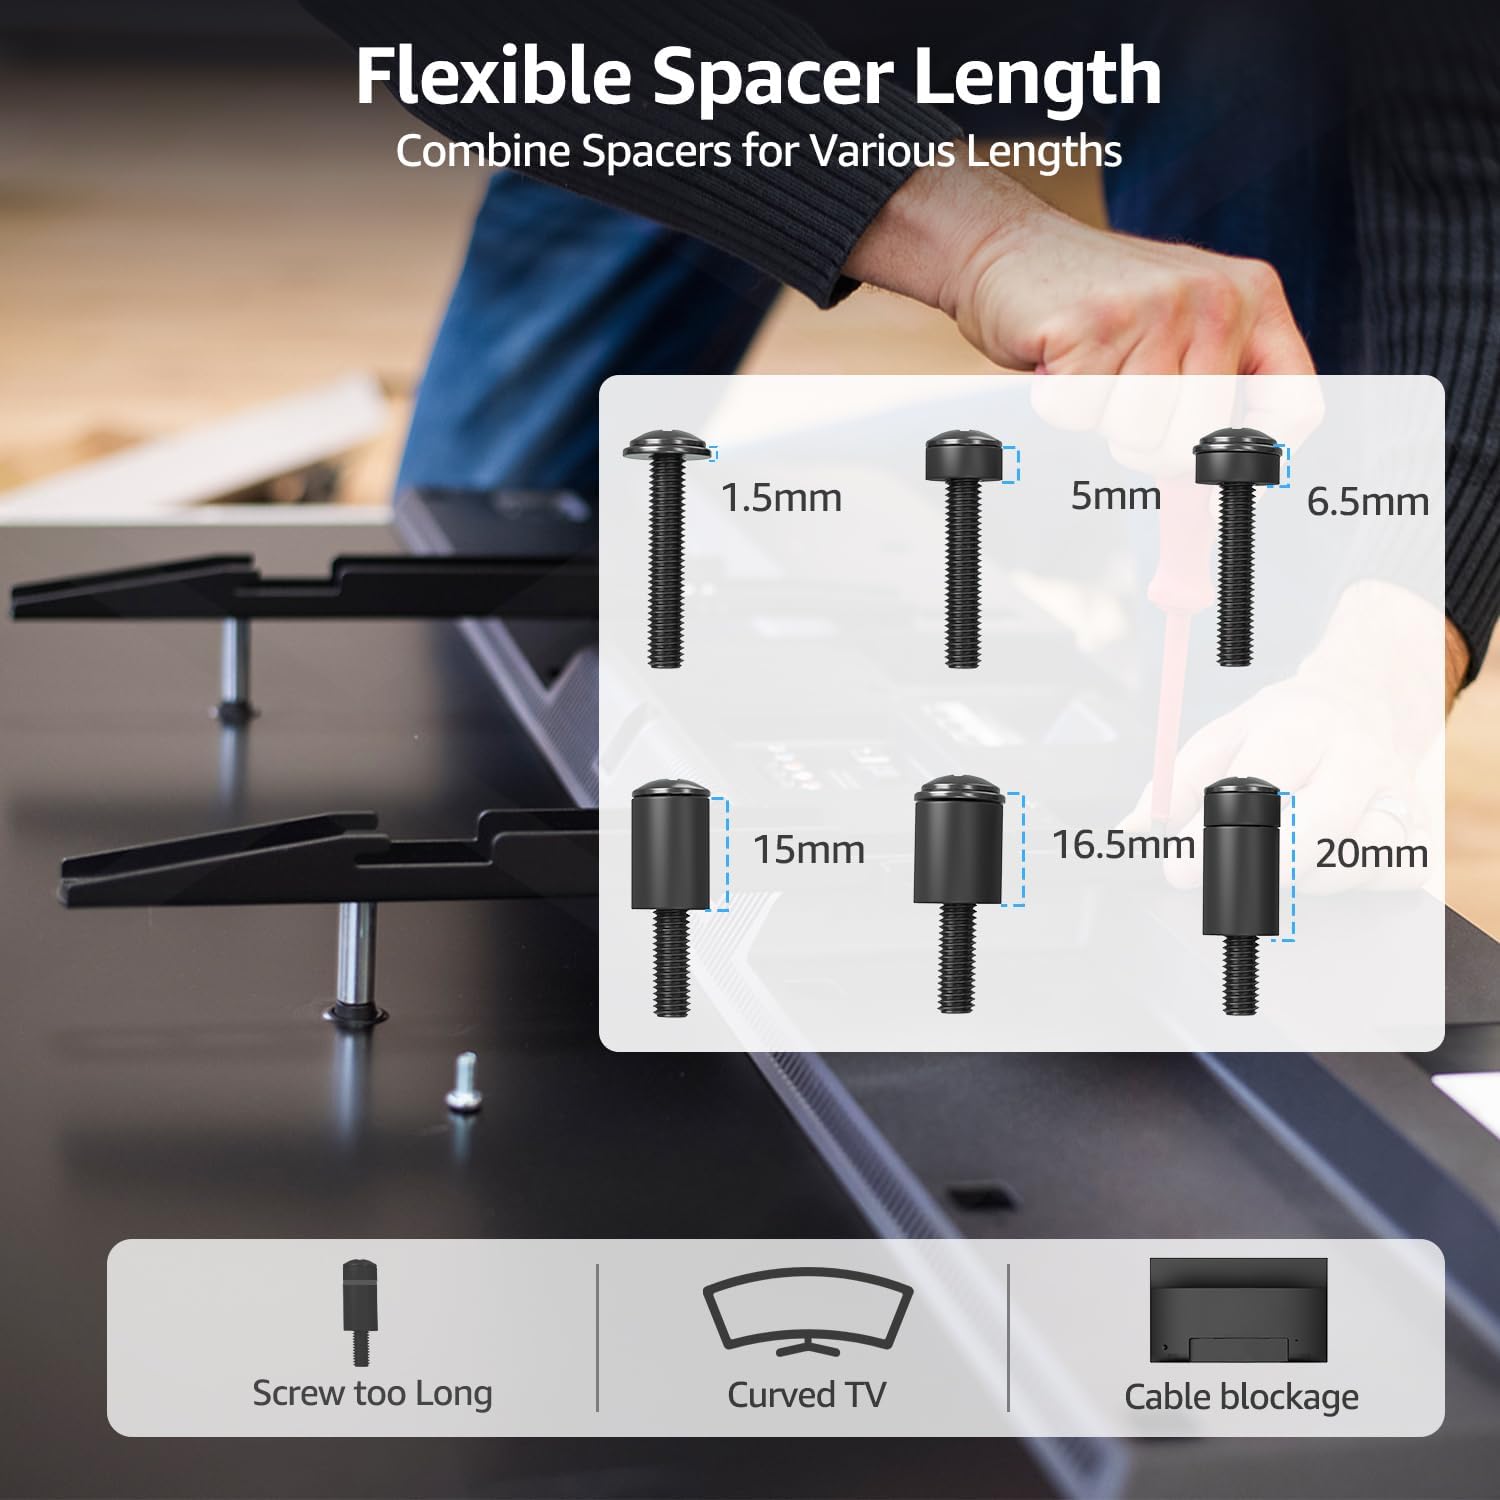
Image: This illustration demonstrates the utility of flexible spacer lengths (1.5mm, 5mm, 6.5mm, 15mm, 16.5mm, 20mm) for addressing common installation challenges such as screws being too long, mounting curved TVs, and preventing cable blockage.
Setup and Installation
This section outlines general steps for installing a TV wall mount using the provided hardware. Always refer to your specific TV mount's instructions for detailed steps, as this kit provides universal hardware components.
Tools Required (Not Included):
- Pencil
- Drill
- Drill bits (appropriate size for anchors/lag bolts)
- Stud finder (for wood stud installation)
- Socket wrench or adjustable wrench
- Phillips head screwdriver
- Measuring tape
Installation Steps:
- Determine Mounting Location: Choose a suitable location on your wall, considering viewing height, power outlets, and potential obstructions.
- Locate Studs or Wall Type:
- For Wood Studs: Use a stud finder to locate the center of two adjacent wood studs. Mark the drilling points.
- For Concrete/Brick Walls: Ensure the wall is solid concrete or brick. Mark the drilling points.
- Position Wall Plate: Hold the TV mount's wall plate against the wall at the desired height. Use the included bubble level to ensure it is perfectly horizontal. Mark the drilling holes with a pencil.
- Drill Pilot Holes:
- For Wood Studs: Drill pilot holes into the center of the marked stud locations using a drill bit slightly smaller than the lag bolts.
- For Concrete/Brick Walls: Drill pilot holes using a masonry drill bit of the size specified for the concrete wall anchors. Insert the concrete wall anchors flush with the wall surface.
- Attach Wall Plate: Align the wall plate with the drilled holes. Insert the M8*65mm lag bolts through the wall plate, adding M8 washers, and tighten them securely into the wood studs or concrete anchors using a socket wrench. Do not overtighten.
- Attach TV Brackets to TV: Identify the correct screws (M4, M5, M6, or M8) and washers from the MU0041 TV Mounting Hardware Kit that fit your TV's VESA mounting holes. If needed, use the appropriate spacers to ensure proper clearance for curved TVs or cables. Attach the TV mounting brackets (from your TV mount, not included in this kit) to the back of your TV.
- Hang TV on Wall Plate: Carefully lift the TV and hook the TV brackets onto the wall plate according to your TV mount's specific instructions. Secure any safety locks or screws as directed by your TV mount manual.
- Final Check: Gently pull on the TV to ensure it is securely attached to the wall mount. Verify that the TV is level.
Operation
Once installed, the MOUNTUP hardware ensures your TV is securely fixed to the wall. The "operation" primarily refers to the secure and stable positioning of your television.
- Secure Attachment: The lag bolts and anchors provide a strong connection to the wall, while the TV screws and spacers ensure the TV brackets are firmly attached to the television.
- Stability: The system is designed to hold your TV stably in place, preventing accidental dislodgement when properly installed.
Maintenance
Regular maintenance helps ensure the long-term safety and stability of your TV mount.
- Periodic Checks: Every 6-12 months, visually inspect all mounting points (lag bolts, TV screws) for any signs of loosening or wear.
- Tighten Connections: If any screws or bolts appear loose, gently re-tighten them. Do not overtighten.
- Cleaning: Dust the hardware components as needed. Avoid using harsh chemicals that could corrode the metal or damage finishes.
- Environmental Factors: Ensure the mounting area remains dry and free from extreme temperature fluctuations, which could affect wall integrity or hardware.
Troubleshooting
If you encounter issues during or after installation, refer to these common troubleshooting tips.
- TV Not Level:
- Ensure the wall plate was installed perfectly level using the bubble level.
- Some TV mounts have fine-tuning adjustments for leveling the TV after it's hung. Consult your TV mount's manual.
- If the wall plate itself is not level, you may need to re-install it.
- Screws Don't Fit TV:
- Verify the correct screw diameter (M4, M5, M6, M8) for your TV's VESA holes. Consult your TV's manual.
- If screws are too long, use the appropriate spacers from the MU0041 kit to achieve the correct length.
- If screws are too short, ensure you are using the longest compatible screw provided in the kit. If still too short, you may need to acquire longer screws (ensure they are VESA compliant).
- Wall Anchors Not Holding:
- Ensure the pilot hole size was correct for the concrete anchors. Too large a hole will prevent a secure grip.
- Verify the wall material is solid concrete or brick. These anchors are not suitable for drywall alone.
- If installing into wood studs, ensure the lag bolts are driven into the center of the stud.
- TV Feels Unstable:
- Immediately remove the TV.
- Re-check all connections: wall plate to wall, and TV brackets to TV. Ensure all bolts and screws are tightened securely (but not overtightened).
- Verify that the wall can support the weight.
- Ensure all safety mechanisms on your TV mount are engaged.
Specifications
| Feature | Detail |
|---|---|
| Brand | MOUNTUP |
| Model Numbers | MU0041-B (Wall Plate Mounting Kit), MU0041 (TV Mounting Hardware Kit) |
| Mounting Type (MU0041-B) | Wall Mount (for concrete/wood stud) |
| Movement Type | Stationary (hardware supports stationary mounts) |
| Material | Metal (for bolts, washers, screws) |
| Compatible Devices | Television (various sizes and VESA patterns) |
| Minimum Supported Screen Size | 22 Inches (general compatibility for TV mounts) |
| Lag Bolt Dimensions | M8 x 65mm (2.56 inches) |
| Screw Sizes Included | M4, M5, M6, M8 (various lengths) |
| Anchor Type | Concrete Wall Anchor |
Warranty and Support
MOUNTUP products are manufactured with quality and durability in mind. While specific warranty details are not provided in this document, please retain your proof of purchase for any warranty claims.
For technical assistance, missing parts, or any questions regarding the installation or use of your MOUNTUP MU0041-B Wall Plate Mounting Kit and MU0041 TV Mounting Hardware Kit, please contact MOUNTUP customer support through their official website or the retailer where the product was purchased. Always refer to the official MOUNTUP website for the most current support information.
MOUNTUP Official Website: MOUNTUP Store on Amazon