1. Introduction
This manual provides comprehensive instructions for the JESSINIE 2-Channel Isolated RS485 Expansion HAT, designed for seamless integration with Raspberry Pi series boards. This HAT facilitates reliable SPI to RS485 communication, featuring dual SC16IS752 and SP3485 chips for robust data transmission and reception. It is equipped with multiple protection circuits to ensure stable and safe operation in various environments.
2. Key Features
- Standard Raspberry Pi 40PIN GPIO extension header, ensuring compatibility with Raspberry Pi series boards.
- Integrates SC16IS752 and SP3485 dual chips for SPI to RS485 conversion, supporting data rates up to 921600bps.
- Allows for manual or automatic data transceiving, configurable via onboard DIP switches.
- Onboard TVS (Transient Voltage Suppressor) for effective suppression of surge voltage and transient spike voltage, providing lightning protection and anti-electrostatic capabilities.
- Includes auto-recovery fuse and protection diodes to ensure stable current/voltage outputs, offering over-current/over-voltage protection and improved shock resistance.
- Features onboard LEDs to indicate power status and transceiver activity.
- Breakout SPI control pins are available for connection with other host control boards, such as Arduino.
- Comes with development resources and example code in C and Python.
3. Specifications
| Parameter | Value |
|---|---|
| Serial Port Expansion Chip | SC16IS752 |
| RS485 Transceiver | SP3485 |
| Working Voltage | 3.3V / 5V |
| Communication Interface | SPI |
| Communication Speed | 300 ~ 921600 bps |
| Product Dimensions | 65 mm x 56.5 mm |
| Through Hole Diameter | 3.0 mm |
| Item Weight | 1.95 ounces |
| Included Components | Main board only |
Dimensions
The board measures 65mm by 56.5mm, designed to fit standard Raspberry Pi form factors.
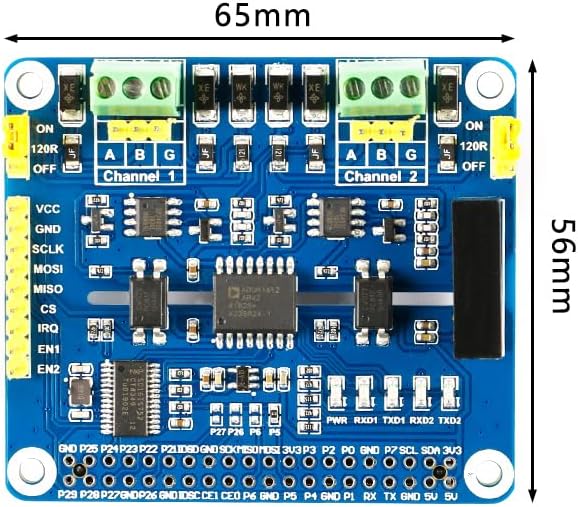
Figure 3.1: Top view of the JESSINIE 2-Channel Isolated RS485 Expansion HAT with indicated dimensions.
4. Setup Guide
4.1 Package Contents
Verify that your package contains the JESSINIE 2-Channel Isolated RS485 Expansion HAT board. No additional cables or accessories are included unless specified by the retailer.
4.2 Hardware Connection
- Prepare your Raspberry Pi: Ensure your Raspberry Pi is powered off before connecting the HAT.
- Align the HAT: Carefully align the 40-pin GPIO header of the RS485 HAT with the corresponding GPIO pins on your Raspberry Pi.
- Mount the HAT: Gently press the HAT down until it is securely seated on the Raspberry Pi's GPIO header. Ensure all pins are correctly engaged.

Figure 4.1: The JESSINIE 2-Channel Isolated RS485 Expansion HAT securely mounted on a Raspberry Pi.
4.3 RS485 Terminal Connections
Connect your RS485 devices to the screw terminals labeled 'A', 'B', and 'G' for each channel. 'A' typically connects to the A-line of the RS485 bus, 'B' to the B-line, and 'G' to ground.

Figure 4.2: Top view of the HAT, highlighting the two RS485 channels and their respective screw terminals.
5. Operating Instructions
5.1 DIP Switch Configuration
The HAT features DIP switches for configuring the RS485 transceiving mode for each channel. The mode can be set to Half-auto or Full-auto. Refer to the table below and the image for correct settings.

Figure 5.1: Bottom view of the HAT, showing the DIP switches and their configuration table.
| Channel | Mode | A (DIP Switch 1) | B (DIP Switch 2) |
|---|---|---|---|
| Channel 1 | Half-auto | 0 (OFF) | 1 (ON) |
| Full-auto | 1 (ON) | 0 (OFF) | |
| Channel 2 | Half-auto | 0 (OFF) | 1 (ON) |
| Full-auto | 1 (ON) | 0 (OFF) |
Note: '0' typically means the switch is in the OFF position, and '1' means the ON position. Consult the specific markings on your board if different.
5.2 Software Configuration and Communication
After hardware setup, you will need to configure your Raspberry Pi's operating system and write software to communicate with the HAT via SPI. The HAT utilizes the SC16IS752 chip, which acts as an SPI to UART bridge, providing two UART channels for RS485 communication.
- Enable SPI: Ensure SPI is enabled on your Raspberry Pi. This can typically be done via
raspi-config. - Driver/Library: Utilize the provided development resources, including C and Python examples, to interact with the SC16IS752 chip. These examples will guide you on how to initialize the chip, configure UART parameters (baud rate, data bits, parity, stop bits), and send/receive data over the RS485 channels.
- Data Transceiving: Depending on your DIP switch settings, the RS485 transceiver will either automatically manage data direction (Full-auto) or require software control (Half-auto) via the EN1/EN2 pins.
6. Maintenance
- Keep Clean: Regularly inspect the board for dust or debris. Use a soft, dry brush or compressed air to clean it. Avoid using liquids.
- Handle with Care: Always handle the HAT by its edges to avoid touching components, especially when powered. Static electricity can damage electronic components.
- Storage: When not in use, store the HAT in an anti-static bag in a cool, dry place.
- Power Off Before Disconnecting: Always power down your Raspberry Pi before connecting or disconnecting the HAT or any RS485 devices.
7. Troubleshooting
- No Power Indicator: If the power LED does not light up when the Raspberry Pi is powered, ensure the HAT is correctly seated on the GPIO header and the Raspberry Pi is receiving power.
- Communication Failure:
- Verify that SPI is enabled on your Raspberry Pi.
- Check your DIP switch settings for the correct transceiving mode (Half-auto/Full-auto).
- Ensure your RS485 wiring (A, B, G) is correct and matches the connected device.
- Confirm that your software configuration (baud rate, data bits, parity, stop bits) matches the RS485 device.
- If using Half-auto mode, ensure your software is correctly controlling the data direction pins (EN1/EN2).
- Intermittent Data: This could be due to noise. Ensure proper grounding and consider adding termination resistors if your RS485 bus is long or has multiple devices. The onboard 120R termination resistors can be enabled via jumpers.
- Over-current/Over-voltage: The HAT has onboard protection. If you suspect an issue, disconnect power immediately and inspect for any visible damage. The auto-recovery fuse should reset once the fault is cleared.
8. Warranty and Support
For technical support, development resources, or warranty inquiries, please refer to the official JESSINIE website or contact your retailer. Keep your purchase receipt for warranty claims.


