1. Introduction
This manual provides detailed instructions for the operation and maintenance of your kh 4-Channel Professional Audio DJ Mixer (Model MX_04_Mixer). This versatile mixer is designed for various audio applications, including live performances, karaoke, home recording, and DJ setups. It features 4 input channels, a built-in 16-preset DSP effects processor, a 7-band graphic equalizer, Bluetooth connectivity, USB/MP3 playback, and 48V phantom power for condenser microphones.
Please read this manual thoroughly before using the mixer to ensure proper operation and to maximize its performance and longevity.
2. Safety Information
To prevent electric shock, fire, or damage to the unit, please observe the following safety precautions:
- Power Source: Use only the specified power adapter. Ensure the voltage matches the requirements of your region.
- Water and Moisture: Do not expose the unit to rain or moisture. Do not place objects filled with liquids, such as vases, on the unit.
- Ventilation: Ensure adequate ventilation. Do not block ventilation openings.
- Heat Sources: Keep the unit away from heat sources such as radiators, heat registers, stoves, or other apparatus (including amplifiers) that produce heat.
- Cleaning: Unplug the unit from the power outlet before cleaning. Use a dry cloth only.
- Servicing: Do not attempt to service this unit yourself. Refer all servicing to qualified service personnel.
- Grounding: Ensure proper grounding if required.
3. Package Contents
Verify that all items are present in the package:
- 1 x kh 4-Channel Professional Audio DJ Mixer (Model MX_04_Mixer)
- 1 x Power Adapter
4. Product Overview
4.1. Front Panel Controls and Connections
The front panel provides access to all primary controls and input/output connections for the mixer.

Figure 4.1: Top-down view of the kh 4-Channel Professional Audio DJ Mixer.

Figure 4.2: Detailed labeled diagram of the mixer's front panel.
- MIC/LINE Inputs (1-4): Combo XLR/TRS jacks for connecting microphones or line-level instruments.
- PHANTOM +48V Button: Activates 48V phantom power for condenser microphones on channels 1-4.
- GAIN Control: Adjusts the input sensitivity for each channel.
- HIGH/LOW EQ: Two-band equalizer for adjusting treble and bass frequencies on each channel.
- PAN Control: Adjusts the stereo positioning (left/right) of each channel.
- AUX Send: Sends a portion of the channel signal to the AUX output for external effects or monitoring.
- LEVEL Fader: Adjusts the output volume of each individual channel.
- MUTE Button: Mutes the audio output for the corresponding channel.
- MAIN OUT (L/R): XLR and 6.35mm TRS jacks for connecting to main speakers or an amplifier.
- AUX OUT: 6.35mm TRS jack for auxiliary output.
- PHONES: 6.35mm TRS jack for headphone monitoring.
- USB Port: For connecting a USB drive for MP3 playback or connecting to a computer for recording/playback.
- MP3/Bluetooth Section: Controls for USB/MP3 playback, Bluetooth pairing, and mode selection.
- DSP Effects Section: Rotary encoder and display for selecting and adjusting 16 built-in digital effects.
- EFFECT Level: Adjusts the overall level of the applied DSP effect.
- STEREO GRAPHIC EQUALIZER: 7-band graphic equalizer for fine-tuning the overall main mix.
- MAIN L/R Faders: Controls the overall output volume of the main stereo mix.
- POWER Indicator: Illuminates when the unit is powered on.
- LEVEL Meters: LED indicators showing the output level of the main mix.
4.2. Rear Panel Connections
The rear panel typically houses the power input and other less frequently accessed connections.

Figure 4.3: Side view of the mixer, showing power input.
- DC IN: Power input jack for connecting the included power adapter.
- POWER Switch: Turns the mixer on or off.
5. Setup
5.1. Power Connection
- Ensure the mixer's POWER switch is in the OFF position.
- Connect the included power adapter to the DC IN jack on the rear panel of the mixer.
- Plug the power adapter into a suitable electrical outlet.
5.2. Connecting Microphones and Instruments

Figure 5.1: Connecting various audio sources to the mixer.
- Connect microphones or instruments to the MIC/LINE inputs (1-4) using XLR or 6.35mm TRS cables.
- For condenser microphones, press the +48V PHANTOM button to supply power. Ensure dynamic microphones or line-level devices are not connected when phantom power is active, unless they are designed to handle it.
5.3. Connecting External Audio Devices (AUX)
Use the 3.5mm AUX input to connect devices like smartphones or tablets.
5.4. Connecting to a Computer (USB)

Figure 5.2: USB connection to a computer.
Connect the mixer to a computer using a USB cable. The mixer can function as an audio interface for recording and playback without requiring additional drivers on most operating systems (Plug and Play).
5.5. Bluetooth Pairing

Figure 5.3: Bluetooth pairing instructions.
- Turn on the mixer.
- On the MP3/Bluetooth section, select Bluetooth mode. The display will show 'bt'.
- On your mobile device, search for Bluetooth devices and select 'BT-Speaker'.
- Once paired, you can stream audio wirelessly to the mixer.
6. Operating Instructions
6.1. Basic Operation
- After all connections are made, turn on the mixer using the POWER switch on the rear panel. The POWER indicator will illuminate.
- Gradually raise the MAIN L/R faders to a suitable listening level.
6.2. Channel Control
Each input channel (1-4) has dedicated controls:
- GAIN: Adjust this knob to set the input level for each microphone or instrument. Aim for the signal to be strong without clipping (distortion).
- HIGH/LOW EQ: Use these knobs to shape the tone of each channel. Turn clockwise to boost frequencies, counter-clockwise to cut.
- PAN: Position the sound of each channel in the stereo field.
- AUX: Adjust the amount of signal sent to the AUX output.
- LEVEL Fader: Controls the individual volume of each channel in the main mix.
- MUTE: Press to instantly silence a channel.
6.3. DSP Effects (16 Presets)
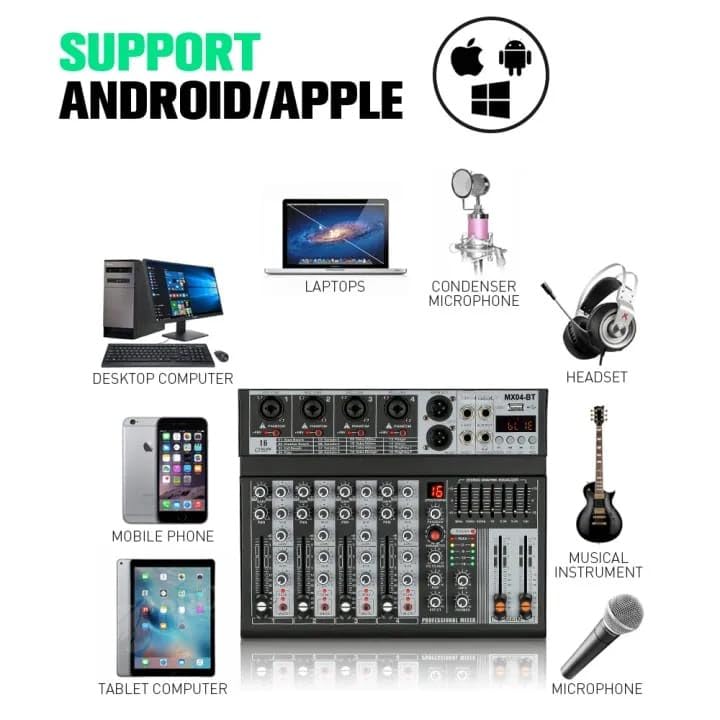
Figure 6.1: The 16 built-in DSP effects.
The mixer includes 16 digital signal processing (DSP) effects:
- Use the rotary encoder in the DSP Effects section to scroll through the 16 available presets (e.g., Room Reverb, Delay, Chorus).
- Press the encoder to select an effect.
- Adjust the EFFECT level knob to control the overall wet/dry mix of the chosen effect.
6.4. USB/MP3 Playback and Recording
- MP3 Playback: Insert a USB flash drive containing MP3 files into the USB port. Use the controls in the MP3/Bluetooth section to play, pause, skip tracks, and adjust volume.
- Recording: When connected to a computer via USB, the mixer can send its main mix output to the computer for recording using appropriate audio software.
6.5. Stereo Graphic Equalizer
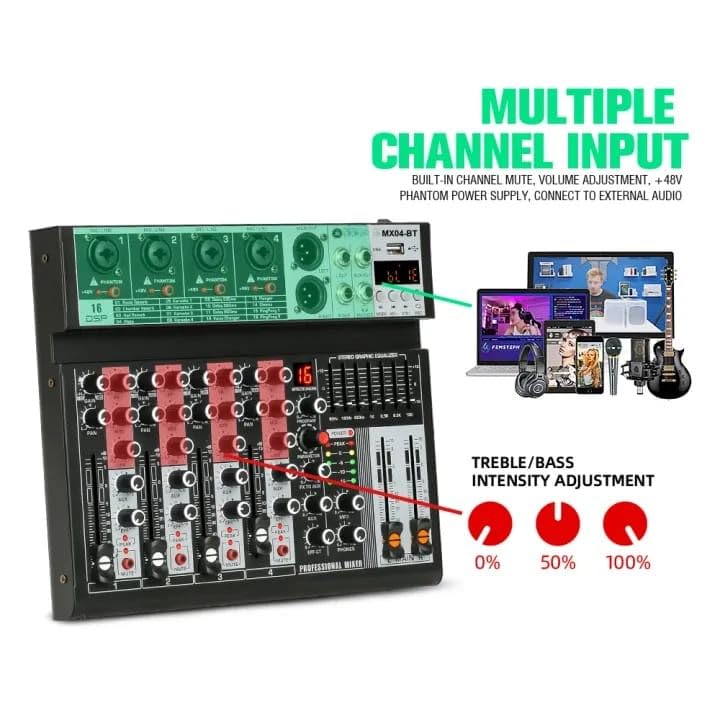
Figure 6.2: Stereo Graphic Equalizer controls.
Use the faders on the 7-band graphic equalizer to fine-tune the frequency response of the overall main mix. Each fader corresponds to a specific frequency band (e.g., 80Hz, 160Hz, 1K, 10K) and allows for boosting or cutting that frequency.
6.6. Headphone Monitoring
Connect headphones to the PHONES jack to monitor the main mix. Adjust the PHONES level knob to control the headphone volume.
7. Maintenance
- Cleaning: Use a soft, dry cloth to clean the exterior of the mixer. Do not use liquid cleaners or solvents.
- Storage: When not in use, store the mixer in a cool, dry place away from direct sunlight and extreme temperatures.
- Dust Protection: Cover the mixer when not in use to prevent dust accumulation, which can affect faders and knobs.
8. Troubleshooting
If you encounter issues with your mixer, refer to the following common problems and solutions:
- No Power:
- Ensure the power adapter is securely connected to both the mixer and a working electrical outlet.
- Check if the POWER switch on the rear panel is in the ON position.
- No Sound Output:
- Verify that the MAIN L/R faders are raised.
- Check individual channel LEVEL faders and ensure channels are not muted.
- Ensure external speakers/amplifiers are powered on and connected correctly.
- Check all audio cables for proper connection and integrity.
- Distorted Sound:
- Reduce the GAIN control for the input channel that is distorting.
- Lower the individual channel LEVEL faders or the MAIN L/R faders.
- Ensure connected microphones or instruments are not outputting an excessively hot signal.
- Bluetooth Connection Issues:
- Ensure the mixer is in Bluetooth mode ('bt' displayed).
- Make sure your mobile device's Bluetooth is enabled and it is searching for devices.
- Try unpairing and re-pairing the device.
- Ensure no other devices are actively connected to the mixer via Bluetooth.
9. Specifications

Figure 9.1: Mixer dimensions.
| Feature | Specification |
|---|---|
| Brand | kh |
| Model Number | MX_04_Mixer |
| Number of Channels | 4 |
| Connectivity Technology | Auxiliary, Bluetooth, USB |
| Power Source | Corded Electric |
| Output Connector Type | 3.5 mm, 6.35 mm, XLR |
| Product Dimensions (LxWxH) | 23 x 26 x 6 cm |
| Item Weight | 2.04 kg |
| Phantom Power | +48V for each channel |
| DSP Effects | 16 Preset Digital Effects |
| Equalizer | 2-Band EQ per channel, 7-Band Stereo Graphic Equalizer |
| Recording Mode | Supported via USB to PC |
10. Warranty and Support
For warranty information and technical support, please refer to the documentation provided with your purchase or contact the manufacturer directly. Keep your proof of purchase for warranty claims.