1. Introduction
This manual provides essential instructions for the safe and efficient use of your Pioneer VSX-535 5.2 Channel AV Receiver. The VSX-535 is designed to deliver an immersive audio-visual experience, supporting advanced technologies such as Dolby Atmos, 8K/4K Ultra HD, and Bluetooth streaming. It features MCACC Auto Room Tuning for optimal sound calibration in your listening environment.
2. Safety Information
- Power Supply: Connect the unit only to an AC outlet of the voltage specified on the rear panel.
- Ventilation: Ensure adequate ventilation. Do not block ventilation openings. Maintain a minimum distance of 4 inches (10 cm) from walls or other objects.
- Water and Moisture: Do not expose the unit to rain, moisture, dripping, or splashing. Do not place objects filled with liquids, such as vases, on the unit.
- Foreign Objects: Do not insert any foreign objects into the unit's openings.
- Servicing: Do not attempt to service this product yourself. Refer all servicing to qualified service personnel.
3. Package Contents
Verify that all items listed below are included in your package:
- Pioneer VSX-535 AV Receiver
- Remote Control
- Setup Microphone (for MCACC)
- FM/AM Antennas
- Power Cord
- Quick Start Guide (separate document)
4. Product Overview
4.1 Front Panel

Image Description: This image displays the front panel of the Pioneer VSX-535 AV Receiver. Key features visible include the large display screen, input selector knob on the left, master volume knob on the right, and various control buttons for functions like Tuner, Personal Preset, Bluetooth, and Setup. A headphone jack is also present.
The front panel provides access to essential controls and indicators:
- Power/Standby Button: Turns the unit on or off.
- Input Selector: Rotates to select the desired input source.
- Master Volume: Adjusts the overall sound level.
- Display: Shows current input, volume level, audio format, and other status information.
- Phones Jack: For connecting headphones.
- Setup Button: Accesses the on-screen setup menu.
- Bluetooth Button: Initiates Bluetooth pairing mode.
4.2 Rear Panel
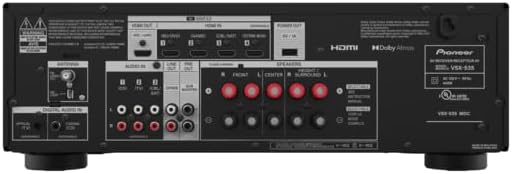
Image Description: This image shows the rear panel of the Pioneer VSX-535 AV Receiver, detailing all connection ports. Visible connections include multiple HDMI inputs and one HDMI output, speaker terminals for 5.2 channels (Front L/R, Center, Surround L/R, Subwoofer Pre-Outs), analog audio inputs, digital audio inputs (optical/coaxial), and antenna connections.
The rear panel houses all input and output connections:
- HDMI IN (1-4): Connect source devices such as Blu-ray players, game consoles, or streaming devices.
- HDMI OUT (ARC): Connect to your TV. Supports Audio Return Channel (ARC).
- Speaker Terminals: Connect your speakers (Front L/R, Center, Surround L/R).
- SUBWOOFER PRE OUT: Connect to a powered subwoofer.
- AUDIO IN (CD, TV/CD, etc.): Analog audio inputs for various devices.
- DIGITAL AUDIO IN (OPTICAL/COAXIAL): Digital audio inputs.
- FM/AM ANTENNA: Connect the supplied antennas for radio reception.
5. Setup
5.1 Speaker Connections
Connect your speakers to the corresponding terminals on the rear panel. Ensure correct polarity (+ to + and - to -) for each speaker. The VSX-535 supports a 5.2 channel configuration.
- Connect Front Left and Right speakers.
- Connect the Center speaker.
- Connect Surround Left and Right speakers.
- Connect up to two powered subwoofers to the SUBWOOFER PRE OUT jacks.
5.2 HDMI Connections
For optimal video and audio performance, use high-quality HDMI cables.
- Connect your source devices (e.g., Blu-ray player, game console, streaming device) to the HDMI IN ports on the receiver. The VSX-535 supports HDMI 2.1a for 8K60 and 4K120 video.
- Connect the HDMI OUT (ARC) port on the receiver to an HDMI input on your TV that supports ARC (Audio Return Channel).
5.3 Power Connection
After all audio and video connections are made, connect the supplied power cord to the receiver and then to a wall outlet.
5.4 Initial Setup and MCACC Auto Room Tuning
Upon first power-on, the receiver will guide you through an initial setup process using an on-screen display (OSD) on your connected TV. This includes network setup and speaker configuration.
Utilize the included setup microphone for MCACC (Multi-Channel Acoustic Calibration System) Auto Room Tuning. Place the microphone at your primary listening position and follow the on-screen instructions. MCACC automatically detects speaker connections, measures room acoustics, and optimizes sound settings for your specific environment.
6. Operating Instructions
6.1 Power On/Off
Press the STANDBY/ON button on the front panel or the remote control to turn the receiver on or off.
6.2 Input Selection
Rotate the INPUT SELECTOR knob on the front panel or use the input buttons on the remote control to choose your desired audio/video source (e.g., HDMI 1, CD, Bluetooth).
6.3 Volume Control
Adjust the sound level using the large MASTER VOLUME knob on the front panel or the Volume +/- buttons on the remote control.
6.4 Audio Modes
The VSX-535 supports various audio modes, including Dolby Atmos and Dolby Surround. Use the SOUND RETRIEVER or SURROUND buttons on the remote to cycle through available listening modes. The Dolby Atmos Height Virtualizer feature allows for immersive sound without dedicated height speakers.
6.5 Bluetooth Streaming
To stream audio via Bluetooth:
- Press the BLUETOOTH button on the front panel or remote control. The display will show "Pairing."
- On your mobile device, enable Bluetooth and select "Pioneer VSX-535" from the list of available devices.
- Once connected, you can play audio from your device through the receiver.
7. Maintenance
To ensure the longevity and optimal performance of your receiver:
- Cleaning: Wipe the exterior with a soft, dry cloth. Do not use abrasive cleaners or solvents.
- Ventilation: Regularly check that the ventilation openings are not obstructed by dust or debris.
- Power Cord: Periodically inspect the power cord for any damage.
8. Troubleshooting
If you encounter issues, refer to the following common solutions:
- No Sound:
- Check speaker connections and polarity.
- Ensure the correct input source is selected.
- Verify that the volume is not muted or set too low.
- Confirm that the audio output settings on your source device are correct.
- No Picture:
- Check HDMI cable connections between the source, receiver, and TV.
- Ensure the TV is set to the correct HDMI input.
- Try bypassing the receiver and connecting the source directly to the TV to isolate the issue.
- Bluetooth Connection Issues:
- Ensure the receiver is in Bluetooth pairing mode.
- Delete the receiver from your device's Bluetooth list and try pairing again.
- Move your device closer to the receiver.
- Receiver Not Responding:
- Unplug the power cord from the wall outlet, wait for 30 seconds, then plug it back in.
- Perform a factory reset (refer to the full online manual for specific steps, as this will erase all settings).
9. Specifications
| Feature | Specification |
|---|---|
| Model Number | VSX-535 |
| Surround Sound Channel Configuration | 5.2 Channel |
| Product Dimensions | 12.54 x 17.13 x 6.31 inches |
| Item Weight | 20.8 pounds |
| Connectivity Technology | Bluetooth |
| Total HDMI Ports | 5 (4 In, 1 Out) |
| Video Encoding | H.264, H.265/HEVC |
| Special Feature | Built-In Bluetooth |
| Compatible Devices | Smartphone, Speaker |
10. Warranty and Support
Pioneer products are backed by a limited warranty. For specific warranty terms and conditions, please refer to the warranty card included with your product or visit the official Pioneer website. For technical support, product registration, or to find authorized service centers, please visit the Pioneer Brand Store or contact Pioneer customer service.


