Mroinge M711
Mroinge Non-Programmable Thermostat M711 User Manual
Model: M711
1. Product Overview
The Mroinge M711 is a non-programmable thermostat designed for multi-stage 2 Heat / 2 Cool HVAC systems. It features a large, easy-to-read LCD display that shows both room temperature and humidity. This thermostat provides straightforward control over your home's heating and cooling, focusing on simplicity and reliability.

Figure 1.1: Mroinge M711 Thermostat Front View
Its intuitive design makes it suitable for users who prefer direct control without complex programming. The thermostat can be powered by either a 24VAC power source or 2 AAA batteries, offering flexible installation options.
2. Key Features
- Large LCD Display: Clear and easy-to-read numbers for temperature and humidity.
- Multi-Stage Compatibility: Supports 2 Heat / 2 Cool systems.
- Temperature & Humidity Monitor: Displays current room temperature and humidity levels.
- Flexible Power Options: Can be powered by 24VAC or 2 AAA batteries (C-wire not required for battery operation).
- Temperature Calibration: Allows for precise adjustment of temperature readings.
- Compressor Delay Protection: Prevents frequent cycling of the compressor, extending its lifespan.
- Heating and Cooling Swing: Adjustable cycle rate for optimal comfort.

Figure 2.1: Simple Digital Thermostat Features
3. Compatibility
The Mroinge M711 thermostat is designed to work with most common HVAC systems. Please review the compatibility details below to ensure it is suitable for your system.
Compatible Systems:
- Central gas, oil, or electric furnace systems
- Multi-stage systems (2 Heat / 2 Cool)
- Heat Only Systems (Gas furnace, Electric furnace, Boiler)
- Cool Only Systems (Air conditioner)
- Millivolt Systems
Incompatible Systems:
- Heat Pump Systems (with Auxiliary or Emergency heating)
- RV systems
- 120/240V Electric Baseboard / Line Volt Systems
- Systems with thick, stranded wires connected by wire nuts
- Systems with wires labeled 110V or 120V

Figure 3.1: System Compatibility Overview
4. Installation Guide
Installing your Mroinge M711 thermostat is designed to be a straightforward process, typically taking around 30 minutes. Follow these steps carefully.
4.1. What's in the Box
- 1 x Mroinge Non-Programmable Thermostat
- 1 x Installation Manual
- 2 x Mounting screws and wall anchors
- 1 x Terminal wire label stickers

Figure 4.1: Package Contents
4.2. Pre-Installation Checklist
- Ensure your system is compatible (refer to Section 3).
- Gather necessary tools: screwdriver, wire stripper (if needed), drill (if new mounting holes are required).
- Purchase 2 AAA alkaline batteries if you plan to power the thermostat via batteries.
4.3. Wiring and Mounting Steps
- Turn Off Power: IMPORTANT! Before beginning, turn off the power to your heating and cooling system at the main circuit breaker or furnace switch.
- Remove Old Thermostat: Carefully remove the cover of your old thermostat. Take a picture of the existing wiring connections for reference. Label each wire with the provided stickers according to its terminal.
- Disconnect Wires: Disconnect the wires from the old thermostat terminals.
- Mount New Base: Separate the front of the Mroinge M711 thermostat from its backplate. Mount the new backplate to the wall using the provided screws and wall anchors. Ensure it is level.
- Connect Wires: Connect the labeled wires to the corresponding terminals on the new thermostat's backplate. Refer to the wiring diagram below.
- Install Batteries (Optional): If using battery power, insert 2 fresh AAA alkaline batteries into the battery compartment.
- Attach Thermostat Body: Carefully snap the front of the thermostat onto the mounted backplate.
- Restore Power: Turn the power back on at the circuit breaker.

Figure 4.2: Easy Installation Process
4.4. Wiring Diagram Reference
| Terminal | Description |
|---|---|
| C | Common terminal |
| O | Reversing Valve (for heat pump applications energized in Cool mode) |
| B | Reversing Valve (for heat pump applications energized in Heat mode) |
| W | Heating Relay |
| W2 | Heating Relay 2 |
| RH | 24V Power (Heating) |
| RC | 24V Power (Cooling) |
| G | Fan Relay |
| Y | Cooling Relay |
| Y2 | Cooling Relay 2 |

Figure 4.3: Thermostat Wiring Connections
5. Operating Instructions
The Mroinge M711 thermostat is designed for simple and intuitive operation.
5.1. Basic Operation
- Adjusting Temperature: Use the large UP (▲) and DOWN (▼) arrow buttons on the right side of the thermostat to set your desired temperature. The 'Set To' display will show your target temperature.
- System Mode Selection: Use the 'SYSTEM' slide switch at the bottom of the thermostat to select the operating mode:
- COOL: Activates the cooling system.
- OFF: Turns off both heating and cooling systems.
- HEAT: Activates the heating system.
- Fan Operation: Use the 'FAN' slide switch at the bottom of the thermostat to control the fan:
- ON: The fan runs continuously.
- AUTO: The fan runs only when the heating or cooling system is actively operating.
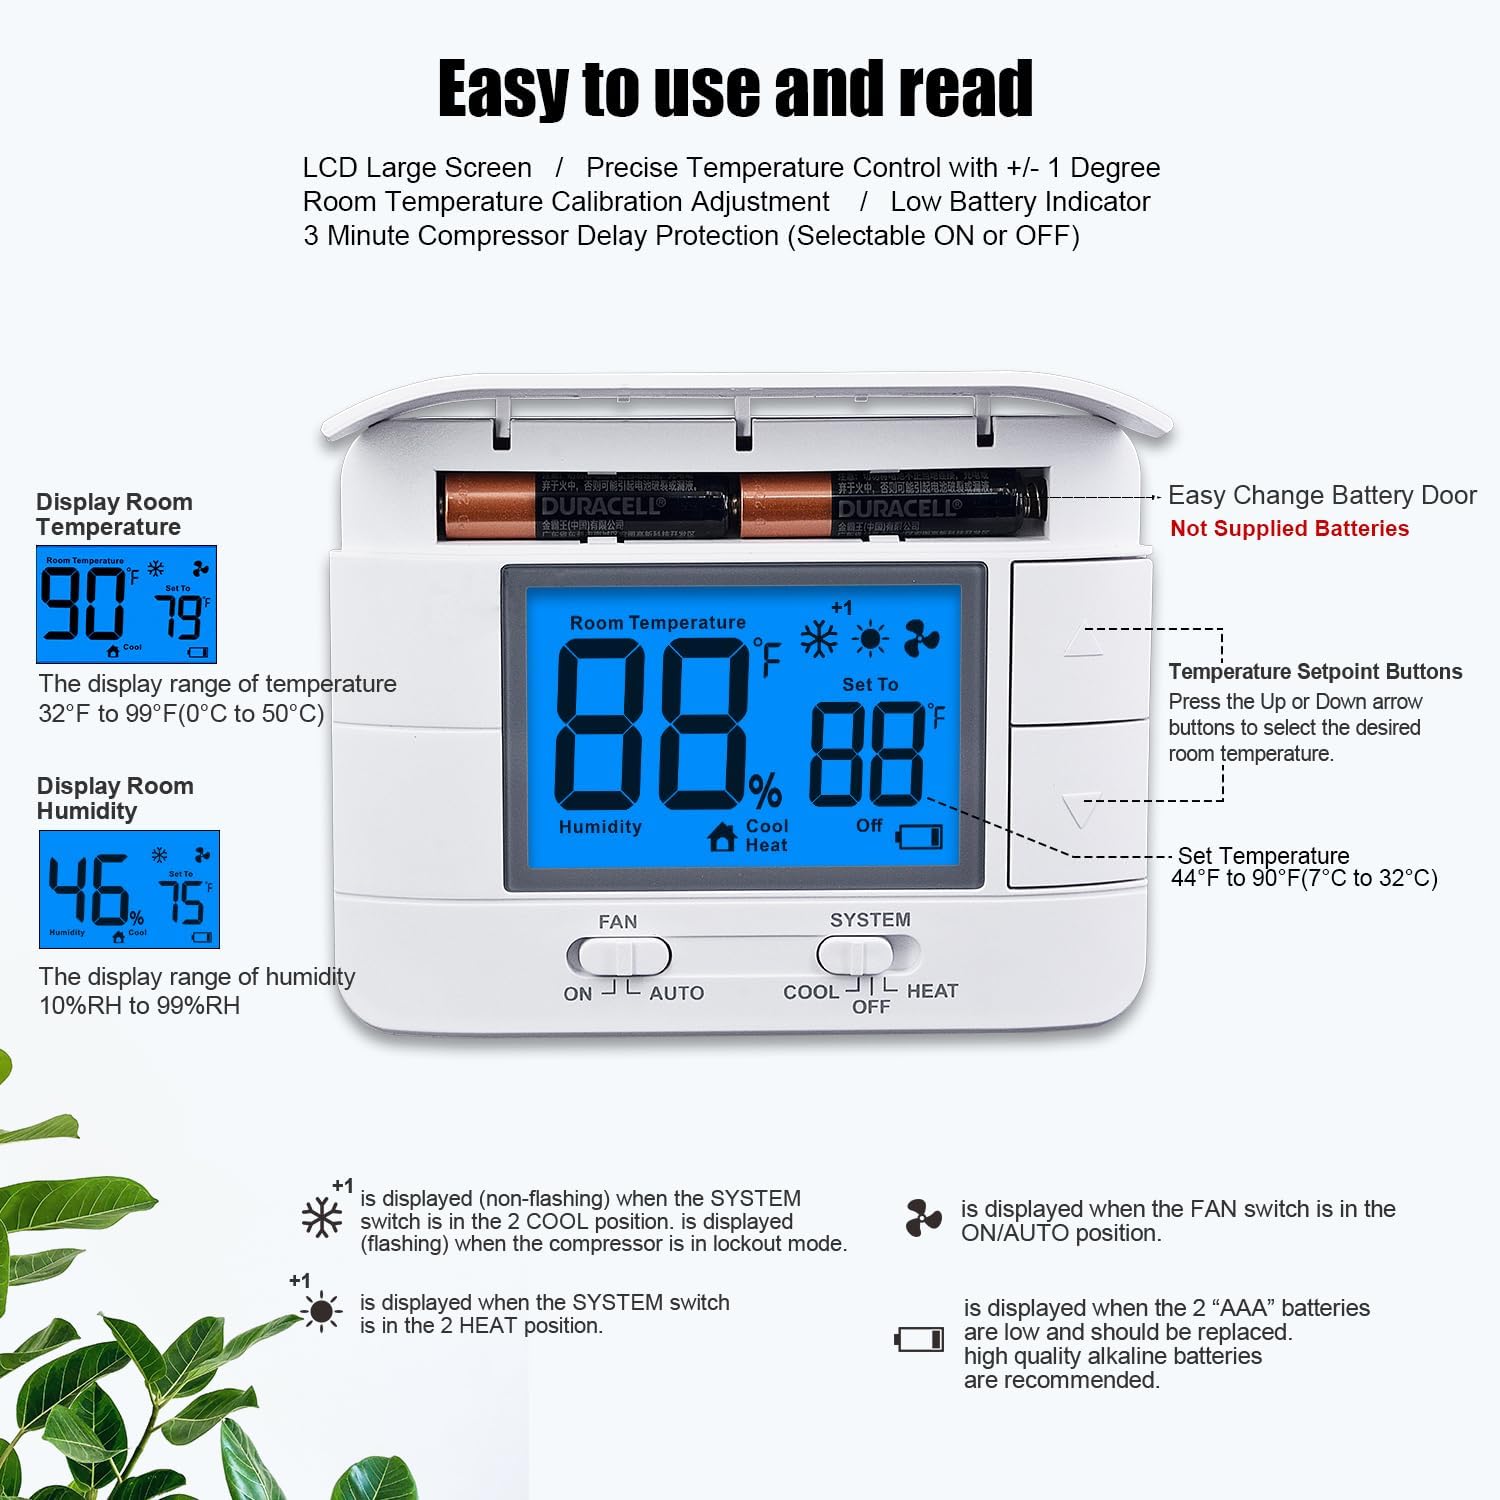
Figure 5.1: Thermostat Display and Controls
5.2. Advanced Settings
- Temperature Calibration: The thermostat allows for calibration to match other temperature readings in your home. Refer to the full installation manual for specific steps on how to enter calibration mode and adjust the offset.
- Compressor Delay Protection: This feature is built-in to protect your HVAC compressor from short cycling. It typically imposes a 3-minute delay between cycles. This feature is selectable ON or OFF; consult the full manual for adjustment.
- Heating and Cooling Swing (Cycle Rate): The swing setting, also known as differential or anticipation, determines how far the temperature can drift from the setpoint before the system activates. A smaller swing setting results in more frequent, shorter cycles, while a larger swing setting results in fewer, longer cycles. The factory default is typically 0.4°F for both heating and cooling.

Figure 5.2: Heating and Cooling Swing Setting
6. Maintenance
Regular maintenance ensures optimal performance and longevity of your thermostat.
6.1. Battery Replacement
If your thermostat is powered by batteries, replace them when the low battery indicator appears on the display. It is recommended to use high-quality AAA alkaline batteries.
- Gently pull the front cover of the thermostat away from the wall plate to access the battery compartment.
- Remove the old AAA batteries.
- Insert two new AAA alkaline batteries, ensuring correct polarity (+/-).
- Snap the front cover back onto the wall plate.
6.2. Cleaning
To clean the thermostat, gently wipe the exterior with a soft, damp cloth. Do not use abrasive cleaners, solvents, or chemical sprays, as these can damage the unit.
7. Troubleshooting
If you encounter issues with your Mroinge M711 thermostat, try the following troubleshooting steps:
- No Display / Blank Screen:
- Check if the power to your HVAC system is on at the circuit breaker.
- If using battery power, replace the AAA batteries with fresh ones.
- Ensure the thermostat is securely snapped onto its wall plate.
- Heating/Cooling Not Engaging:
- Verify the 'SYSTEM' switch is set to 'HEAT' or 'COOL' as desired.
- Check that the set temperature is appropriately above (for heating) or below (for cooling) the current room temperature.
- Allow for the compressor delay protection (approx. 3 minutes) if the system just turned off.
- Confirm that your HVAC system is receiving power.
- Review the wiring connections at the thermostat and furnace/air handler to ensure they are secure and correct (refer to Section 4.4).
- Inaccurate Temperature Reading:
- Ensure the thermostat is not exposed to direct sunlight, drafts, or heat sources (e.g., lamps, appliances) that could affect its temperature sensor.
- Perform a temperature calibration if necessary (refer to Section 5.2 or the full manual).
- Thermostat Not Responding to Button Presses:
- Ensure the batteries are not low or depleted.
- Gently press the buttons to ensure proper contact.
If these steps do not resolve the issue, please contact Mroinge customer support for further assistance.
8. Specifications
| Feature | Specification |
|---|---|
| Brand | Mroinge |
| Model Name | Thermostat (M711) |
| Product Dimensions | 0.99"D x 4.92"W x 3.74"H |
| Controller Type | Push Button |
| Special Feature | Large Display |
| Color | Blue Backlight |
| Specific Uses For Product | Non Programmable Thermostat |
| Temperature Control Type | Manual |
| Included Components | Temperature Sensor |
| Power Source | AC Adapter (24VAC) or 2 AAA Batteries |
| Item Weight | 5.92 ounces |
| Voltage | 24 Volts (AC) |
| Material | Plastic |
| Shape | Rectangular |
| Display Type | LCD |
| Control Type | Button Control |
| Control Method | Touch (buttons) |
| Mounting Type | Wall Mount |
| Backlight | Yes |

Figure 8.1: Thermostat Dimensions
9. Warranty and Support
The Mroinge M711 Non-Programmable Thermostat comes with a 2-year warranty from the date of purchase, covering defects in materials and workmanship under normal use.
For warranty claims, technical support, or any questions not covered in this manual, please contact Mroinge customer service through the retailer's platform or the official Mroinge website. Please have your product model number (M711) and proof of purchase ready when contacting support.
Ask a question about this manual
Ask about setup, troubleshooting, compatibility, parts, safety, or missing instructions. Manuals+ will review the question and use this page’s manual context to help answer it.