1. Introduction
This manual provides detailed instructions for the safe and proper installation, operation, and maintenance of your USX MOUNT Full Motion and Fixed TV Wall Mount. Please read this manual thoroughly before installation and keep it for future reference. This product is designed to securely mount flat-screen televisions within specified size and weight limits to compatible wall structures.

Image 1: Overview of the USX MOUNT Full Motion and Fixed TV Wall Mount components. The image displays both the full motion articulating arm mount and the fixed low-profile mount, along with a spirit level and cable ties.
2. Important Safety Information
WARNING: Failure to read and follow all instructions, warnings, and cautions in this manual may result in serious personal injury, damage to the product, or property damage.
- Do not begin installation until you have read and understood all instructions and warnings contained in this installation sheet. If you have any questions regarding any of the instructions or warnings, please contact your local distributor.
- This mounting bracket is intended for use only with the maximum weights indicated. Use with products heavier than the maximum weights indicated may result in instability causing possible injury.
- The wall or mounting surface must be capable of supporting the combined weight of the mount and the display.
- Always use an assistant or mechanical lifting equipment to safely lift and position the television.
- Ensure the mounting surface is free from hidden electrical wires, water pipes, or gas lines before drilling.
- Do not install on drywall alone. This mount is designed for installation on wood studs, concrete walls, or brick walls.
3. Product Specifications
| Feature | Description |
|---|---|
| TV Size Compatibility (Full Motion) | Most 42-86 inch Flat Screen/LED/4K TVs |
| TV Size Compatibility (Fixed) | Most 37-86 inch Flat Screen/LED/4K TVs |
| Weight Capacity | Up to 132 lbs (60 kg) |
| VESA Compatibility | Min: 200x100mm, Max: 600x400mm |
| Tilt Angle | +5° / -15° |
| Swivel Angle | ±45° (maximum angle depends on TV size) |
| Post-Installation Leveling | ±3° |
| Extension from Wall (Full Motion) | Extends up to 16.49 inches |
| Retraction from Wall (Full Motion) | Retracts to 2.40 inches |
| Low Profile (Fixed) | 1.1 inches from wall |
| Wall Type Compatibility | 16" Wood Studs (Full Motion), 8"/16"/24" Wood Studs (Fixed), Concrete Wall, Brick Wall |
| Material | Iron |

Image 2: Illustrates the universal compatibility of the mount, showing VESA patterns from 200x100mm to 600x400mm and compatible wall types including concrete/brick and 8"/12"/16" wood studs.

Image 3: Details the TV size compatibility (42"-86") and maximum weight capacity (132 lbs) for the mount.

Image 4: A diagram showing VESA compatibility, indicating minimum 200x100mm and maximum 600x400mm VESA patterns.
4. Package Contents
Please verify that all components are present and undamaged before installation. If any parts are missing or defective, contact USX MOUNT customer service for assistance.
- Wall Plate Assembly (Full Motion or Fixed)
- TV Brackets (2x)
- Mounting Hardware Kit (various screws, washers, spacers, anchors)
- Spirit Level
- Cable Ties
- Instruction Manual

Image 5: Highlights key features such as 132 lbs max weight, UL listing, easy tilting adjustment, ultra-strong six-arms structure, security lock, and heavy-duty steel wall plate.
5. Setup and Installation
5.1 Pre-Installation Checks
- TV Compatibility: Ensure your TV's size (37-86 inches) and weight (up to 132 lbs) are within the mount's specifications.
- VESA Pattern: Check the four mounting holes on the back of your TV. Measure the horizontal and vertical distance between them. This mount supports VESA patterns from 200x100mm to 600x400mm.
- Wall Type: Identify your wall type. This mount is suitable for wood studs (16" for full motion, 8"/16"/24" for fixed), concrete walls, and brick walls. DO NOT mount on drywall alone.
- Cable Outlets: Verify that the mount will not obstruct any cable outlets on the back of your TV.

Image 6: Illustrates the importance of checking cable outlet locations on the TV to ensure they are not blocked by the mount.

Image 7: Shows compatible wall types: 8"/12"/16" wood studs and concrete walls.
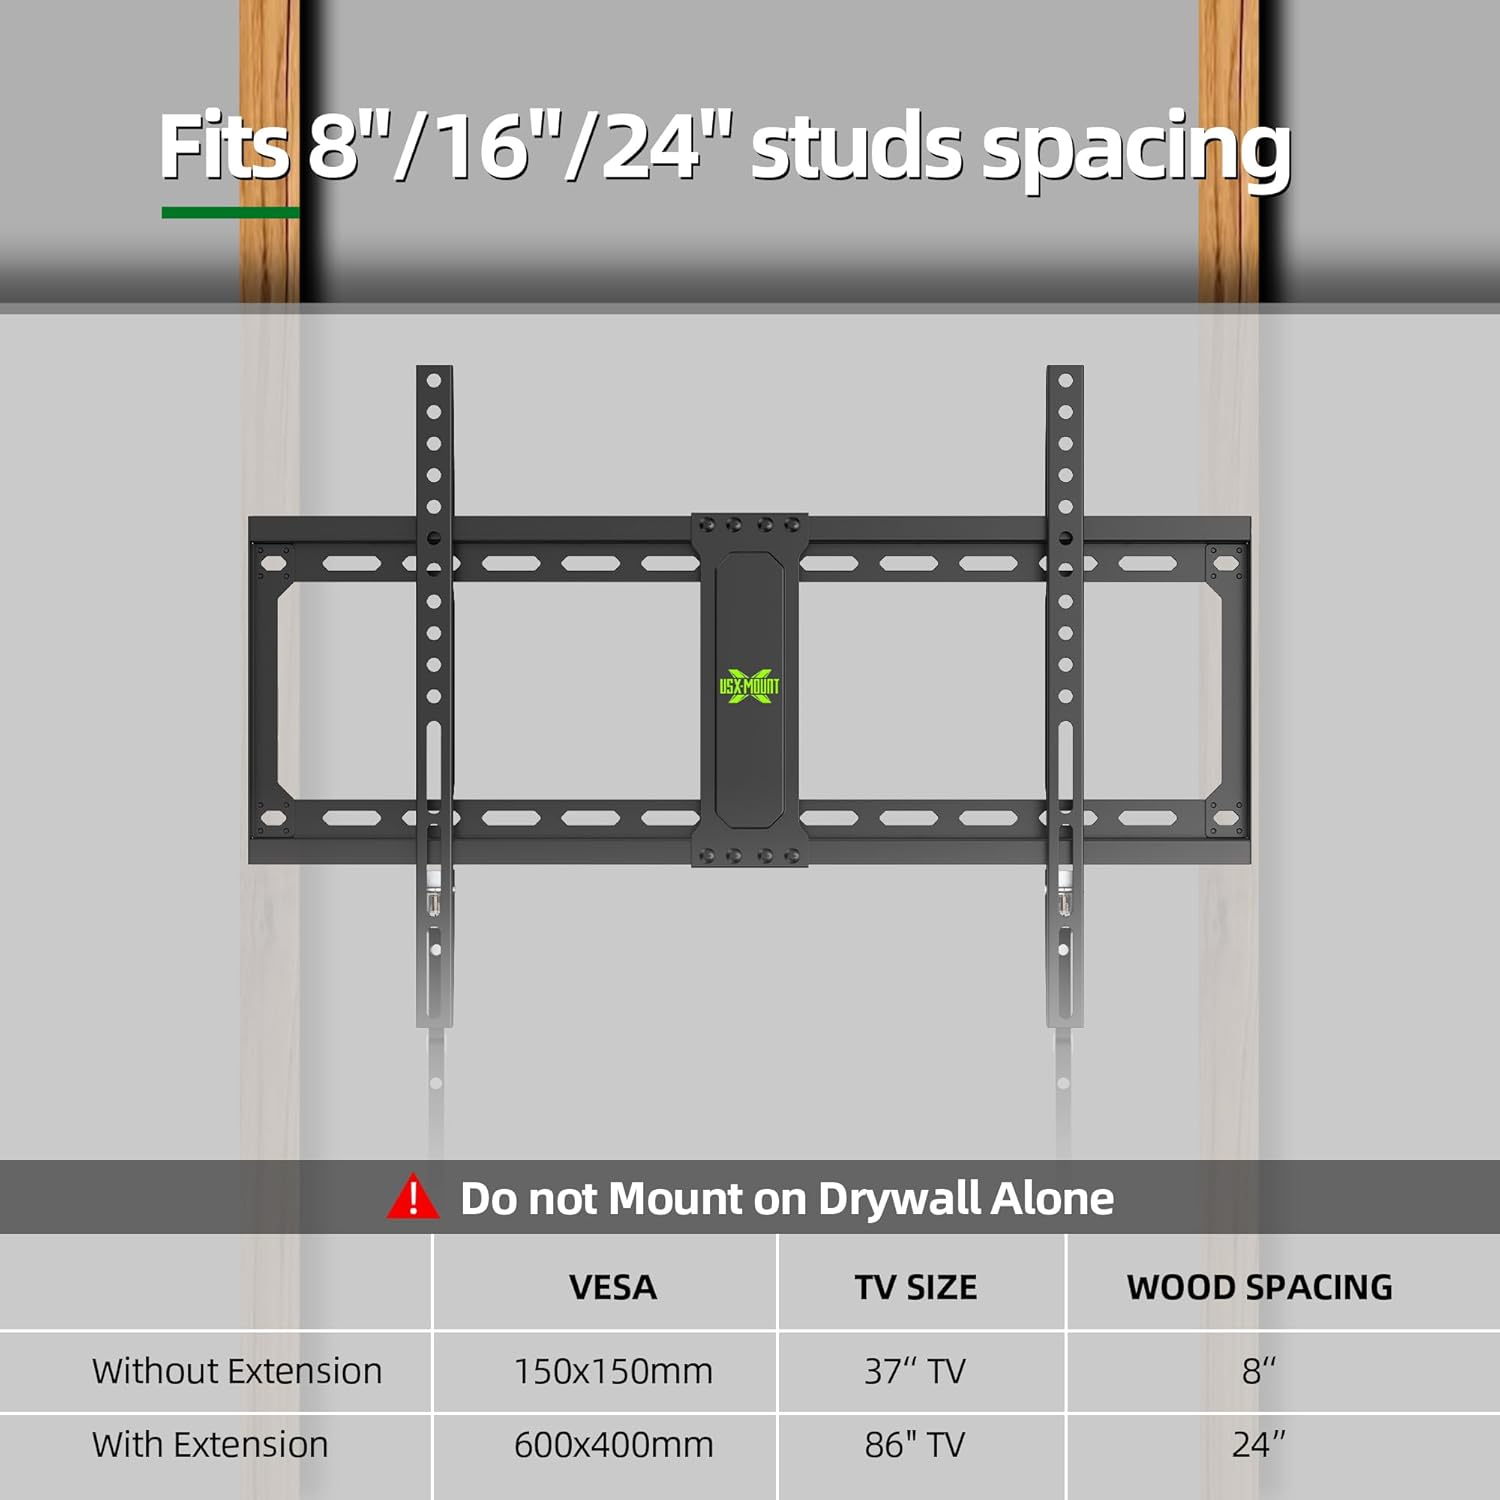
Image 8: Details stud spacing compatibility (8"/16"/24") and explicitly warns against mounting on drywall alone.
5.2 Tools Required (Not Included)
- Pencil
- Stud Finder (for wood stud installation)
- Drill with appropriate drill bits
- Socket Wrench
- Phillips Head Screwdriver
- Hammer (for concrete anchors)
5.3 Step-by-Step Installation Guide
Follow these general steps for installation. Refer to the detailed diagrams in your physical manual for specific hardware and measurements.
- Attach Brackets to TV: Secure the TV brackets to the back of your television using the appropriate screws, washers, and spacers from the hardware kit. Ensure the brackets are centered and level.
- Install Wall Plate:
- For Wood Studs: Locate the center of your wood studs using a stud finder. Mark the drilling locations. Drill pilot holes and secure the wall plate using the lag bolts and washers.
- For Concrete/Brick Walls: Use the wall plate as a template to mark drilling locations. Drill pilot holes, insert concrete anchors, and then secure the wall plate using lag bolts and washers.
- Hang the TV: Carefully lift the TV (with attached brackets) and hook it onto the wall plate. Ensure the brackets are securely seated on the wall plate. Engage any safety locks or screws to prevent accidental dislodgement.

Image 9: A visual guide demonstrating the three easy steps for assembly: 1. Mount brackets at the back of your TV, 2. Install the wall plate, 3. Hang up the TV.

Image 10: A detailed visual representation of the easy 3-step installation process, showing a person drilling, attaching brackets, installing the wall plate, and hanging the TV.
6. Operating Instructions (Adjustments)
Once installed, your USX MOUNT TV wall mount allows for various adjustments to achieve optimal viewing angles.
6.1 Tilt Adjustment
The mount allows for a tilt range of +5° (upward) to -15° (downward) to reduce glare and optimize viewing from different heights.

Image 11: Demonstrates the tilt adjustment range (+5° to -15°) and the extension capability of the full motion mount (extends 16.49", retracts 2.40").

Image 12: Shows a TV in a living room setting, illustrating the +5°/-15° tilt adjustment to reduce glare.
6.2 Swivel Adjustment (Full Motion Mount Only)
The full motion mount allows for a swivel of up to ±45° left or right, depending on your TV size and wall distance, providing flexible viewing angles from various positions in a room.

Image 13: Illustrates the ±45° swivel capability of the full motion TV mount, allowing the TV to be angled left or right.

Image 14: Depicts a TV in a kitchen setting, demonstrating the ±45° swivel for optimal viewing.
6.3 Extension and Retraction (Full Motion Mount Only)
The full motion mount can extend up to 16.49 inches from the wall and retract to a low profile of 2.40 inches, offering easy access to cables and flexible positioning.

Image 15: Shows a TV in a bedroom, highlighting the 16.49" extension feature for easy cable access.
6.4 Post-Installation Leveling
A ±3° post-installation leveling adjustment allows for minor corrections to ensure your TV is perfectly horizontal after mounting.

Image 16: Illustrates the ±3° post-installation leveling feature, useful for correcting minor alignment errors in an office setting.
7. Maintenance
- Regular Checks: Periodically check that all screws and connections are tight and secure.
- Cleaning: Clean the mount with a soft, dry cloth. Avoid abrasive cleaners or solvents.
- TV Removal: If you need to remove the TV from the mount, utilize the pull cords to disengage the safety locks. Always have an assistant when removing the TV.

Image 17: Shows the pull cords mechanism used to easily unlock and remove the TV from the wall mount.
8. Troubleshooting
| Problem | Possible Cause | Solution |
|---|---|---|
| TV is not level after installation. | Minor misalignment during wall plate installation. | Use the ±3° post-installation leveling feature to adjust. Refer to the operating instructions. |
| Difficulty adjusting tilt or swivel. | Adjustment bolts may be too tight; TV size may limit swivel range. | Loosen adjustment bolts slightly. Note that larger TVs may have reduced swivel range due to hitting the wall. |
| Mount feels loose on the wall. | Improper installation or loose fasteners. | Immediately remove the TV. Re-check all wall plate fasteners and ensure they are securely tightened into appropriate wall structures (wood studs, concrete). Do not re-mount TV until secure. |
| Missing parts in package. | Packaging error. | Contact USX MOUNT customer service for replacement parts. |
9. Warranty and Customer Support
USX MOUNT products are manufactured with quality and customer satisfaction in mind. For warranty information, technical support, or any questions regarding your product, please contact USX MOUNT customer service through the retailer where you purchased the product or visit the official USX MOUNT website for contact details.
We are committed to providing a convenient and secure viewing experience.