1. Introduction
Thank you for choosing the VASAGLE Tall Slim Bathroom Cabinet. This manual provides detailed instructions for assembly, operation, maintenance, and troubleshooting to ensure safe and efficient use of your new cabinet. Please read this manual thoroughly before beginning assembly or use, and retain it for future reference.

Image 1.1: The VASAGLE Tall Slim Bathroom Cabinet integrated into a modern bathroom environment, showcasing its compact design and storage capabilities.
2. Safety Instructions
To prevent injury or damage to the product, please adhere to the following safety guidelines:
- Always assemble the product on a clean, flat, and soft surface to avoid scratches.
- Ensure all parts are present and undamaged before assembly. Do not proceed with assembly if any parts are missing or defective.
- Follow the assembly instructions precisely. Do not force components together.
- Securely attach the anti-tipping device to the wall as instructed. This is crucial for stability and preventing accidental tipping, especially in households with children or pets.
- Do not overload shelves. Refer to the specifications section for maximum weight capacity.
- Keep small parts and packaging materials away from children to prevent choking hazards.
- Clean the cabinet with a dry cloth. Avoid abrasive cleaners or excessive moisture.

Image 2.1: Illustration of the anti-tipping device being securely fastened to the wall, emphasizing its importance for safety.
3. Package Contents
Please verify that all components listed below are included in your package:
- Cabinet Panels (various sizes)
- Adjustable Shelves (2)
- Door with integrated light
- Door hinges and hardware
- Drawer (1) and drawer slides
- Anti-tipping device
- Assembly Hardware (screws, dowels, etc.)
- Instruction Manual
4. Assembly Instructions
Follow these steps carefully for proper assembly. It is recommended to have two people for assembly.
- Prepare the Area: Clear a spacious, flat, and clean area. Lay down a blanket or cardboard to protect the cabinet parts from scratches.
- Identify Parts: Unpack all components and identify them using the provided parts list in the separate assembly guide. Each part is typically labeled.
- Assemble the Frame: Begin by connecting the main side panels to the base and top panels using the provided hardware. Ensure all connections are snug but do not overtighten.
- Install Adjustable Shelves: Insert the shelf pins into the desired height holes within the cabinet sections. Place the adjustable shelves onto these pins. The cabinet offers 5 height options for each adjustable shelf.
- Assemble and Install Drawer: Follow the specific instructions for assembling the drawer box and attaching the drawer slides. Install the assembled drawer into its designated slot.
- Attach Doors: Secure the hinges to the cabinet doors and then attach the doors to the cabinet frame. The doors can be mounted to open either to the left or to the right, depending on your preference and room layout.
- Connect Door-Activated Light: The integrated light in the upper cabinet section is designed to turn on automatically when the door opens and turn off when it closes. Ensure the light strip and sensor are correctly positioned during door installation.
- Install Anti-Tipping Device: Once the cabinet is in its final position, use the provided anti-tipping kit to secure the cabinet to the wall. This step is critical for safety.

Image 4.1: Detailed dimensions of the cabinet (30 x 30 x 170 cm) and the weight capacity for the top shelf (10 kg).

Image 4.2: Visual representation of the two installation options, allowing the doors to open either to the left (Type A) or to the right (Type B), with adjustable shelf height options indicated.
5. Operating Instructions
5.1 Door-Activated Light
The upper cabinet features an integrated light that automatically illuminates when the door is opened and turns off when the door is closed. This feature is designed to provide convenient visibility inside the cabinet, especially in dimly lit areas.

Image 5.1: A detailed view of the light strip and the door-activated switch inside the upper cabinet, illustrating how the light functions.
5.2 Adjustable Shelves
Both the upper and lower cabinet sections include adjustable shelves. To change the shelf height, simply remove the shelf, reposition the shelf pins into the desired holes, and then place the shelf back onto the pins. There are 5 height options available for each adjustable shelf, allowing you to customize storage for items of various sizes.

Image 5.2: Illustration demonstrating the adjustable shelf feature, highlighting the flexibility in shelf placement.
5.3 Storage Compartments
The cabinet is designed with various storage options:
- Shelves: Ideal for frequently used items like toiletries and bottles.
- Drawer: Perfect for concealing small personal items.
- Open Compartments: Suitable for decorative items or easily accessible essentials.
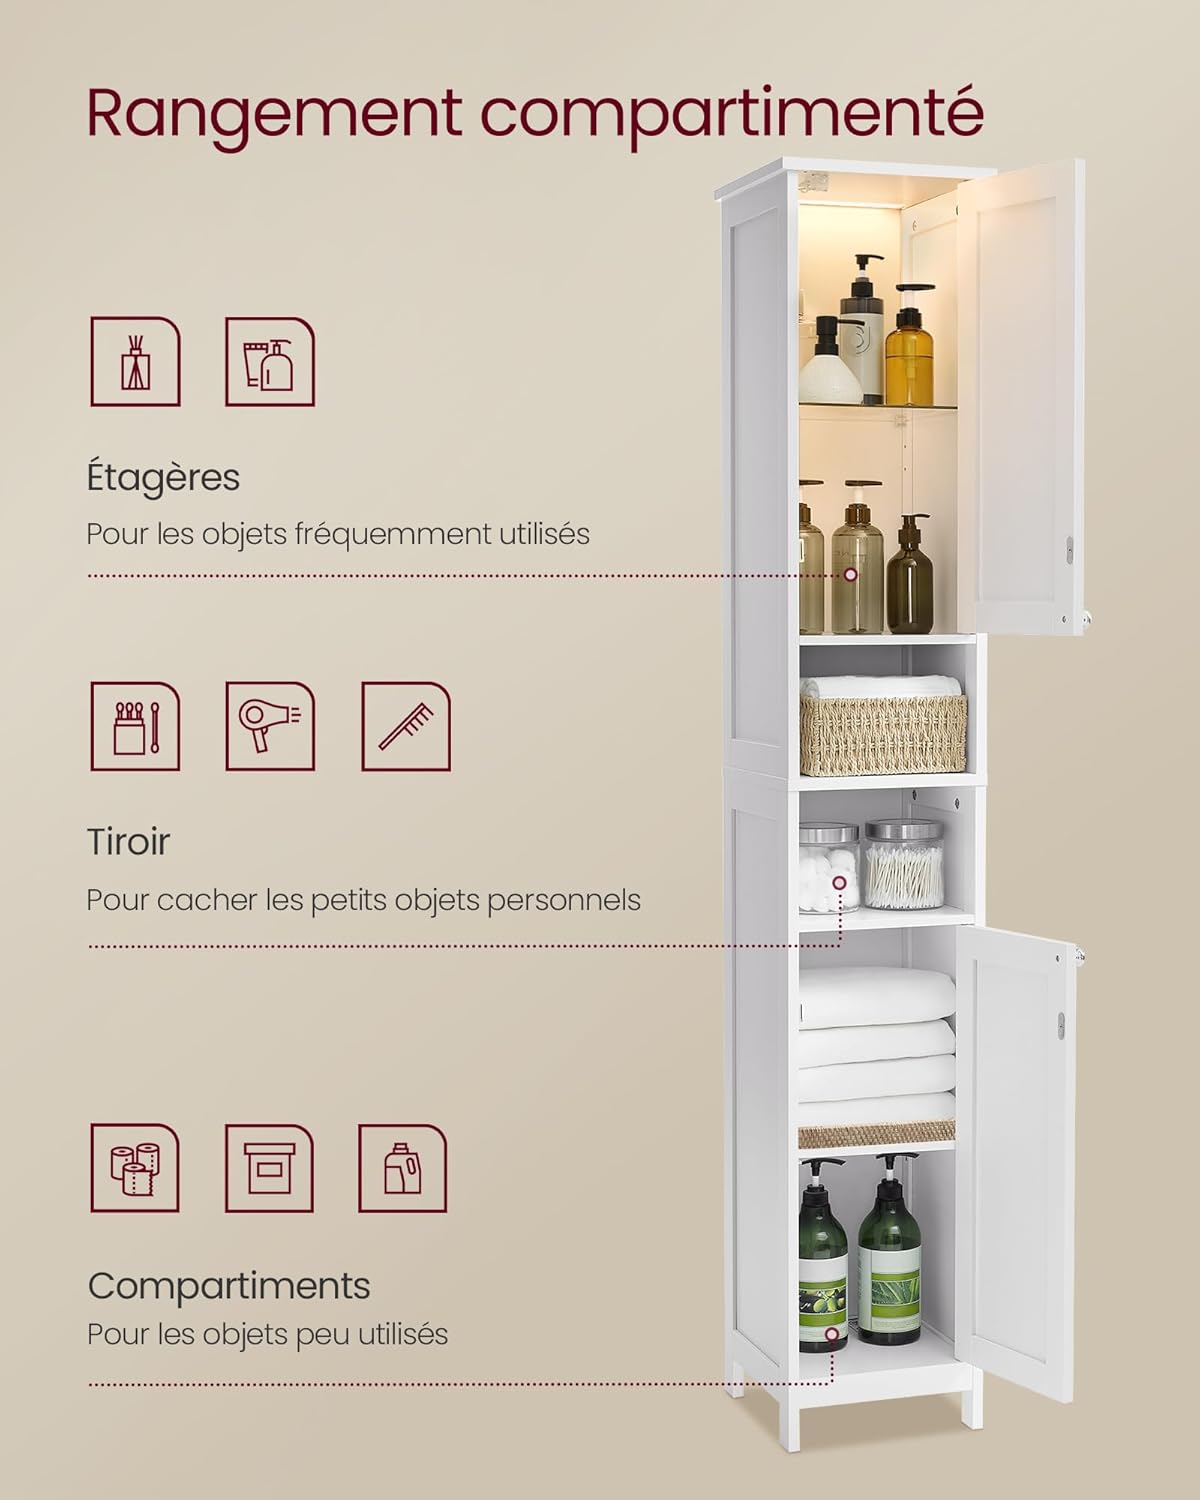
Image 5.3: Visual guide to the cabinet's compartmentalized storage, indicating optimal placement for various items.
6. Maintenance
To maintain the appearance and longevity of your VASAGLE cabinet:
- Cleaning: Wipe the cabinet surfaces with a soft, dry cloth. For stubborn marks, a slightly damp cloth can be used, followed immediately by a dry cloth.
- Avoid Harsh Chemicals: Do not use abrasive cleaners, solvents, or polishes that may damage the lacquered MDF finish.
- Moisture: While designed for bathroom use, avoid prolonged exposure to excessive moisture. Wipe up spills immediately.
- Hardware: Periodically check all screws and fittings to ensure they remain tight. Retighten if necessary.

Image 6.1: A hand wiping a surface with water droplets, illustrating the ease of cleaning the cabinet's finish.
7. Troubleshooting
| Problem | Possible Cause | Solution |
|---|---|---|
| Cabinet is wobbly/unstable. | Screws are loose; anti-tipping device not installed or improperly installed. | Ensure all assembly screws are tightened. Install the anti-tipping device securely to the wall as per instructions. |
| Door-activated light not working. | Light strip or sensor misaligned; power issue. | Check the alignment of the light strip and the sensor. Ensure the power cable for the light is properly connected. If issues persist, contact customer support. |
| Doors do not close properly. | Hinges are misaligned or loose; cabinet not level. | Adjust the hinges as needed. Ensure the cabinet is placed on a level surface. |
| Drawer sticks or is difficult to open/close. | Drawer slides are misaligned or damaged. | Check the installation of the drawer slides. Ensure they are parallel and properly lubricated if necessary. |
8. Specifications
| Feature | Detail |
|---|---|
| Model Number | BBC566W03 |
| Dimensions (L x W x H) | 30 x 30 x 170 cm (11.8 x 11.8 x 66.9 inches) |
| Weight | 15 Kilograms (33 lbs) |
| Material | Engineered Wood (Lacquered MDF) |
| Color | Cloud White |
| Number of Shelves | 2 (adjustable) + open compartments |
| Number of Drawers | 1 |
| Special Feature | Door-activated light |
| Max. Weight Capacity (Top Shelf) | 10 kg (22 lbs) |
| Assembly Required | Yes |
| Care Instructions | Wipe with a dry cloth |
9. Warranty and Support
VASAGLE products are designed for quality and durability. For any questions regarding assembly, missing parts, or product defects, please contact VASAGLE customer support directly. Please have your model number (BBC566W03) and purchase information ready when contacting support.
For more information and support, visit the official VASAGLE website or your retailer's support page.
Note: Specific warranty terms may vary by region and retailer. Please refer to your purchase documentation for detailed warranty information.