Introduction
This instruction manual provides detailed guidance for the safe and proper installation and use of your Stellar Mounts Ultra Slim Flat TV Wall Mount Bracket, Model 55S451. This mount is designed to securely hold flat-panel TVs from 37 inches to 102 inches, with a maximum weight capacity of 165 lbs (75 kg).
The low-profile design ensures your television sits close to the wall, providing a clean and modern appearance. The sliding bracket feature allows for horizontal adjustment of the screen even after installation, ensuring perfect placement.
Important Safety Information
Please read all instructions carefully before installation. If you do not understand these instructions, or have doubts about the safety of the installation, please contact a qualified installer.
- Ensure the wall structure can safely support the combined weight of the mount and the television.
- Do not exceed the maximum weight capacity of 165 lbs (75 kg).
- Use only the hardware provided or specified in this manual.
- Improper installation may result in property damage or serious injury.
- Always use appropriate safety gear during installation.
Package Contents
Verify that all components are present before beginning installation:
- TV Wall Mount Bracket (Wall Plate and TV Brackets)
- Hardware Kit (various screws, washers, spacers for TV and wall attachment)
- Bubble Level
- Instruction Manual
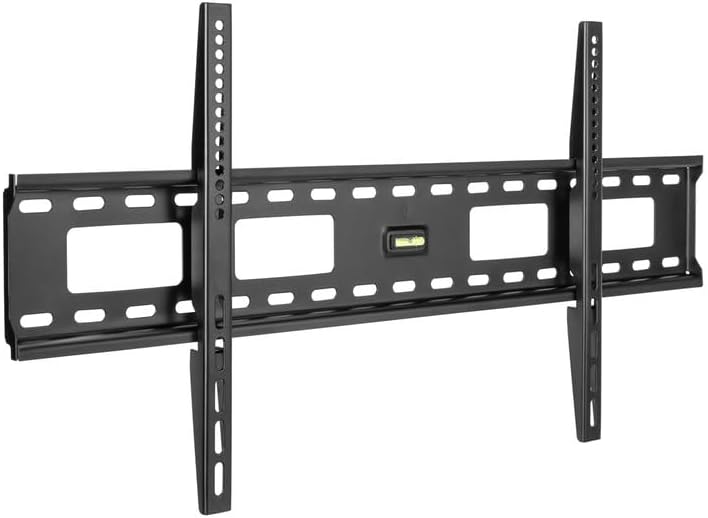
Image 1: Main components of the Stellar Mounts TV Wall Mount Bracket. This includes the wall plate, TV mounting arms, and a bubble level.
Specifications
| Feature | Detail |
|---|---|
| Model | 55S451 |
| Compatible TV Sizes | 37" – 102" |
| Maximum Weight Capacity | 165 lbs (75 kg) |
| VESA Compatibility | Max VESA 800x400mm (Min 200x200mm) |
| Profile from Wall | 1.4 inches (35mm) |
| Material | Heavy Duty Steel (Alloy Steel) |
| Color | Black |
| Movement Type | Fixed (with horizontal adjustment) |

Image 2: Visual representation of the mount's versatility, showing compatibility with various TV sizes (37"-102"), maximum load (165 lbs), and VESA mounting patterns (Min 200x200mm, Max 800x400mm).

Image 3: Diagram illustrating the ultra-slim design, showing the TV mounted approximately 1.4 inches (35mm) from the wall, contributing to a flush appearance.
Setup and Installation
The installation process involves three main steps. Ensure you have all necessary tools (e.g., drill, stud finder, screwdriver) before you begin.
Step 1: Attach Wall Plate to Wall
- Locate Mounting Position: Determine the desired height for your TV. Use a stud finder to locate wall studs for secure mounting. If mounting to concrete or brick, appropriate anchors (not always included, check hardware kit) must be used.
- Mark Drill Holes: Hold the wall plate against the wall at the desired position and use a pencil to mark the drill holes. Ensure the wall plate is level using the included bubble level.
- Drill Pilot Holes: Drill pilot holes at the marked locations. The size of the drill bit will depend on your wall type and the lag bolts provided.
- Secure Wall Plate: Attach the wall plate to the wall using the provided lag bolts and washers. Tighten securely, but do not overtighten.
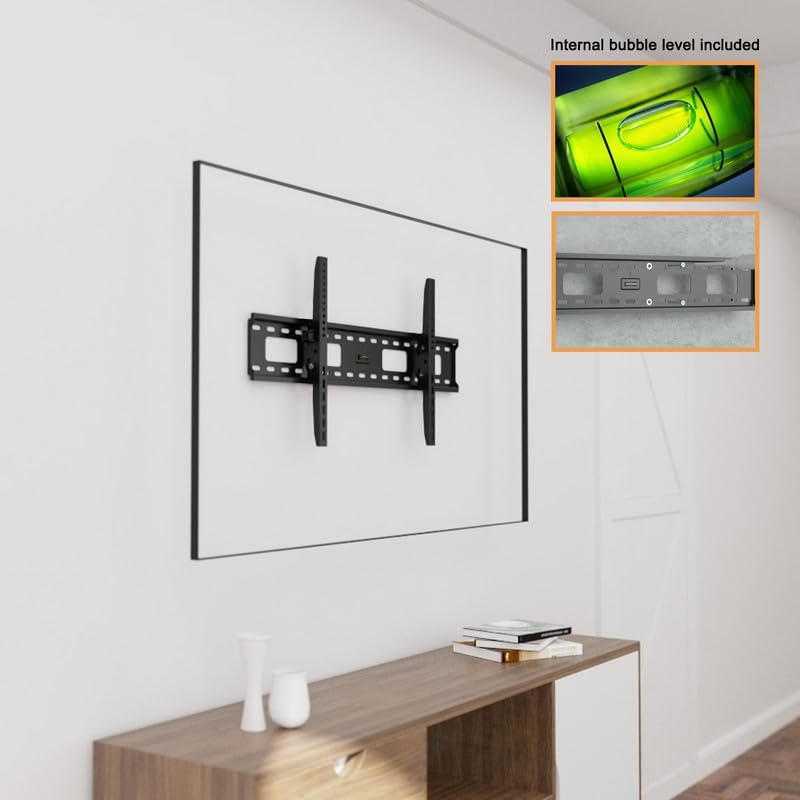
Image 4: The wall plate securely mounted to the wall, demonstrating the use of the integrated bubble level to ensure a perfectly horizontal installation.
Step 2: Attach TV Brackets to TV
- Identify VESA Holes: Lay your TV face down on a soft, clean surface. Locate the four VESA mounting holes on the back of your TV.
- Select Correct Screws: Choose the appropriate diameter and length of screws from the hardware kit that fit your TV's VESA holes. Use washers and spacers if necessary to ensure a snug fit without overtightening or damaging the TV.
- Attach Brackets: Align the TV brackets with the VESA holes and secure them using the selected screws. Ensure the brackets are oriented correctly so they can hook onto the wall plate.
Step 3: Attach TV to Wall Plate
- Lift and Hook: With assistance, carefully lift the TV and hook the attached TV brackets onto the top edge of the wall plate.
- Lower and Secure: Gently lower the TV until the brackets are fully seated on the wall plate.
- Horizontal Adjustment: The sliding bracket design allows for minor horizontal adjustments to center the TV. Slide the TV left or right as needed.
- Engage Safety Screws: Locate the safety screws on the bottom of the TV brackets. Tighten these screws to anchor the TV brackets to the wall plate, preventing accidental dislodgement and limiting movement.
Your TV is now securely mounted. Double-check all connections and ensure the TV is stable before releasing it.
Operation and Adjustment
This is a fixed wall mount designed for a low-profile installation. Once installed, the TV will remain at a fixed distance from the wall (approximately 1.4 inches).
Horizontal Adjustment: The mount features a sliding bracket design that allows for minor horizontal repositioning of the TV on the wall plate. To adjust, loosen the safety screws at the bottom of the TV brackets, slide the TV to the desired position, and then re-tighten the safety screws firmly.
Cable Management: The wall plate includes large rectangular access holes for easy routing and management of cables behind the TV. Organize your cables to maintain a clean appearance and prevent strain.
Maintenance
To ensure the longevity and safety of your TV wall mount:
- Regular Inspection: Periodically check all screws and bolts to ensure they remain tight and secure.
- Cleaning: Dust the mount with a soft, dry cloth. Avoid using abrasive cleaners or solvents, as these may damage the finish.
- Weight Limit: Do not hang additional items or exceed the maximum weight capacity of the mount.
Troubleshooting
If you encounter any issues during or after installation, refer to the following common solutions:
- TV is not level:
Ensure the wall plate was installed perfectly level. If not, you may need to re-adjust the wall plate. For minor adjustments, some mounts allow for slight tilting or rotation of the TV brackets; however, this fixed mount primarily relies on the wall plate's levelness. Re-check with the bubble level.
- TV feels unstable or loose:
Verify that all wall plate bolts are securely tightened into wall studs or appropriate anchors. Ensure the TV brackets are fully seated on the wall plate and the safety screws are firmly tightened.
- Cannot find correct screws for TV:
The hardware kit includes a variety of screws. Consult your TV's manual for its specific VESA screw requirements. If none of the provided screws fit, you may need to purchase compatible screws separately.
Warranty and Support
For warranty information or technical support, please refer to the contact details provided with your purchase or visit the official Stellar Mounts website. Keep your purchase receipt as proof of purchase.
For additional assistance, you may contact Stellar Mounts customer service.