1. Product Overview
The Racer X Rush Gaming Chair is designed to provide ergonomic support and comfort for extended periods of use, whether for gaming or office work. This chair features a reclining backrest, adjustable height, and a swivel base, making it adaptable to various user preferences and tasks.
Key features include:
- Reclining backrest (90° to 180°)
- Adjustable seat height
- 360-degree swivel base
- Adjustable armrests
- Removable headrest and lumbar support cushions
- Durable PU leather upholstery

Image 1.1: Front view of the assembled Racer X Rush Gaming Chair in blue and black. The chair features a high backrest, adjustable armrests, a five-star base with wheels, and two removable cushions for head and lumbar support.
2. Safety Information
Please read all instructions carefully before assembly and use. Retain this manual for future reference.
- Maximum Weight Capacity: Do not exceed the maximum supported weight of 130 kg (286 lbs). Exceeding this limit may cause damage to the chair and potential injury.
- Assembly: Ensure all components are securely fastened before use. Periodically check all screws and bolts for tightness.
- Children: Keep small parts away from children during assembly. This chair is not a toy.
- Stability: Avoid standing on the chair or using it for purposes other than sitting. Do not lean excessively to one side or the other, especially when reclining, to prevent tipping.
- Movement: Use caution when moving the chair, especially on uneven surfaces.
3. Package Contents
Verify that all components are present before beginning assembly. If any parts are missing or damaged, please contact customer support.
- Backrest
- Seat Base
- Armrests (2)
- Five-star Base
- Casters (5)
- Gas Lift Cylinder
- Gas Lift Cover
- Mechanism Plate
- Headrest Cushion
- Lumbar Support Cushion
- Hardware Pack (screws, washers, Allen key)
4. Setup and Assembly Instructions
Follow these steps to assemble your Racer X Rush Gaming Chair. It is recommended to assemble the chair on a soft, clean surface to prevent damage.
- Attach Casters to Base: Insert the five casters into the holes at the end of each leg of the five-star base. Push firmly until they click into place.
- Install Gas Lift: Place the gas lift cylinder into the center hole of the five-star base. Cover the gas lift with the telescopic cover.
- Attach Mechanism to Seat: Align the mechanism plate with the screw holes on the underside of the seat base. Ensure the front of the mechanism faces the front of the seat. Secure with screws from the hardware pack.
- Attach Armrests to Seat: Attach the armrests to the sides of the seat base using the provided screws. Do not fully tighten yet.
- Attach Backrest to Seat: Align the backrest with the mounting brackets on the seat base and armrests. Secure with screws. Once the backrest is attached, fully tighten all armrest screws.
- Connect Seat to Base: Carefully place the assembled seat and backrest onto the gas lift cylinder, ensuring the center hole of the mechanism plate aligns with the top of the gas lift.
- Attach Cushions: Secure the headrest and lumbar support cushions using their elastic straps through the designated slots on the backrest.

Image 4.1: Side view of the assembled Racer X Rush Gaming Chair, showcasing the profile and the attachment points for the armrests and backrest. This image provides a visual reference for the completed assembly.
5. Operating Instructions
Your Racer X Rush Gaming Chair offers several adjustment options to customize your seating experience.
5.1. Height Adjustment
To adjust the seat height, pull the lever located on the right side of the seat (when seated) upwards. While holding the lever, lift your weight off the seat to raise it, or remain seated to lower it. Release the lever at the desired height.
5.2. Recline Adjustment
To recline the backrest, pull the lever located on the left side of the seat (when seated) upwards. Lean back to the desired angle (between 90° and 180°). Release the lever to lock the backrest in position. To return to an upright position, pull the lever again and lean forward slightly.

Image 5.1: Diagram illustrating the recline system of the Racer X Rush chair. It shows recommended angles for working (100°), reading (120°), relaxing (155°), and total recline (180°), with an arrow pointing to the recline valve/lever.
5.3. Armrest Adjustment
The armrests are adjustable. To adjust their height, press the button located on the side of each armrest post and move the armrest up or down. Release the button to lock it in place.
5.4. Swivel Function
The chair features a 360-degree swivel base, allowing for easy rotation without moving the entire chair.
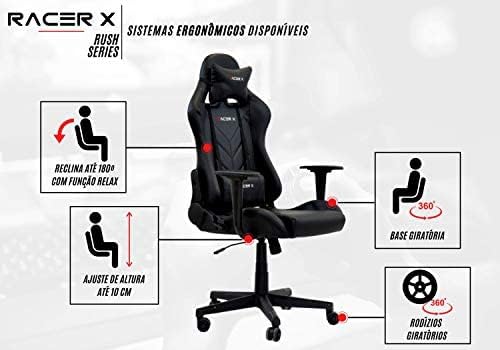
Image 5.2: Diagram highlighting the ergonomic systems available on the Racer X Rush chair. It shows the 180° recline with relax function, up to 10 cm height adjustment, 360° swivel base, and rotating casters.
6. Maintenance
Proper maintenance will extend the life and appearance of your gaming chair.
- Cleaning: For PU leather upholstery, wipe with a soft, damp cloth. For stubborn stains, use a mild soap solution and wipe dry immediately. Avoid harsh chemicals or abrasive cleaners.
- Hardware Check: Periodically (every 3-6 months) check all screws and bolts to ensure they are tight. Re-tighten if necessary to maintain stability and prevent squeaking.
- Caster Care: Keep casters clean from hair and debris to ensure smooth rolling.
- Avoid Direct Sunlight: Prolonged exposure to direct sunlight can cause the PU leather to fade or crack.
7. Troubleshooting
If you encounter any issues with your chair, refer to the following common problems and solutions:
- Chair does not adjust height: Ensure the gas lift lever is fully engaged. If the chair is new, the gas lift might need a few uses to function smoothly. Check if the gas lift cylinder is properly seated in the base and mechanism.
- Chair is unstable/wobbly: Check all assembly screws, especially those connecting the armrests, backrest, and mechanism to the seat. Ensure they are all tightened securely. Verify that the casters are fully inserted into the base.
- Squeaking noises: This is often caused by loose hardware. Re-tighten all screws and bolts. A small amount of silicone lubricant can be applied to moving parts if the noise persists, avoiding contact with upholstery.
- Casters not rolling smoothly: Check for hair, dust, or debris wrapped around the caster wheels. Clean them thoroughly.
If these solutions do not resolve the issue, please contact customer support.
8. Specifications

Image 8.1: Product dimensions diagram for the Racer X Rush chair. It indicates a total height range of 1.20m to 1.30m, a base width of 0.75m, seat width of 0.53m, seat depth of 0.51m, backrest width of 0.45m, and backrest height of 0.78m.
| Feature | Detail |
|---|---|
| Brand | Racer X |
| Model | Rush |
| Color | Blue Light |
| Upholstery Material | PU Leather |
| Backrest Structure | Metal |
| Foam Density (Seat) | 50 kg/m³ |
| Foam Density (Backrest) | 35 kg/m³ |
| Gas Lift Class | Class 3 |
| Height Adjustment Range | 100 mm (approx. 10 cm) |
| Mechanism Type | Butterfly |
| Recline Angle | 90° - 180° |
| Maximum Supported Weight | 130 kg (286 lbs) |
| Recommended User Height | Up to 2 meters (6'7") |
| Product Weight | 16 kg (35.3 lbs) |
| Overall Dimensions (Min Height) | Approx. 65 cm (D) x 75 cm (W) x 120 cm (H) |
| Overall Dimensions (Max Height) | Approx. 65 cm (D) x 75 cm (W) x 130 cm (H) |
| Seat Dimensions | 53 cm (W) x 51 cm (D) |
| Backrest Dimensions | 45 cm (W) x 78 cm (H) |
9. Warranty Information
Warranty information for this product was not provided in the available data. Please refer to your purchase documentation or contact the retailer for details regarding warranty coverage.
10. Customer Support
Specific customer support contact information was not provided in the available data. For assistance, please contact the retailer or the point of purchase.