Introduction
This manual provides detailed instructions for the installation, operation, and maintenance of your Nexete Universal Ceiling Fan Wall Remote Control, Model BY06. This in-wall wired switch is designed to replace existing wall controls for ceiling fans, offering adjustable 3-speed fan control and light dimming capabilities. It is compatible with various ceiling fan receivers, including those from Hampton Bay, Harbor Breeze, and Hunter.
Important Safety Information
- WARNING! This switch requires connection to Live and Load wires only. DO NOT connect the "NEUTRAL" supply wire of the electric circuit to the transmitter wall switch. Doing so can cause damage to the transmitter and may result in fire.
- Always turn off power at the circuit breaker before installing or servicing the control.
- Installation should be performed by a qualified electrician or in accordance with local electrical codes.
- Ensure all wire connections are secure and properly insulated.
- This device is for indoor use only.
Product Features

Image: Nexete Wall Remote Control with its key features labeled, including power switch, fan off button, 3 fan speeds (High/Medium/Low), and light dimmer function.
- In-Wall Wired Switch: Designed as a direct replacement for existing wall controls, requiring no neutral wire.
- 4 DIP Switches: Features 16 selectable code frequencies to prevent interference and allow pairing with specific receivers.
- 3-Speed Fan Control: Offers High, Medium, Low, and Fan Off settings.
- Light Dimming Capability: Press and hold the light button to cycle through the dimming range.
- On/Off Power Switch: A dedicated slide switch to turn the main power to the unit on or off.
- Dual Control Option: Can be used independently or in conjunction with a handheld remote control (receiver not included).
- Standard Junction Box Mount: Designed for easy installation into a standard electrical junction box.
Compatibility
The Nexete BY06 wall control is designed for broad compatibility with various ceiling fan systems. It is a replacement for many popular remote models and works with specific receiver types.
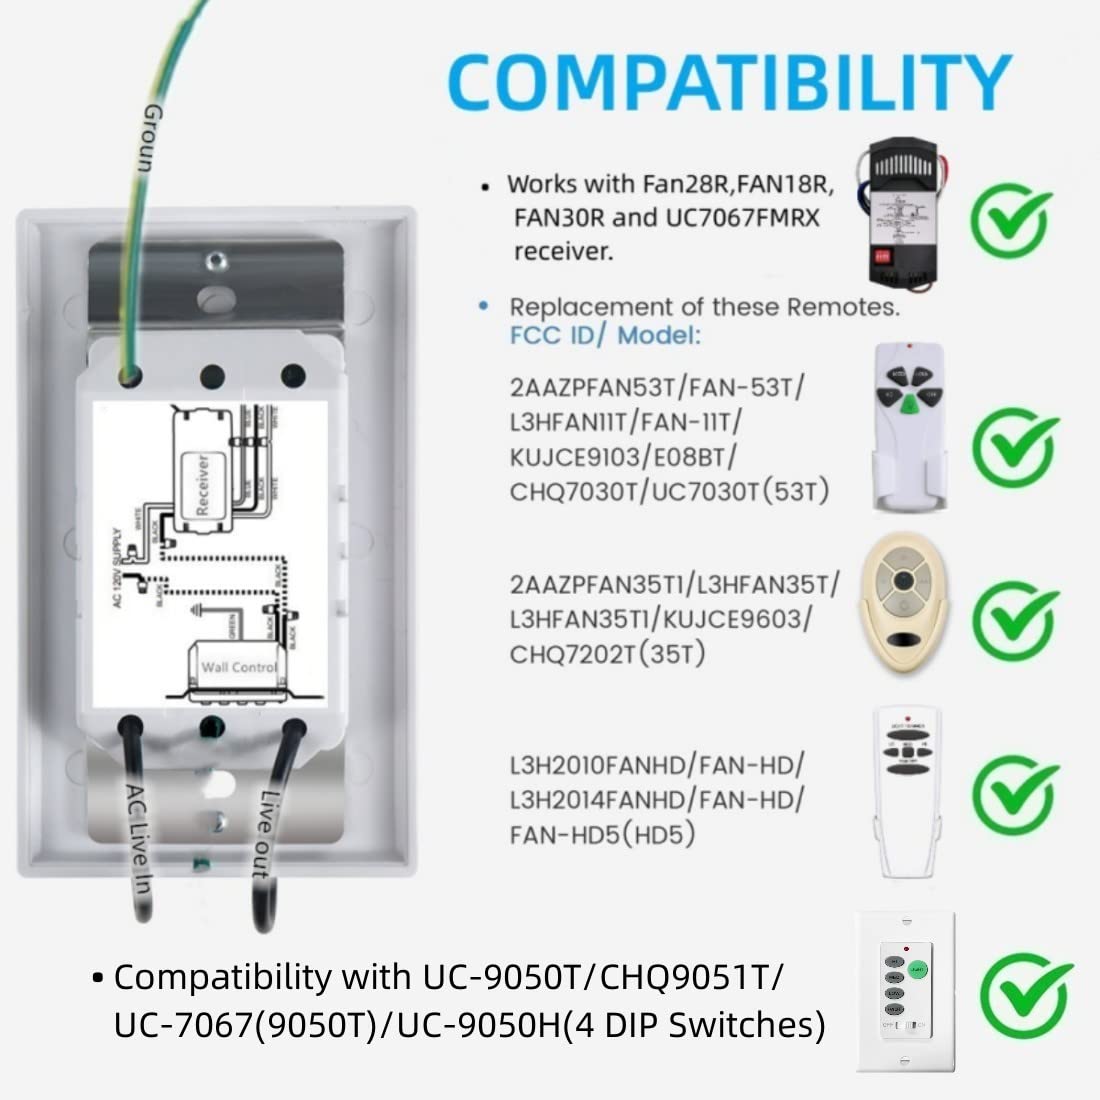
Image: A compatibility chart listing various remote control models and FCC IDs, such as UC9050T, UC9050U, CHQ9051T, 53T, 35T, and HD5, indicating the Nexete BY06's compatibility.

Image: A chart illustrating compatibility with fan types (most downrod style fans) and lamp types (Halogen, Incandescent, Dimmable LED, Dimmable CFL). It explicitly states incompatibility with wall-mounted or exhaust-type fans.
Specifically, it is compatible with the UC9050T, UC9050U, CHQ9051T, 53T, 35T, and HD5 remote models. It works with Fan28R, FAN18R, FAN30R, and UC7067FMRX receivers. This wall control is suitable for most downrod style ceiling fans and supports Halogen, Incandescent, Dimmable LED, and Dimmable CFL lamps. It is not compatible with wall-mounted fans or exhaust-type fans.
Setup and Installation
1. DIP Switch Configuration

Image: A detailed view of the 4 DIP switches located on the side of the wall control, showing their numbered positions and the 'ON' indicator. This image also includes tips for setting the switches.
- Before installation, locate the DIP switches on your existing ceiling fan receiver (not included) and the Nexete BY06 wall control.
- Set the 4 DIP switches on the Nexete BY06 wall control to the exact same pattern as the DIP switches on your ceiling fan receiver. This ensures proper communication.
- It is easier to verify the switch settings before fully installing the unit into the wall.
- If controlling multiple ceiling fans, set different DIP switch patterns for each fan and its corresponding wall control/remote to prevent interference.
2. Wiring Instructions

Image: A detailed wiring diagram illustrating how to connect the Nexete wall control to the AC supply, a ceiling fan receiver (not included), and the ceiling fan itself. A prominent warning advises against connecting a neutral wire to the wall switch.
- Turn off power: Before beginning, ensure the power to the circuit is OFF at the main circuit breaker.
- This wall control is designed to mount into a standard junction box.
- Connect the wall control to the Live wire and Load wire only. This unit does NOT require a neutral wire connection.
- Refer to the provided wiring diagram for specific connections. The receiver is not included with this product.
- Secure all wire connections with wire nuts and ensure they are properly insulated.
- Carefully push the wired switch into the junction box and secure it with screws. Attach the wall plate.
- Once installation is complete, restore power at the circuit breaker.
Operating Instructions

Image: The front panel of the Nexete wall control, displaying the fan speed buttons (HI, MED, LOW, FAN OFF), the LIGHT button, and the main OFF/ON slide switch.
Fan Control
- Power On/Off: Use the slide switch at the bottom of the control to turn the main power to the fan and light on or off.
- Fan Speed: Press the HI, MED, or LOW buttons to select the desired fan speed.
- Fan Off: Press the FAN OFF button to turn the fan off.
Light Control
- Light On/Off: Press the LIGHT button to turn the light on or off.
- Dimming: When the light is on, press and hold the LIGHT button to cycle through the dimming range. Release the button when the desired brightness is reached.
Ceiling Fan Reverse Switch

Image: A visual guide demonstrating the function of a ceiling fan's reverse switch, showing how counter-clockwise rotation is ideal for summer cooling and clockwise rotation for winter heat distribution.
Many ceiling fans include a reverse switch, typically located on the motor housing. This switch changes the direction of the fan blades. For optimal air circulation:
- Summer Operation: Set the switch for counter-clockwise rotation to create a downdraft, providing a cooling effect.
- Winter Operation: Set the switch for clockwise rotation to create an updraft, circulating warm air near the ceiling throughout the room.
- Always ensure the fan is completely off before changing the direction of the reverse switch.
Troubleshooting
- Fan or Light Not Responding:
- Ensure the main ON/OFF slide switch on the wall control is in the "ON" position.
- Verify that the DIP switches on the wall control match the settings on your ceiling fan receiver.
- Check the circuit breaker to ensure power is supplied to the fan.
- Inspect wiring connections for any loose or incorrect connections, especially ensuring no neutral wire is connected to the wall switch.
- Interference with Other Fans/Remotes:
- If another fan or remote is activating this ceiling fan, change the DIP switch settings on both the wall control and the receiver to a different, unique pattern.
- Light Not Dimming:
- Ensure you are using dimmable light bulbs. Non-dimmable bulbs will not dim and may flicker or be damaged.
- Press and hold the LIGHT button to activate the dimming function. A quick press will only turn the light on/off.
Specifications
| Attribute | Detail |
|---|---|
| Brand | Nexete |
| Model Number | BY06 |
| Product Dimensions | 5.3 x 4.8 x 2.8 inches |
| Item Weight | 4.97 ounces |
| Power Source | 120V AC (No Neutral wire Required) |
| Operation Mode | ON-OFF |
| Current Rating | 1 Amps |
| Operating Voltage | 120 Volts |
| Contact Type | Normally Closed |
| Connector Type | Clamp |
| Terminal | Screw |
| Circuit Type | 1-way |
| Mounting Type | Wall Mount |

Image: Physical dimensions of the Nexete wall control, indicating a height of 11.5 cm (4.52 inches) and a width of 7 cm (2.75 inches).
Warranty and Support
Specific warranty information for the Nexete Universal Ceiling Fan Wall Remote Control (Model BY06) is not provided in the product details. For warranty claims, technical support, or further assistance, please contact Nexete customer service directly through their official channels or the retailer where the product was purchased.
You can visit the Nexete Store for more information: Nexete Store on Amazon