REEWISLY S868+869+870+871 4set
REEWISLY Embroidery Starter Kit Instruction Manual
Model: S868+869+870+871 4set
Introduction
This manual provides comprehensive instructions for using your REEWISLY 4-piece Embroidery Starter Kit. Designed for beginners and adults, this kit allows you to create beautiful abstract art patterns through embroidery. Please read through these instructions carefully before beginning your project to ensure a successful and enjoyable experience.

Image: Overview of the REEWISLY Embroidery Starter Kit, showcasing the four distinct abstract art patterns on fabric within embroidery hoops, along with the included colored threads, needles, and instruction manuals.
What's Included
Your REEWISLY Embroidery Starter Kit contains the following components:
- 4 pcs Cotton Fabric with Patterns: Each fabric piece measures 11.8 inches x 11.8 inches (30 cm) and features a pre-printed abstract art design.
- 2 pcs Plastic Embroidery Hoops: Each hoop measures 7.8 inches (20 cm) in diameter and includes a brass adjusting screw.
- 1 pc Scissors: A small pair of scissors for cutting threads.
- 4 Manuals: Detailed English instruction manuals for each pattern.
- 8 Pins: For various uses during the embroidery process.
- Enough Colored Thread: A comprehensive selection of colored embroidery threads required for all four patterns.
- Needles: Appropriate needles for embroidery.

Image: All individual components of the embroidery kit laid out, including the pre-printed fabrics, embroidery hoops, various colored threads, needles, and the instruction sheets, ready for setup.
Setup Instructions
Follow these steps to prepare your embroidery project:
- Unpack Materials: Carefully open the material package and identify all components listed in the "What's Included" section.
- Prepare the Embroidery Hoop:
- Loosen the brass adjusting screw on the embroidery hoop.
- Separate the inner ring from the outer ring of the hoop.
- Position the Fabric:
- Place one of the cotton fabric pieces with the pre-printed pattern over the inner ring.
- Carefully place the outer ring over the fabric and inner ring, ensuring the fabric is taut and centered within the hoop.
- Tighten the brass adjusting screw on the outer ring to secure the fabric firmly in place. The fabric should be drum-tight to facilitate smooth stitching.
- Review Instructions: Refer to the detailed English instruction manual provided for your specific pattern. This manual will guide you on thread numbers, stitch methods, and color placement.
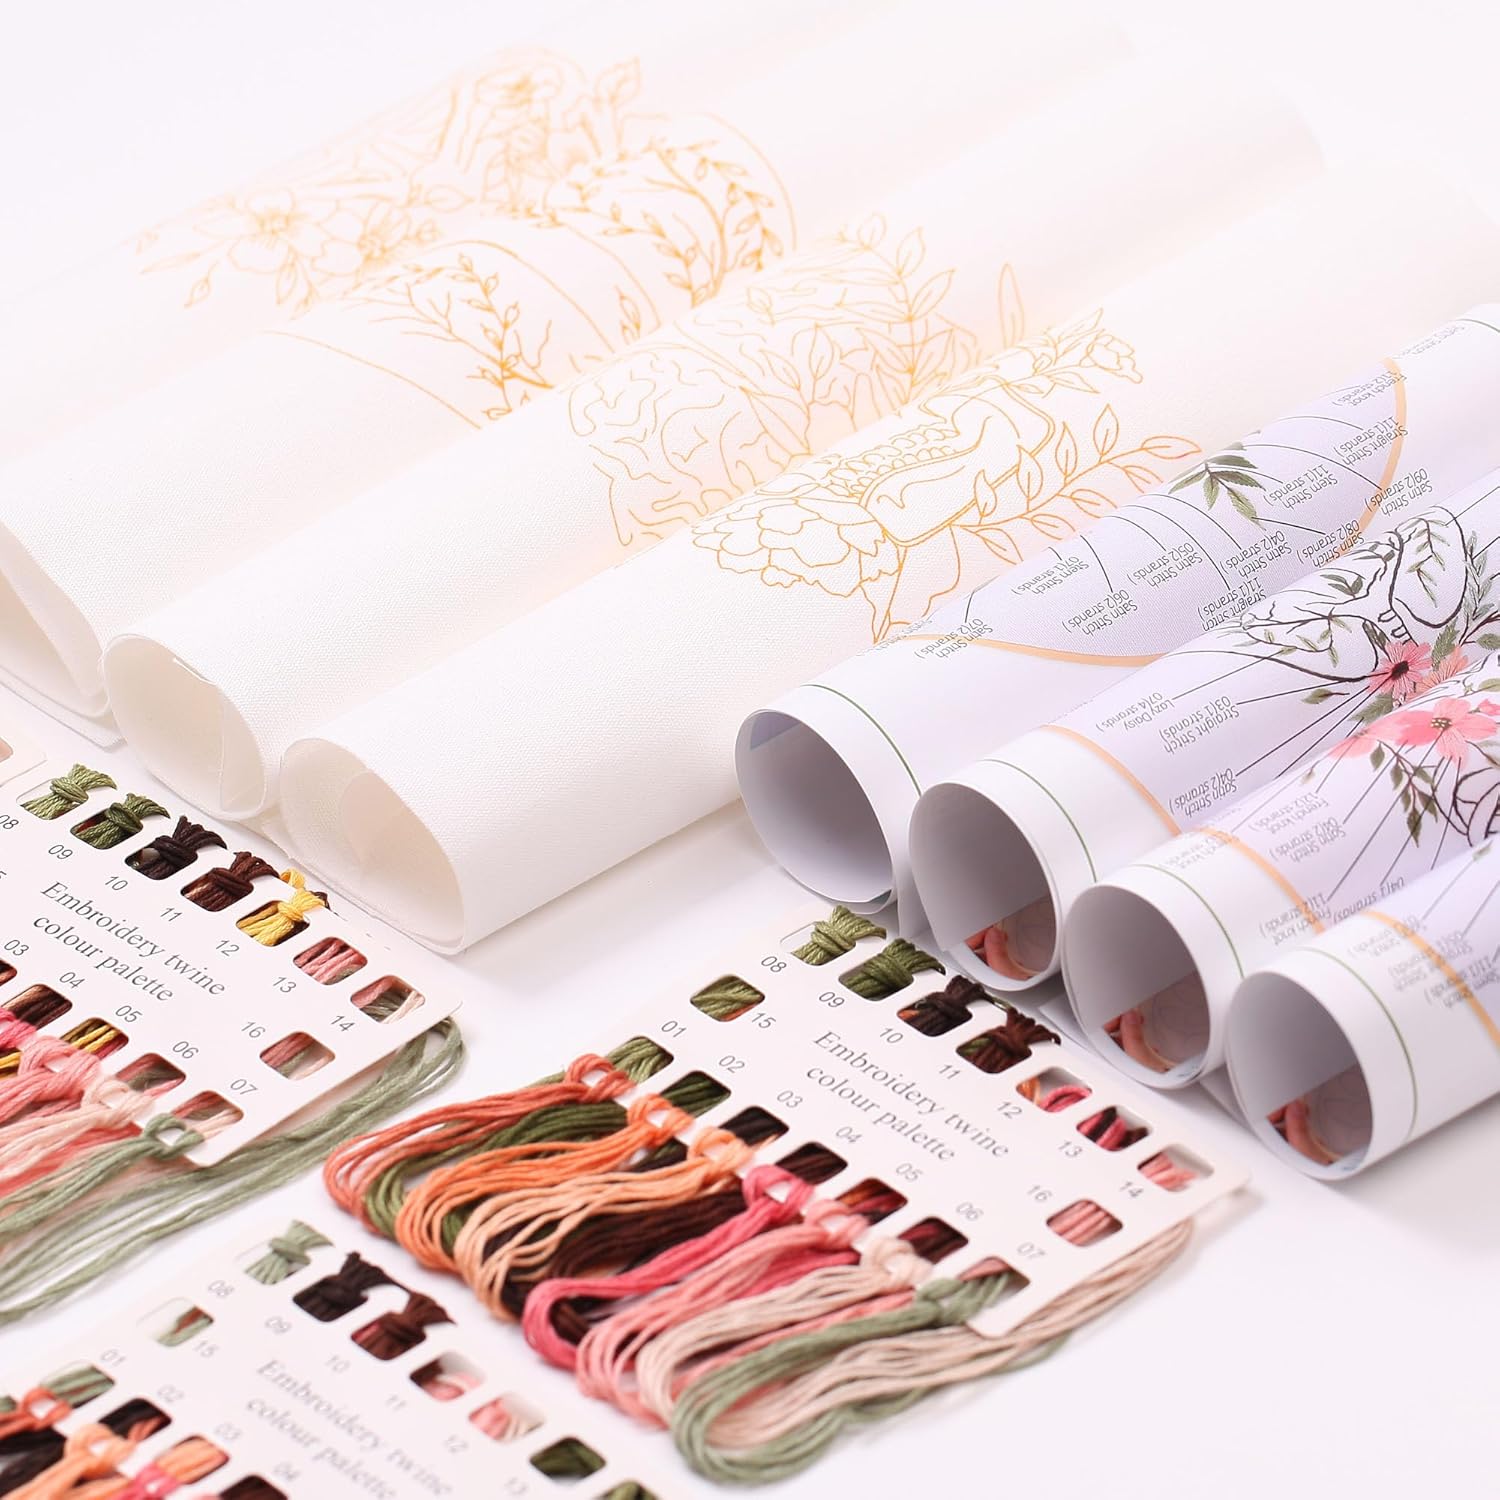
Image: A close-up view of the embroidery materials, showing the rolled cotton fabrics with printed patterns, the organized colored thread palette, and the detailed instruction sheets, all essential for setting up the project.
Operating Instructions (Embroidery Process)
Once your fabric is secured in the hoop, you can begin the embroidery process:
- Understand the Pattern: Study the printed pattern on your fabric and cross-reference it with the provided English drawing instructions. The instructions will indicate which thread colors and stitch types to use for each section of the design.
- Select Thread: Choose the correct colored thread according to the instruction manual. Cut a manageable length of thread (typically 18-24 inches) to avoid tangling.
- Thread the Needle: Pass one end of the chosen thread through the eye of an embroidery needle. You may need to use a needle threader if available.
- Begin Stitching: Follow the stitch methods outlined in your manual. Common stitches include satin stitch, French knots, stem stitch, and backstitch. Start from the back of the fabric, bringing the needle up through the fabric to the front, and then down again to create the desired stitch.
- Maintain Tension: Keep consistent tension on your thread to ensure even and neat stitches. The taut fabric in the hoop helps with this.
- Finish Sections: Work through the pattern section by section, referring to the instructions for guidance.
- Secure Threads: When you finish a thread or a section, secure the thread on the back of the fabric with a small knot or by weaving it under existing stitches.
The patterns on the fabric are designed to be a great help for beginners, guiding you through the process easily and conveniently.
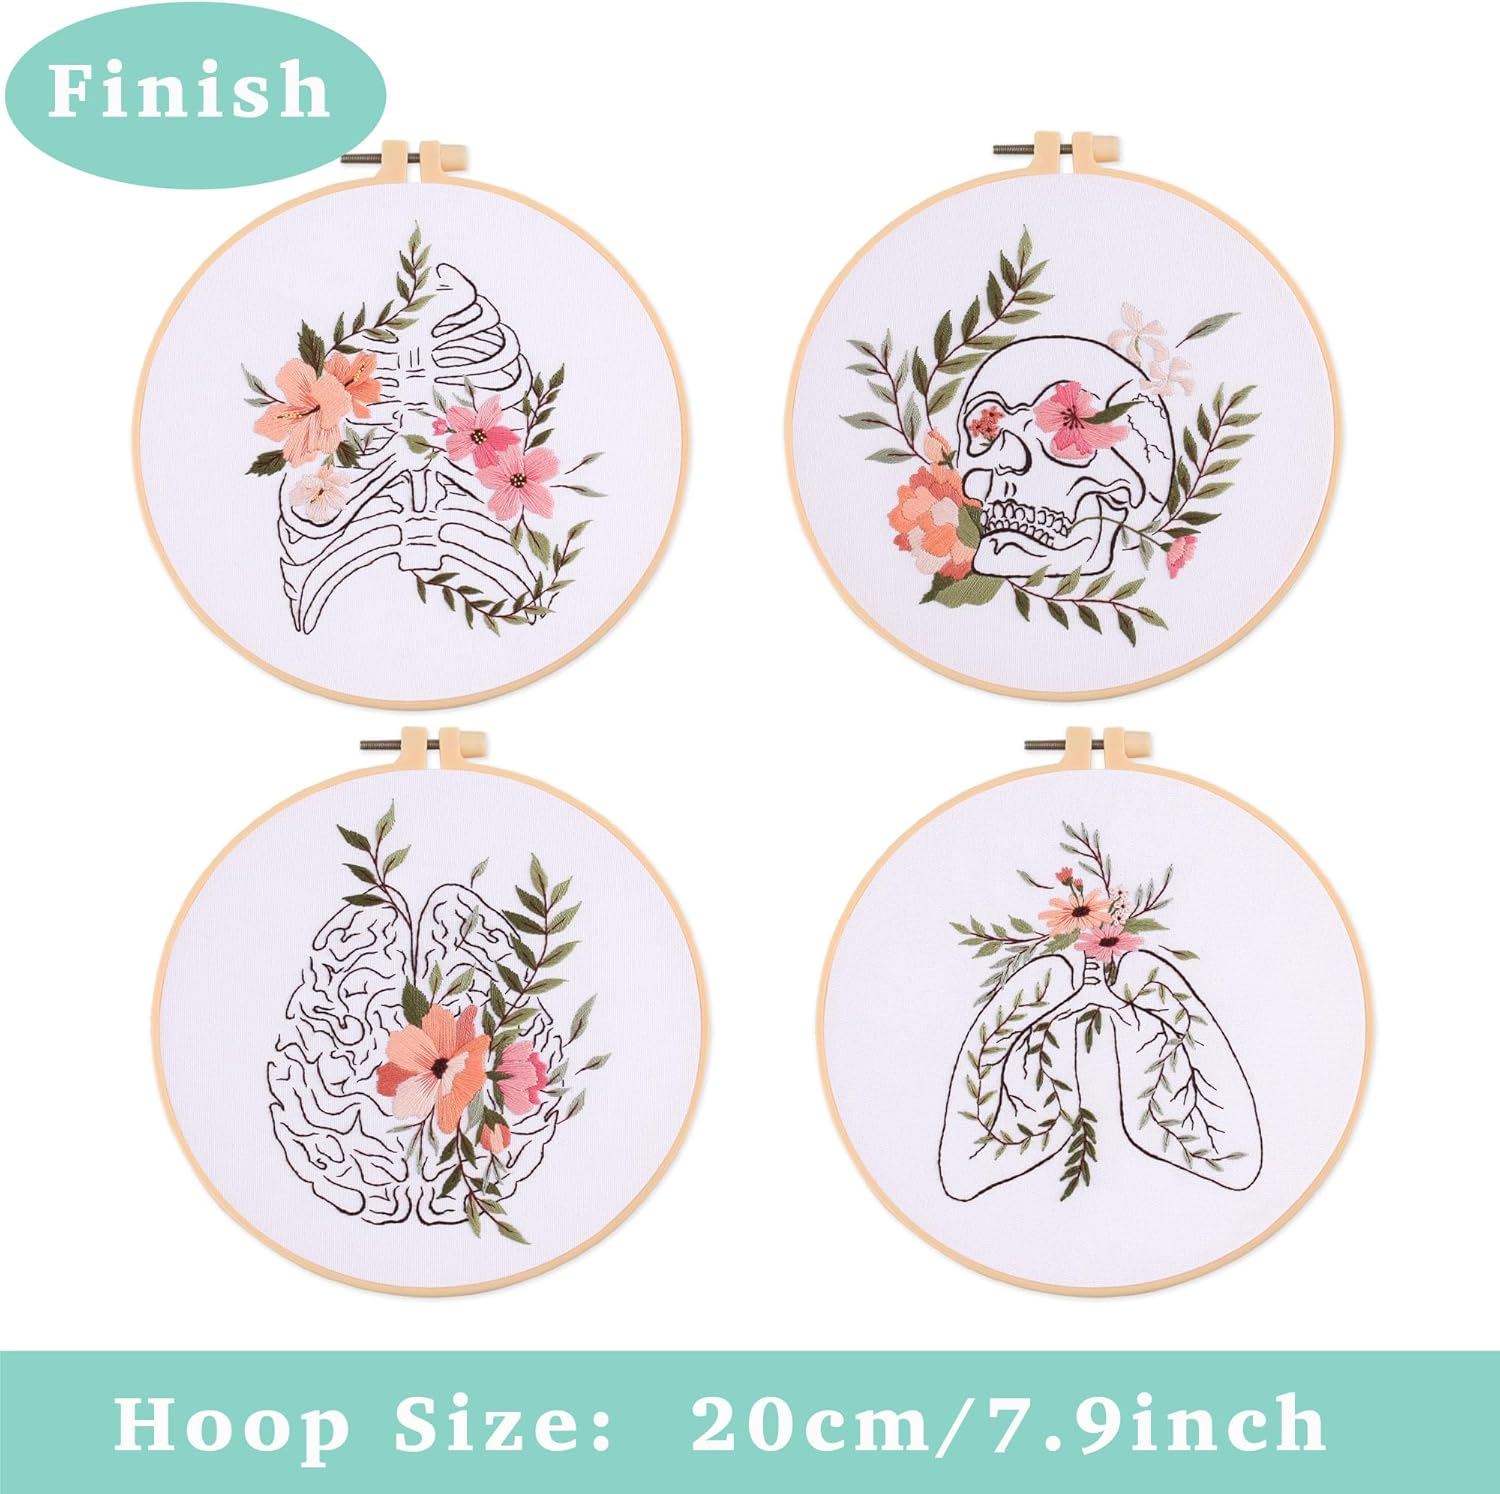
Image: Four completed embroidery projects, each showcasing a unique abstract design within its hoop. The image also highlights the standard hoop size of 20cm (7.9 inches).

Image: A detailed view of one of the finished embroidery pieces, depicting an abstract skull design adorned with vibrant floral elements, demonstrating the intricate stitching possible with the kit.
Care and Precautions
To ensure the longevity and quality of your embroidery project, please observe the following precautions:
- Water-Soluble Pattern: The patterns printed on the fabric are water-soluble. This means they will disappear when exposed to water.
- Avoid Water Before Completion: Do not touch the fabric with water or iron it before you have completely finished embroidering the pattern. Exposure to moisture will cause the pattern to fade or disappear prematurely, making it difficult to complete your design.
- Post-Completion Cleaning: Once your embroidery is fully completed and all stitches are in place, you may gently rinse the fabric with cold water to remove any remaining pattern lines. Allow it to air dry completely.
- Storage: Store unused threads and fabric in a dry, clean place away from direct sunlight to prevent fading or damage.
Troubleshooting
Here are some common issues and their solutions:
- Problem: Fabric is not taut in the hoop.
Solution: Loosen the brass screw, reposition the fabric, pull it gently from all sides to ensure even tension, and then tighten the screw firmly. - Problem: Thread tangles frequently.
Solution: Use shorter lengths of thread (e.g., 18 inches). Ensure you are not pulling the thread too quickly or forcefully. - Problem: Pattern lines are fading prematurely.
Solution: This indicates exposure to moisture. Ensure your hands are dry and avoid working in humid environments. Do not use a steam iron near the fabric until the embroidery is complete. - Problem: Difficulty threading the needle.
Solution: Use a needle threader if available. Cut the end of the thread cleanly and twist it slightly to make it more rigid.
Product Specifications
| Brand | REEWISLY |
| Model Name | Embroidery Kits |
| Item Model Number | S868+869+870+871 4set |
| Number of Pieces | 4 (complete kits) |
| Fabric Dimensions | 11.8 x 11.8 inches (30 x 30 cm) |
| Embroidery Hoop Size | 7.8 inches (20 cm) |
| Material | Cotton (fabric), Plastic (hoops) |
| Item Weight | 9.9 ounces |
| Product Dimensions | 8.6 x 8.6 x 1.57 inches (packaging) |
| Age Range | Adult |
Warranty and Support
Specific warranty information for this product is not provided in the available documentation. For any questions, concerns, or support regarding your REEWISLY Embroidery Starter Kit, please contact the seller directly through the platform where you made your purchase.
You may also visit the official REEWISLY store for additional information and products: REEWISLY Store on Amazon.
Ask a question about this manual
Ask about setup, troubleshooting, compatibility, parts, safety, or missing instructions. Manuals+ will review the question and use this page’s manual context to help answer it.