1. Introduction
This manual provides essential information for the safe and effective operation of your MOKA SFX CO2 Jet Machine. This device is designed to produce dramatic CO2 fog effects for various events such as nightclubs, parties, and stage shows. Please read this manual thoroughly before setup, operation, or maintenance to ensure proper usage and prevent potential hazards.
2. Important Safety Information
- CO2 Gas Handling: Always use CO2 cylinders with appropriate pressure ratings and ensure secure connections. CO2 is an asphyxiant; use only in well-ventilated areas.
- Personal Protective Equipment: Wear appropriate eye and hand protection when handling CO2 cylinders and connecting hoses.
- Placement: Position the machine on a stable, level surface. Ensure the jet is directed away from people, animals, and sensitive equipment. Maintain a safe distance from the jet output.
- Electrical Safety: Connect the machine to a grounded power outlet. Do not operate with damaged cables or if the machine shows signs of malfunction.
- Temperature: Do not expose the machine to extreme temperatures or direct sunlight.
- Children and Unauthorized Personnel: Keep the machine out of reach of children and ensure only trained personnel operate the device.
- Emergency Procedures: In case of a CO2 leak, immediately ventilate the area and shut off the CO2 supply. Seek medical attention if symptoms of CO2 exposure occur (dizziness, shortness of breath).
3. Package Contents
Upon unpacking, verify that all items listed below are present and undamaged:
- 1x MOKA SFX CO2 Jet Machine
- 1x 6-meter Gas Hose
- 1x Power Cable
- 1x User Manual
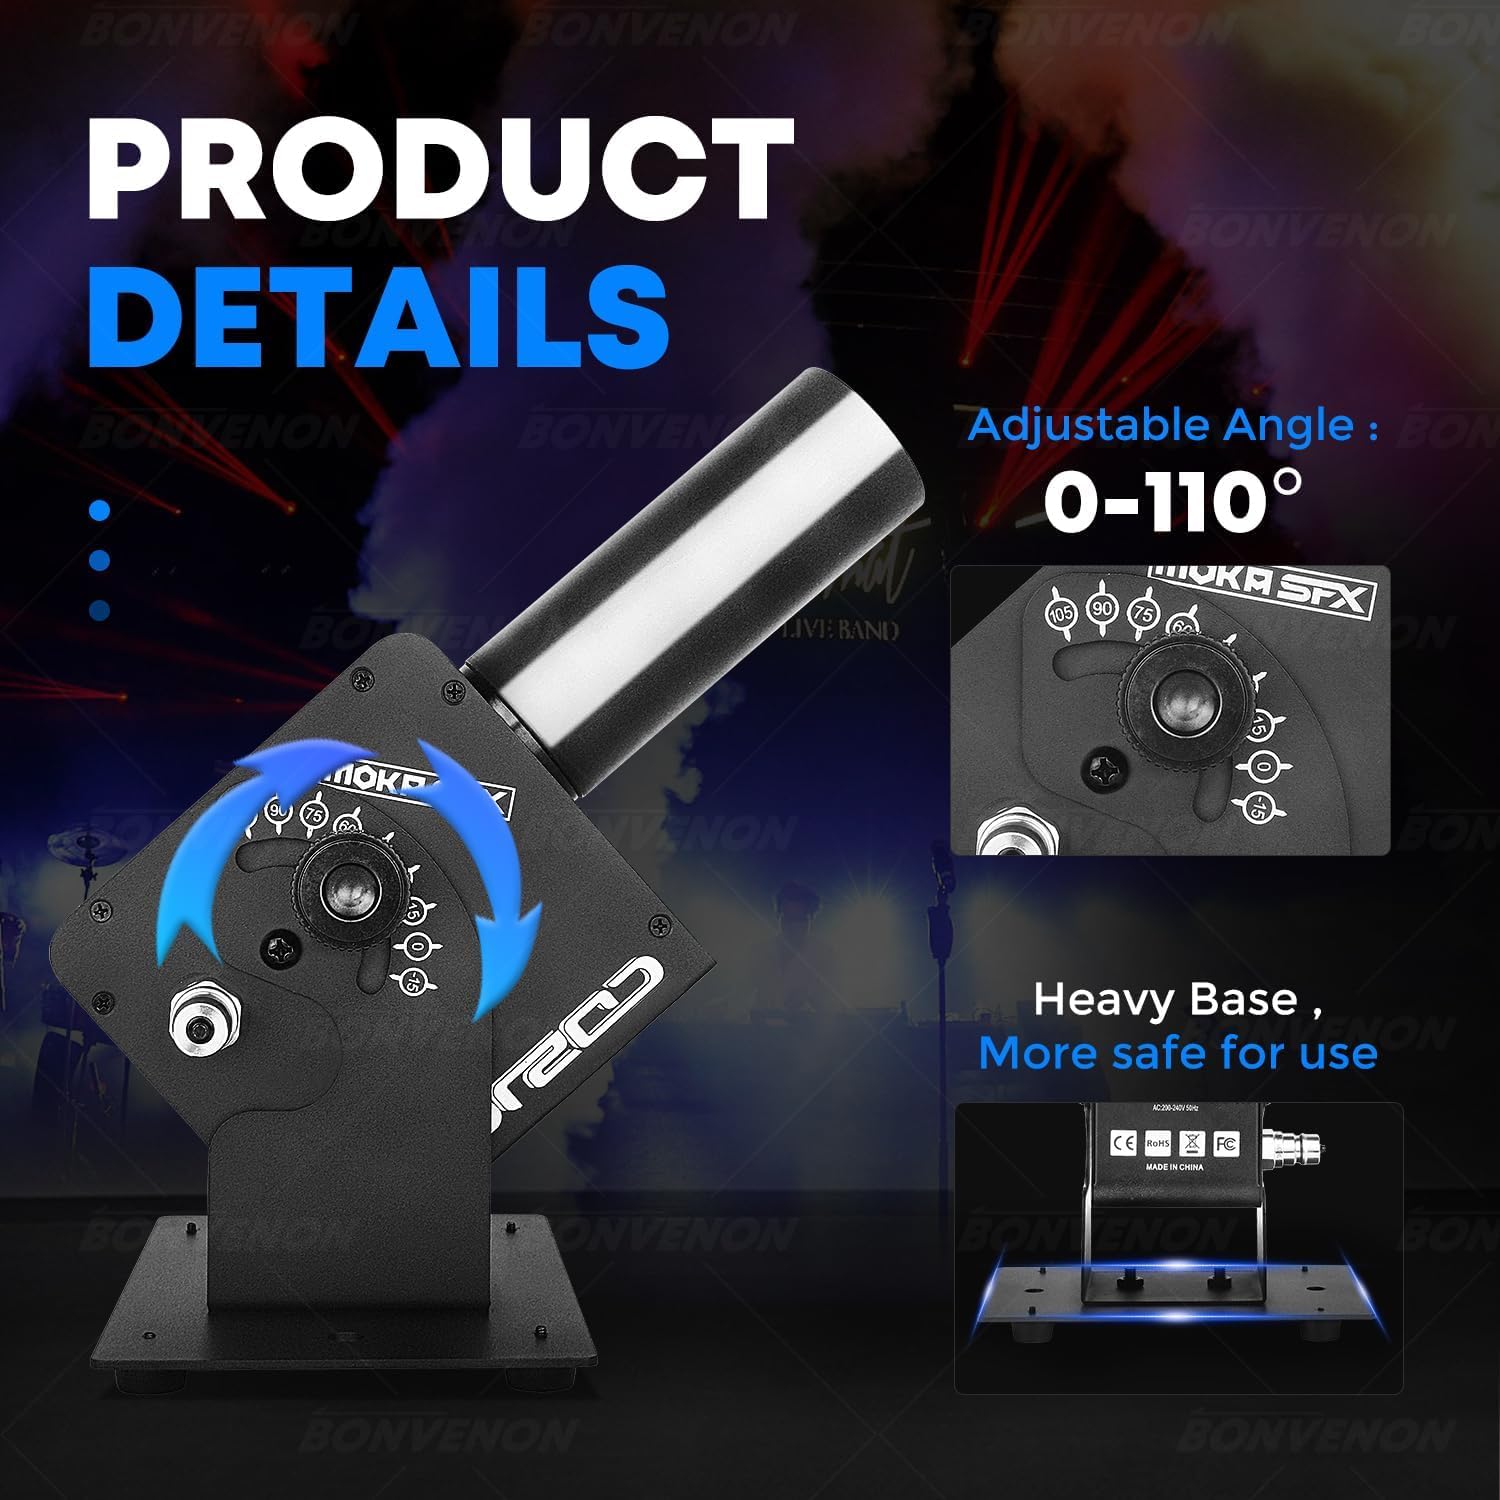
Image: Package contents including the CO2 jet machine, gas hose, power cable, and manual.
4. Technical Specifications
| Feature | Detail |
|---|---|
| Brand | MOKA SFX |
| Model Name | CO2 Jet Machine |
| Model Number | BV0429 |
| Color | Black |
| Material | Metal, Plastic |
| Operating Voltage | AC100-240V, 50/60Hz |
| Product Power | 25W |
| Jet Height | 8-10 meters |
| Adjustable Angle | 0-110 degrees |
| Electric Valve Pressure | 1400Psi |
| Working Mode | Electric Control |
| Item Dimensions (L x W x H) | 10 x 2 x 2.72 inches (approx. 25.4 x 5.08 x 6.9 cm) |
| Weight | 6kg (approx. 13.2 lbs) |
| Connector Type | Quick Connector |

Image: Visual representation of product parameters and dimensions.
5. Setup Instructions
- Placement: Place the CO2 Jet Machine on a stable, flat surface. The heavy base ensures stability during operation. Ensure there is sufficient clear space above and in front of the nozzle for the CO2 jet.
- Connect Gas Hose: Connect one end of the provided 6-meter gas hose to the CO2 Jet Machine's quick connector. Securely attach the other end to your CO2 gas cylinder. Ensure all connections are tight to prevent leaks.
- Power Connection: Connect the power cable to the machine's power input and then to a suitable grounded electrical outlet (AC100-240V, 50/60Hz).
- Adjust Angle: The jet direction can be adjusted within a 0-110 degree range. Loosen the adjustment knob, set the desired angle, and tighten the knob to secure the position.
- DMX Connection (Optional): For advanced control, connect a DMX controller to the DMX IN port. You can daisy-chain multiple units using the DMX OUT port.
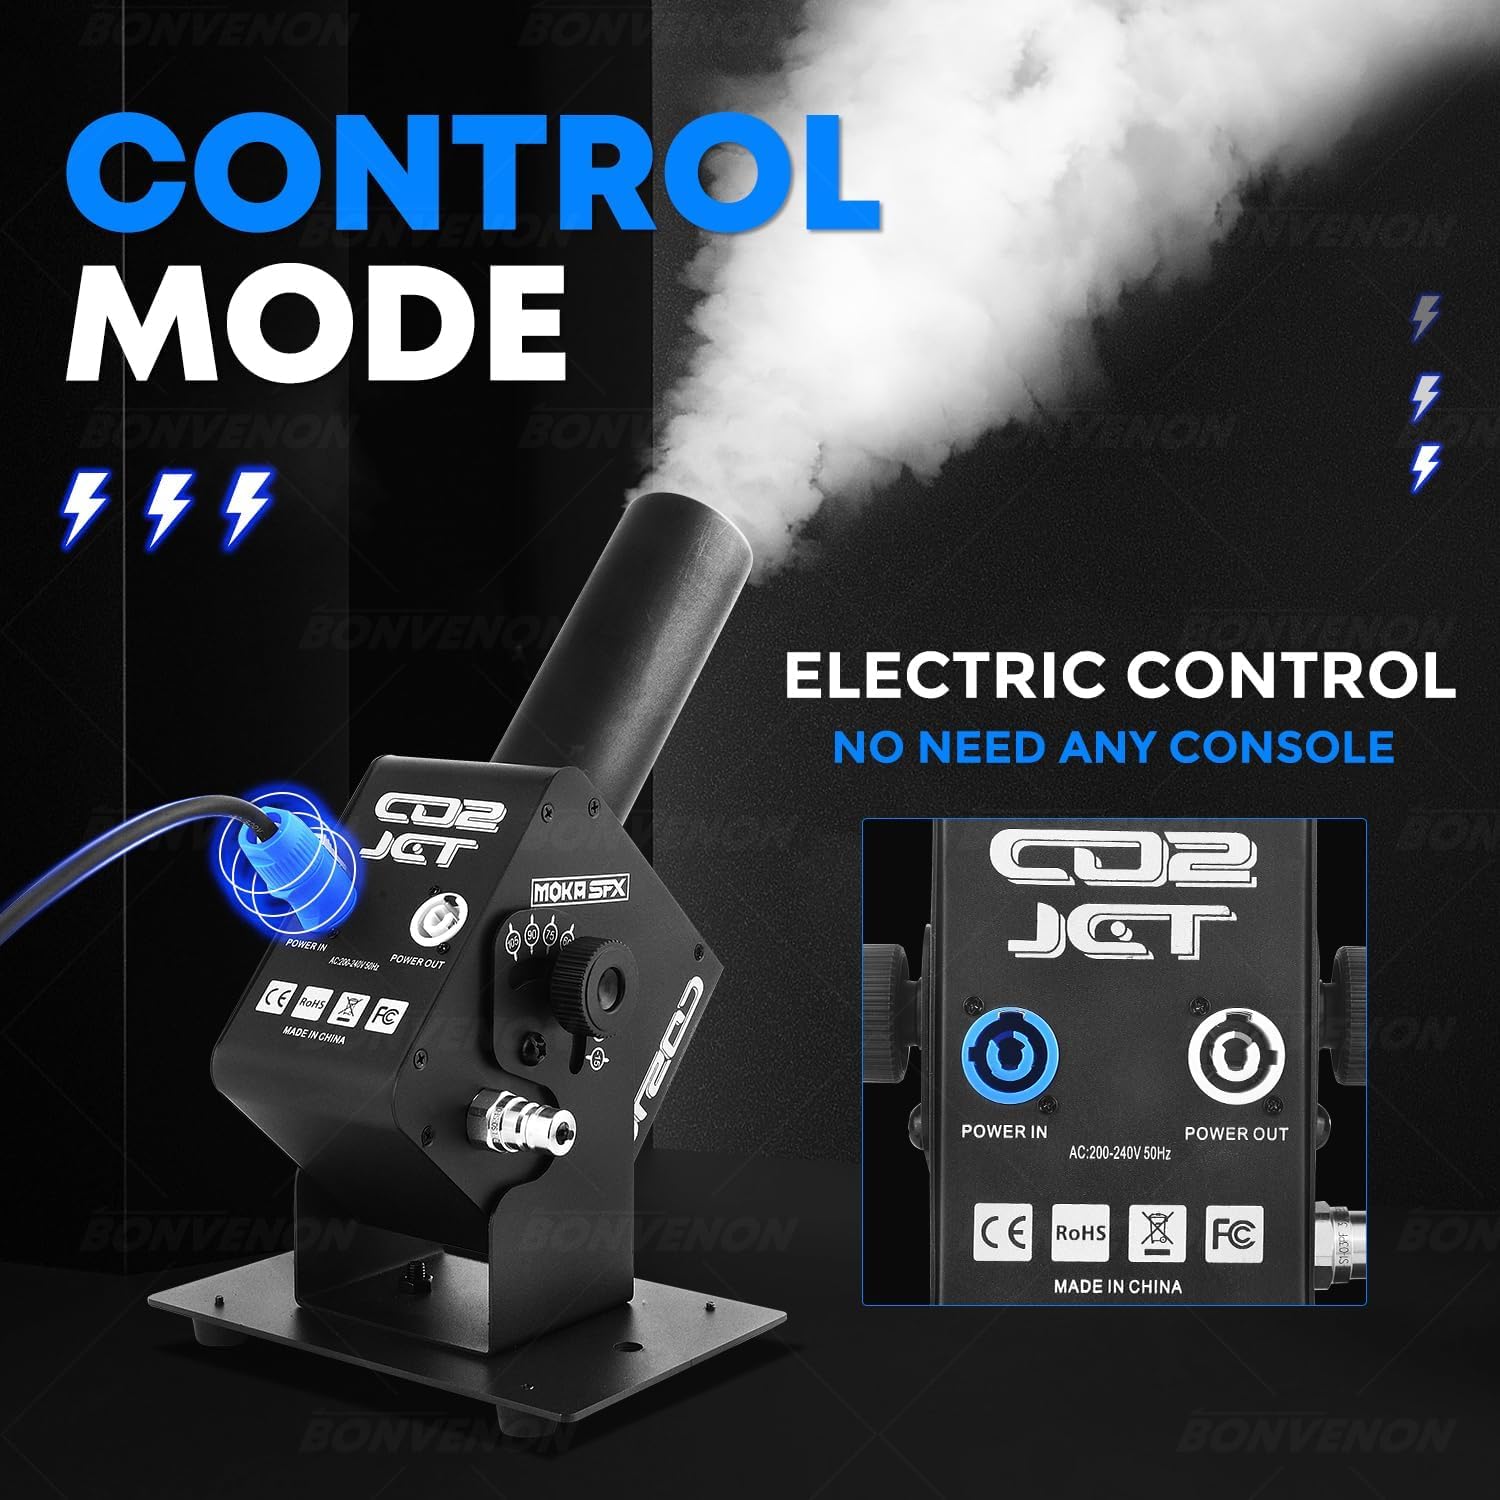
Image: Rear view of the CO2 Jet Machine showing power input/output and control panel.

Image: Close-up of the adjustable angle mechanism on the CO2 Jet Machine.
6. Operating Instructions
- Power On: Turn on the main power switch on the machine. The display will illuminate.
- Open CO2 Cylinder Valve: Slowly open the valve on the CO2 gas cylinder. You may hear a hiss as the gas fills the hose.
- Initiate Spray: The machine supports electronic control. Once powered and connected to the gas cylinder, it is ready to spray. Depending on the model, this can be triggered via a button on the unit, a remote control (if included), or a DMX controller.
- Adjusting LED Effects: If your model includes LED lights, use the control panel buttons (MENU, UP, DOWN, ENTER) to select desired color modes or effects.
- DMX Control: If using DMX, ensure your DMX controller is properly configured to the machine's DMX channels. Refer to the DMX channel chart in the full manual for detailed programming.
- Stopping Operation: To stop the CO2 jet, release the trigger or deactivate the DMX channel. To completely shut down, close the CO2 cylinder valve first, allow any remaining gas in the hose to dissipate, then turn off the machine's power switch.
Video: Demonstration of the CO2 jet machine in operation, showing the powerful fog effect.
Video: A Super LED CO2 Jet Machine in action, showcasing various LED color effects combined with CO2 output.
7. Maintenance
- Cleaning: Regularly wipe down the exterior of the machine with a soft, dry cloth. Do not use abrasive cleaners or solvents.
- Connection Checks: Before each use, inspect the gas hose and all connections for any signs of wear, damage, or leaks. Replace damaged components immediately.
- Storage: Store the machine in a cool, dry place away from direct sunlight and extreme temperatures. Disconnect the CO2 cylinder and power when not in use.
8. Troubleshooting
| Problem | Possible Cause | Solution |
|---|---|---|
| No CO2 jet when triggered | CO2 cylinder valve closed; empty cylinder; hose kinked or disconnected; power issue. | Open CO2 valve; replace cylinder; check hose for obstructions/connections; verify power supply. |
| Weak CO2 jet | Low CO2 pressure; partially closed valve; hose obstruction. | Check cylinder pressure; fully open valve; inspect hose. |
| LED lights not working | Power issue; DMX signal problem (if applicable); internal fault. | Check power connection; verify DMX settings; contact support if problem persists. |
| Gas leak detected | Loose connections; damaged hose/seal. | Immediately close CO2 valve. Tighten all connections. Inspect hose and seals for damage and replace if necessary. |
9. Warranty and Support
For warranty information and technical support, please refer to the official MOKA SFX website or contact their customer service directly. Keep your purchase receipt as proof of purchase.
Additional protection plans may be available for purchase separately.