GKU D200
GKU D200 Dash Cam User Manual
Model: D200 | Brand: GKU
Introduction
Thank you for choosing the GKU D200 Dash Cam. This device is designed to provide reliable video recording of your journeys, offering enhanced safety and peace of mind. Featuring 2.5K UHD resolution, Wi-Fi connectivity for app control, 24-hour parking monitoring, loop recording, G-sensor, and night vision capabilities, the D200 is a compact yet powerful solution for your vehicle's surveillance needs. Please read this manual thoroughly before using the product to ensure proper operation and maintenance.
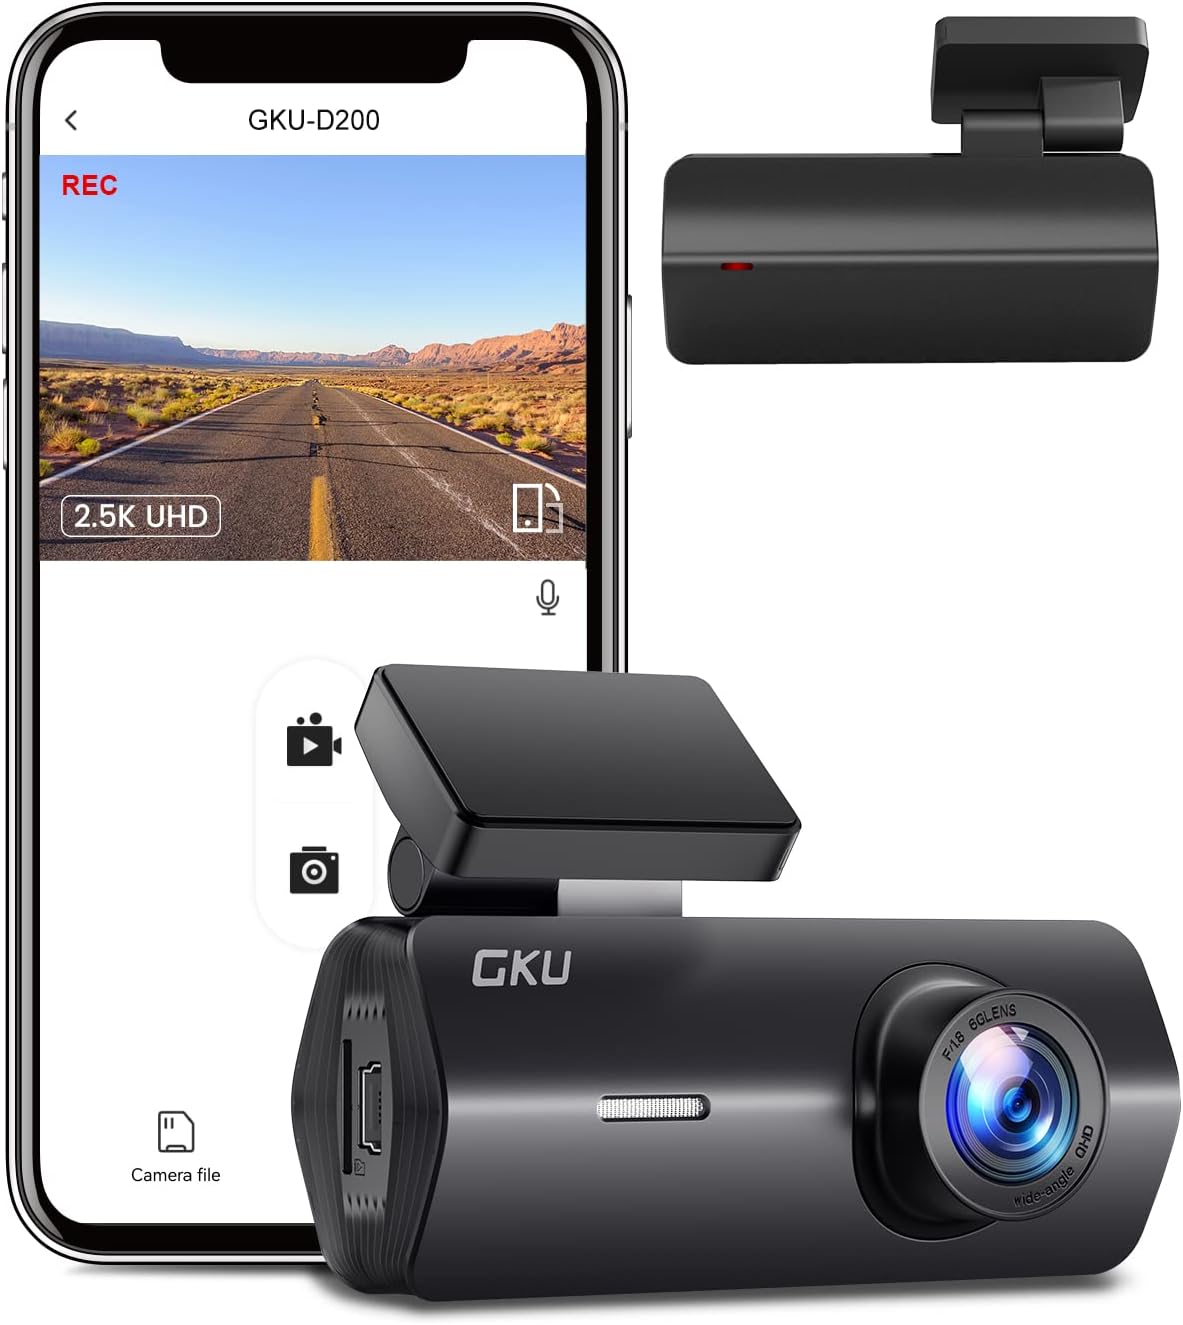
Image: The GKU D200 Dash Cam shown alongside a smartphone displaying its app interface, highlighting its compact design and connectivity features.
Safety Information
- Do not operate the dash cam or access its settings while driving. Always pull over safely before making any adjustments.
- Ensure the dash cam is securely mounted and does not obstruct your view of the road or interfere with airbag deployment.
- Use only the original power adapter and cables provided with the device to prevent damage or fire hazards.
- Avoid exposing the dash cam to extreme temperatures, direct sunlight for prolonged periods, or excessive moisture.
- Keep the lens clean to ensure clear video recordings. Use a soft, dry cloth for cleaning.
- Do not attempt to disassemble or repair the device yourself. Contact customer support for assistance.
Package Contents
Please check the package contents upon unboxing:
- GKU D200 Dash Cam
- Car Charger
- USB Power Cable
- Mounting Bracket (Suction Mount)
- User Manual
- (Micro SD card not included)
Product Overview
The GKU D200 Dash Cam is designed for discreet and effective in-car recording. Below are its key features and dimensions.

Image: The GKU D200 Dash Cam with its compact dimensions (78mm x 140mm) and icons representing its main features: 2.5K UHD, WiFi, 24H Parking Monitor, Loop Recording, Super Night Vision, App Control, G-Sensor, and Front F1.8 aperture.
Key Features:
- 2.5K UHD Resolution: Records high-definition video at 2560x1600P/30fps.
- Built-in WiFi & APP Control: Seamless connection to the dedicated app for video management and settings.
- Compact Design: Slim and unobtrusive, designed not to block your view.
- 24 Hours Parking Monitor: Requires hardwire kit (not included) for continuous surveillance.
- Seamless Loop Recording: Automatically overwrites oldest footage when the memory card is full.
- G-Sensor: Detects sudden shakes/collisions and locks footage to prevent overwriting.
- Night Vision & WDR: Enhances clarity in low-light conditions and balances exposure.
- 170° Wide Angle Lens: Captures a broad view of the road.
- Heat-Resistant: Durable materials for operation in various climates (-4°F~160°F).
- Micro SD Card Support: Supports up to 256GB (Class 10 or higher recommended).
Setup Guide
Follow these steps for quick and easy setup of your GKU D200 Dash Cam.

Image: A visual guide illustrating the five steps for setting up the dash cam: inserting the SD card, connecting the power cable, connecting to the app, formatting the SD card, and starting recording.
Step 1: Insert a Correct SD Card
Locate the Micro SD card slot on the dash cam. Gently insert a Class 10 or higher Micro SD card (32GB-256GB, not included) until it clicks into place. Ensure the card is inserted correctly to avoid damage.
Step 2: Connect Power Cable
Connect the provided car charger to your vehicle's cigarette lighter socket and the USB power cable to the dash cam's power input. The dash cam will automatically power on and begin recording when your vehicle starts.
Step 3: Connect The Dash Cam in App
Download the "JarvisCam" app from your smartphone's app store (available for Android and iOS). Turn off Bluetooth and cellular data on your phone. Open the app, select "Add a Camera," and connect to the dash cam's Wi-Fi network (e.g., "GKU_D200_xxxx").

Image: A smartphone displaying the JarvisCam app interface for WiFi control, with a QR code provided for easy app download. The app allows for viewing, downloading, and sharing videos.
Download the JarvisCam App: https://www.6zhentan.com/app/jarvis/index.html

Image: A step-by-step visual guide on how to connect the dash cam to Wi-Fi using the app, including adding a camera, connecting to the Wi-Fi network, accessing camera settings, and starting recording.
Step 4: Format the SD Card in App
Once connected to the app, navigate to the camera settings and select the option to "Format SD Card." This prepares the card for optimal recording performance and clears any previous data.
Step 5: Start Recording
After formatting, the dash cam is ready to record. It will automatically start recording when powered on. You can manage recordings and settings via the JarvisCam app.
Operating Instructions
Video Recording Quality (2.5K UHD & 170° Wide Angle)
The GKU D200 records in 2.5K UHD (2560x1600P) resolution, providing significantly clearer and more detailed footage compared to standard 1080P. The 170° wide-angle lens captures a broad perspective of the road, minimizing blind spots.

Image: A visual comparison demonstrating the superior clarity of 2.5K resolution over 1080P, showing enhanced detail in recorded footage.

Image: A diagram illustrating the expansive 170° wide-angle field of view captured by the dash cam, covering multiple lanes of traffic.
Loop Recording
The dash cam records video in continuous loops. When the memory card reaches its storage limit, the oldest unlocked recordings are automatically overwritten by new footage. This ensures continuous recording without manual intervention.

Image: A composite image explaining three key features: G-sensor (locking video upon impact), Parking Monitoring (24H protection), and Loop Recording (overwriting old footage).
G-Sensor (Emergency Recording)
The built-in G-sensor automatically detects sudden impacts, collisions, or abrupt braking. When triggered, it locks the current video segment, preventing it from being overwritten by loop recording. These emergency files are stored in a separate, protected folder on the SD card.
24 Hours Parking Monitor
With an optional hardwire kit (not included), the dash cam can provide 24-hour surveillance. When your vehicle is parked, the dash cam will automatically switch to parking mode and continue recording, capturing incidents even when the engine is off. This feature helps ensure continuous protection for your vehicle.
Night Vision & WDR (Wide Dynamic Range)
The dash cam is equipped with advanced night vision capabilities and WDR technology. Night vision enhances clarity in low-light environments, such as nighttime driving or tunnels. WDR balances exposure, ensuring clear video quality in scenes with high contrast, preventing overexposure in bright areas and underexposure in dark areas.

Image: A visual demonstration of the WDR (Wide Dynamic Range) feature, showing how it corrects footage that is either too light or too dark, resulting in a balanced and clear image.

Image: An example of video footage captured using the Super Night Vision feature, demonstrating improved visibility in dark conditions.
Voice Broadcast
The dash cam provides voice prompts to inform you about its operational status, such as "Stop Recording," "Start Recording," or "Video Locked." This allows you to confirm the camera's function without needing to look at the device.
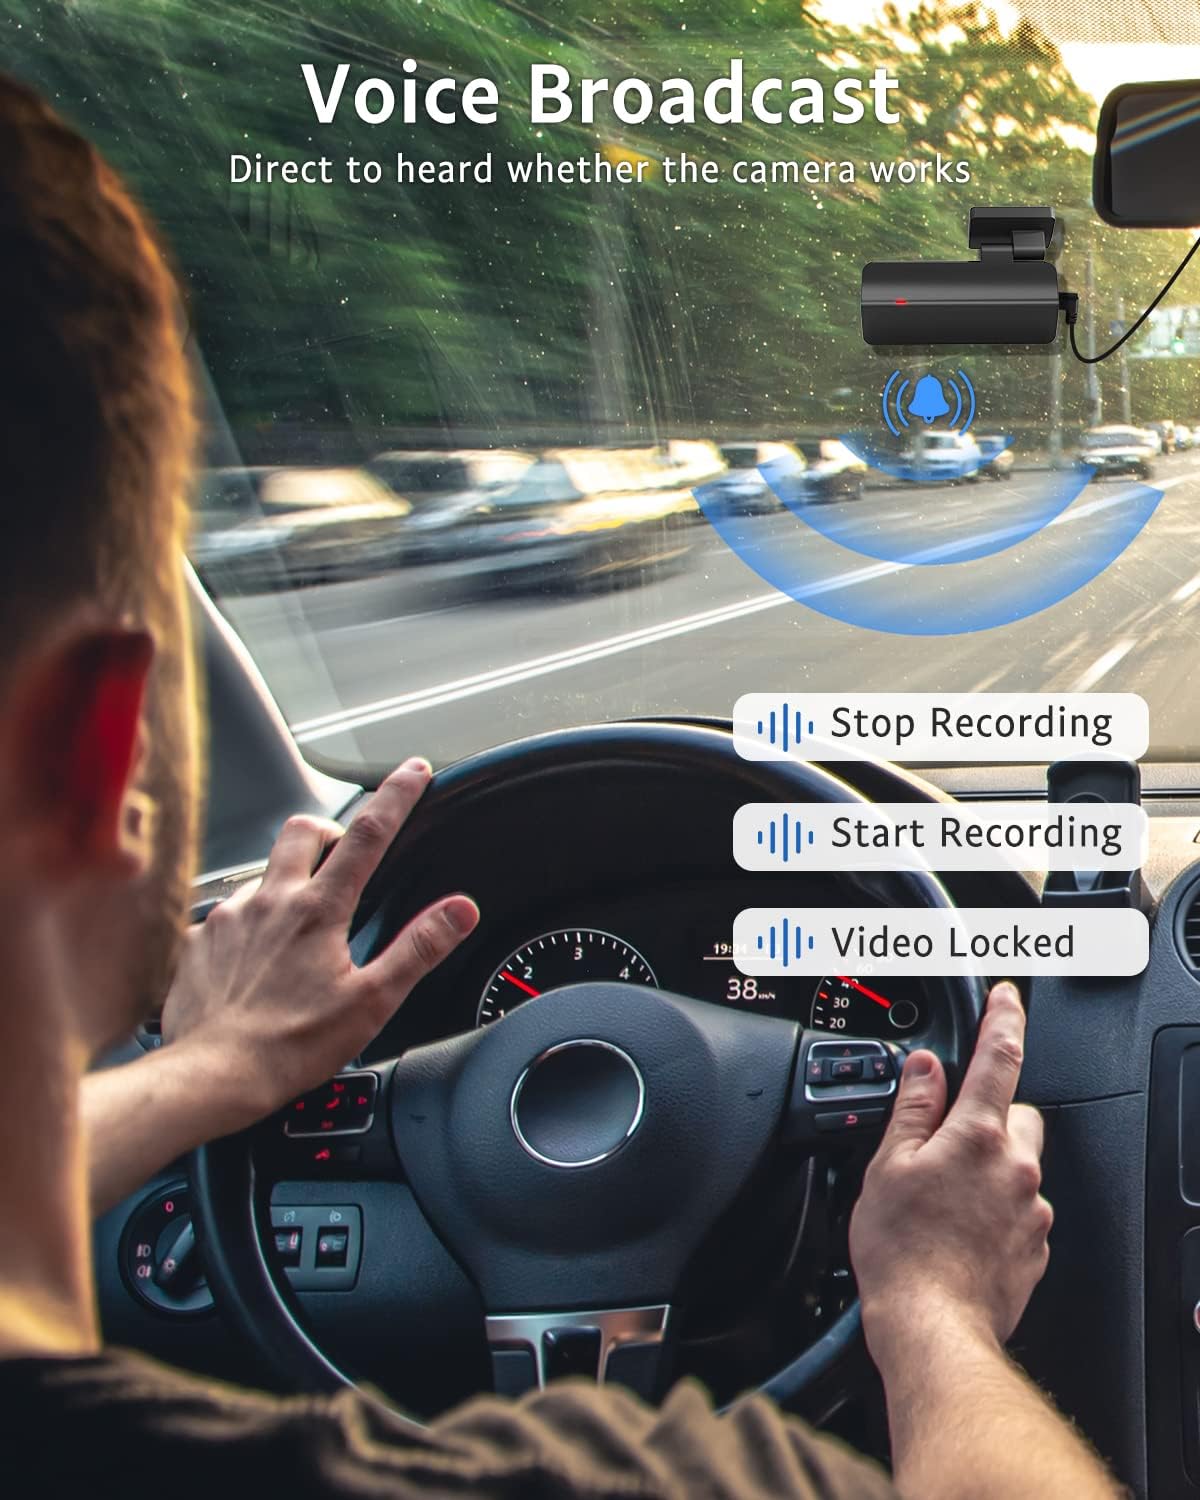
Image: An illustration of a driver hearing voice broadcasts from the dash cam, indicating statuses like "Stop Recording," "Start Recording," and "Video Locked."
APP Control (JarvisCam)
The JarvisCam app provides full control over your dash cam via Wi-Fi. You can:
- View live video feed from the dash cam.
- Download recorded videos and photos directly to your smartphone.
- Change dash cam settings (e.g., resolution, G-sensor sensitivity, loop recording duration).
- Edit and share videos on social media platforms.
Maintenance
- Cleaning: Use a soft, dry cloth to clean the dash cam's lens and body. Do not use liquid cleaners or abrasive materials.
- SD Card Management: Regularly format your Micro SD card (at least once a month) through the app to maintain optimal performance and prevent data corruption. Back up important files before formatting.
- Firmware Updates: Check the GKU official website or the JarvisCam app for any available firmware updates to ensure your dash cam has the latest features and bug fixes.
- Storage Conditions: When not in use for extended periods, store the dash cam in a cool, dry place away from direct sunlight.
Troubleshooting
| Problem | Possible Cause | Solution |
|---|---|---|
| Dash cam does not power on. | No power supply; faulty cable/charger. | Check car charger connection. Ensure vehicle's cigarette lighter socket is working. Try a different USB cable or car charger. |
| Cannot connect to Wi-Fi/App. | Incorrect Wi-Fi settings; app issue; phone settings. | Ensure Wi-Fi is enabled on dash cam. Turn off mobile data and Bluetooth on your phone. Restart both dash cam and phone. Reinstall the JarvisCam app. |
| Video footage is blurry/unclear. | Dirty lens; protective film on lens; low resolution setting. | Clean the lens with a soft cloth. Remove any protective film. Check video resolution settings in the app. |
| SD card error/cannot record. | SD card full; incompatible SD card; corrupted SD card. | Format the SD card via the app. Use a Class 10 or higher Micro SD card (32GB-256GB). Try a new SD card. |
| Loop recording not working. | SD card full of locked files; G-sensor too sensitive. | Manually delete locked files from the SD card or format it. Adjust G-sensor sensitivity in app settings. |
Specifications
| Feature | Detail |
|---|---|
| Model | D200 |
| Video Resolution | 2.5K (2560x1600P) @ 30fps |
| Lens Angle | 170° Wide Angle |
| Aperture | F1.8 |
| Connectivity | Wi-Fi, USB |
| Storage | Micro SD Card (Class 10+, 32GB-256GB) |
| Special Features | Night Vision, WDR, G-Sensor, Loop Recording, 24H Parking Monitor (with hardwire kit), APP Control, Voice Broadcast |
| Operating Temperature | -4°F to 160°F (-20°C to 71°C) |
| Dimensions | Approx. 1 x 11 x 1 inches (2.54 x 27.94 x 2.54 cm) |
| Weight | Approx. 10.8 ounces (306 grams) |
Warranty and Support
GKU products come with a standard manufacturer's warranty. For detailed warranty information, please refer to the warranty card included in your package or visit the official GKU website. If you encounter any issues or have questions regarding your GKU D200 Dash Cam, please contact GKU customer support through their official channels. Provide your model number (D200) and purchase details for faster service.
Related Documents - D200
 |
GKU D600 4K Dash Cam User Manual User manual for the GKU D600 4K Dash Cam, covering installation, app usage, features, and specifications. |
 |
GKU D200 2.5K Dash Cam User Manual Comprehensive user manual for the GKU D200 2.5K Dash Cam, covering installation, operation, features, app connectivity, specifications, and troubleshooting. Includes warranty information and regulatory compliance statements. |
 |
GKU D200 2.5K Dash Cam User Manual User manual for the GKU D200 2.5K Dash Cam, detailing installation, operation, app connectivity, and specifications. Learn about recording, parking monitoring, and WiFi features. |
 |
GKU D600Pro Dash Cam: Installation and User Guide Comprehensive guide to installing and using the GKU D600Pro dash cam, covering app connection, GPS features, camera settings, parking mode, and troubleshooting. |
 |
GKU Dash Cam D600: Frequently Asked Questions and Troubleshooting Comprehensive guide to GKU Dash Cam D600, covering common issues, setup, and features. Learn about connectivity, SD card errors, video playback, and parking monitoring. |
 |
GKU Dash Cam Support FAQ: Installation, Features, and Troubleshooting Comprehensive FAQ guide for GKU dash cameras, covering installation of hardwire kits and rear cameras, troubleshooting common issues with screen, GPS, and Wi-Fi, and usage tips for parking monitoring and reversing functions. Get support from GKU. |