Macchi M 33 (7027)
Instruction Manual
SBS 7027 1/72 Macchi M 33 'Schneider Trophy' Full Kit Resin Model
Introduction
This manual provides comprehensive instructions for assembling and finishing your SBS 7027 1/72 Macchi M 33 'Schneider Trophy' resin model kit. Designed for experienced modelers, this kit offers a detailed replica of the iconic Macchi M 33 seaplane. Please read all instructions carefully before beginning assembly.

Image: The front packaging of the SBS 7027 Macchi M 33 resin model kit, showcasing the aircraft illustration and kit details.
Kit Contents:
- High-quality resin parts for the main airframe and components.
- Casted metal parts for fine details and structural elements.
- Photo-etched parts for intricate details.
- Clear resin parts for transparent elements.
- Decals for various markings and liveries.
Assembly (Setup)
Before starting, ensure you have a clean, well-lit workspace and the necessary tools, including hobby knives, files, sandpaper, super glue (CA glue), and appropriate safety equipment. Resin parts may require careful handling and cleaning.
Preparation:
- Clean Resin Parts: Wash all resin parts with mild soap and water to remove any mold release agents. Allow them to dry completely.
- Inspect Parts: Carefully inspect all resin, metal, and photo-etched parts for any flash or imperfections. Trim and sand as necessary.
- Test Fit: Always test fit parts before applying adhesive. This helps identify any fit issues and allows for adjustments.
Construction Steps:
Follow the detailed diagrams and instructions provided within the kit packaging for specific assembly sequences. General steps include:
- Assemble the main fuselage and wing sections.
- Attach the engine nacelle and propeller assembly.
- Integrate landing gear/floats and supporting struts.
- Add smaller detail parts, including photo-etched components and clear resin elements.
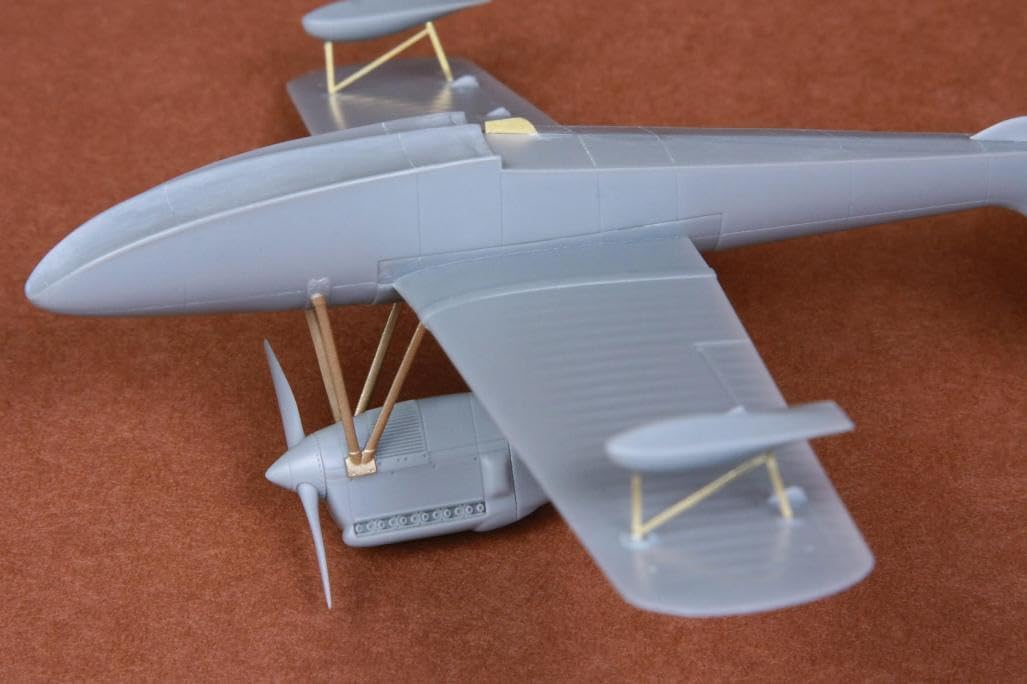
Image: A close-up view of the assembled Macchi M 33 model, highlighting the engine, propeller, and supporting struts.
Finishing and Decaling (Operating)
Once the model is fully assembled, it's time for painting and decaling to bring your Macchi M 33 to life. Refer to historical references and the provided painting guide for accurate color schemes.
Painting:
- Primer: Apply a thin, even coat of primer suitable for resin models.
- Base Coats: Apply base colors using airbrush or brush, allowing each coat to dry thoroughly.
- Detail Painting: Paint smaller details, weathering, and panel lines as desired.
Decal Application:
- Gloss Coat: Apply a gloss clear coat over the painted surface where decals will be placed. This prevents "silvering."
- Apply Decals: Cut out decals, dip in water, and slide onto the model. Use decal setting solutions to help them conform to surfaces.
- Seal Decals: Once decals are dry, apply another clear coat (gloss or matte, depending on desired finish) to seal them.

Image: A detailed diagram showing the painting and decaling guide for the Macchi M 33 model, including top and bottom views and specific marking placements.
Display and Handling
Once your Macchi M 33 model is complete, proper display and handling will ensure its longevity and preserve its intricate details.
- Display Location: Choose a stable, level surface away from direct sunlight, extreme temperatures, and high humidity.
- Dust Protection: Consider displaying the model in a dust-proof display case to prevent accumulation and damage.
- Handling: Always handle the model by its most robust parts, such as the main fuselage or wing roots. Avoid touching delicate components like propellers, antennas, or small struts.
Care and Cleaning (Maintenance)
Regular, gentle cleaning will keep your model looking its best.
- Dusting: Use a soft, dry brush (like a makeup brush) or a can of compressed air (held at a distance) to gently remove dust.
- Avoid Liquids: Do not use water, cleaning solutions, or harsh chemicals, as these can damage paint, decals, or the resin material.
- Storage: If storing the model, ensure it is in a secure container, padded to prevent movement and damage.
Troubleshooting
While assembling resin kits can be challenging, many common issues have straightforward solutions.
| Problem | Possible Cause | Solution |
|---|---|---|
| Warped Resin Parts | Improper cooling during manufacturing or storage. | Gently heat the part (e.g., with hot water or a hairdryer on low) and carefully bend it back into shape. Cool under cold water to set. |
| Poor Part Fit | Excess flash, mold lines, or slight dimensional inaccuracies. | Carefully sand, file, or trim mating surfaces. Use filler (putty) for small gaps. |
| Decal Silvering | Air trapped under the decal, often due to a matte surface. | Apply decals over a gloss surface. Use decal setting solutions to help them conform and eliminate air bubbles. |
| Adhesive Not Holding | Residue on parts or incorrect adhesive type. | Ensure parts are clean and dry. Use super glue (CA glue) specifically designed for resin. An accelerator can speed up curing. |
Specifications
- Manufacturer: SBS Model
- Model Number: 7027
- Aircraft Type: Macchi M 33 'Schneider Trophy' Seaplane
- Scale: 1/72
- Material: Resin, Casted Metal, Photo-Etched, Clear Resin
- Condition: New in Box
- Recommended Age: 12 years and up
- ASIN: B0CCYQLXHG
Warranty and Support
As a resin model kit, this product typically does not come with an explicit manufacturer's warranty beyond ensuring all parts are present and free from manufacturing defects upon receipt. Please inspect your kit immediately upon delivery.
For any missing or defective parts, or for technical assistance with assembly, please contact the manufacturer, SBS Model, directly. You may find contact information on their official website, www.sbsmodel.com, or through your retailer.
Note: This kit is intended for experienced modelers. SBS Model is not responsible for issues arising from improper assembly techniques or use of incompatible materials.
Ask a question about this manual
Ask about setup, troubleshooting, compatibility, parts, safety, or missing instructions. Manuals+ will review the question and use this page’s manual context to help answer it.