WUYJTIF Street Fighter
WUYJTIF Pandora Box DX Retro Arcade Console
Instruction Manual - Street Fighter Edition
1. Introduction
Thank you for purchasing the WUYJTIF Pandora Box DX Retro Arcade Console, Street Fighter Edition. This console brings the classic arcade experience to your home with a vast library of 10888 pre-installed games, including 300 3D titles. Featuring an 8-way joystick, 16 responsive buttons, and 720P HD output, it offers a versatile gaming experience. This manual provides essential information for setting up, operating, maintaining, and troubleshooting your new arcade system.
2. Safety Information
- Always use the provided power adapter. Using an incorrect adapter may damage the device and void the warranty.
- Keep the console away from water, moisture, and extreme temperatures.
- Do not attempt to open or repair the console yourself. Refer all servicing to qualified personnel.
- Ensure proper ventilation around the console during operation to prevent overheating.
- Keep out of reach of small children to prevent accidental damage or injury.
3. Package Contents
Please check the package for the following items:
- WUYJTIF Pandora Box DX Retro Arcade Console (Street Fighter Edition)
- Power Adapter
- HDMI Cable (3 meters)
- VGA Cable (3 meters)
- User Manual (this document)
4. Product Overview
The Pandora Box DX console features a classic arcade layout with two sets of controls, allowing for immediate two-player action. The system supports HD 720P output for a clear visual experience on modern displays.

Image: Front view of the Pandora Box DX console, displaying the game selection menu and key features like 720P HD output and game saving.
4.1 Console Layout and Ports
Familiarize yourself with the console's rear panel for proper connection.
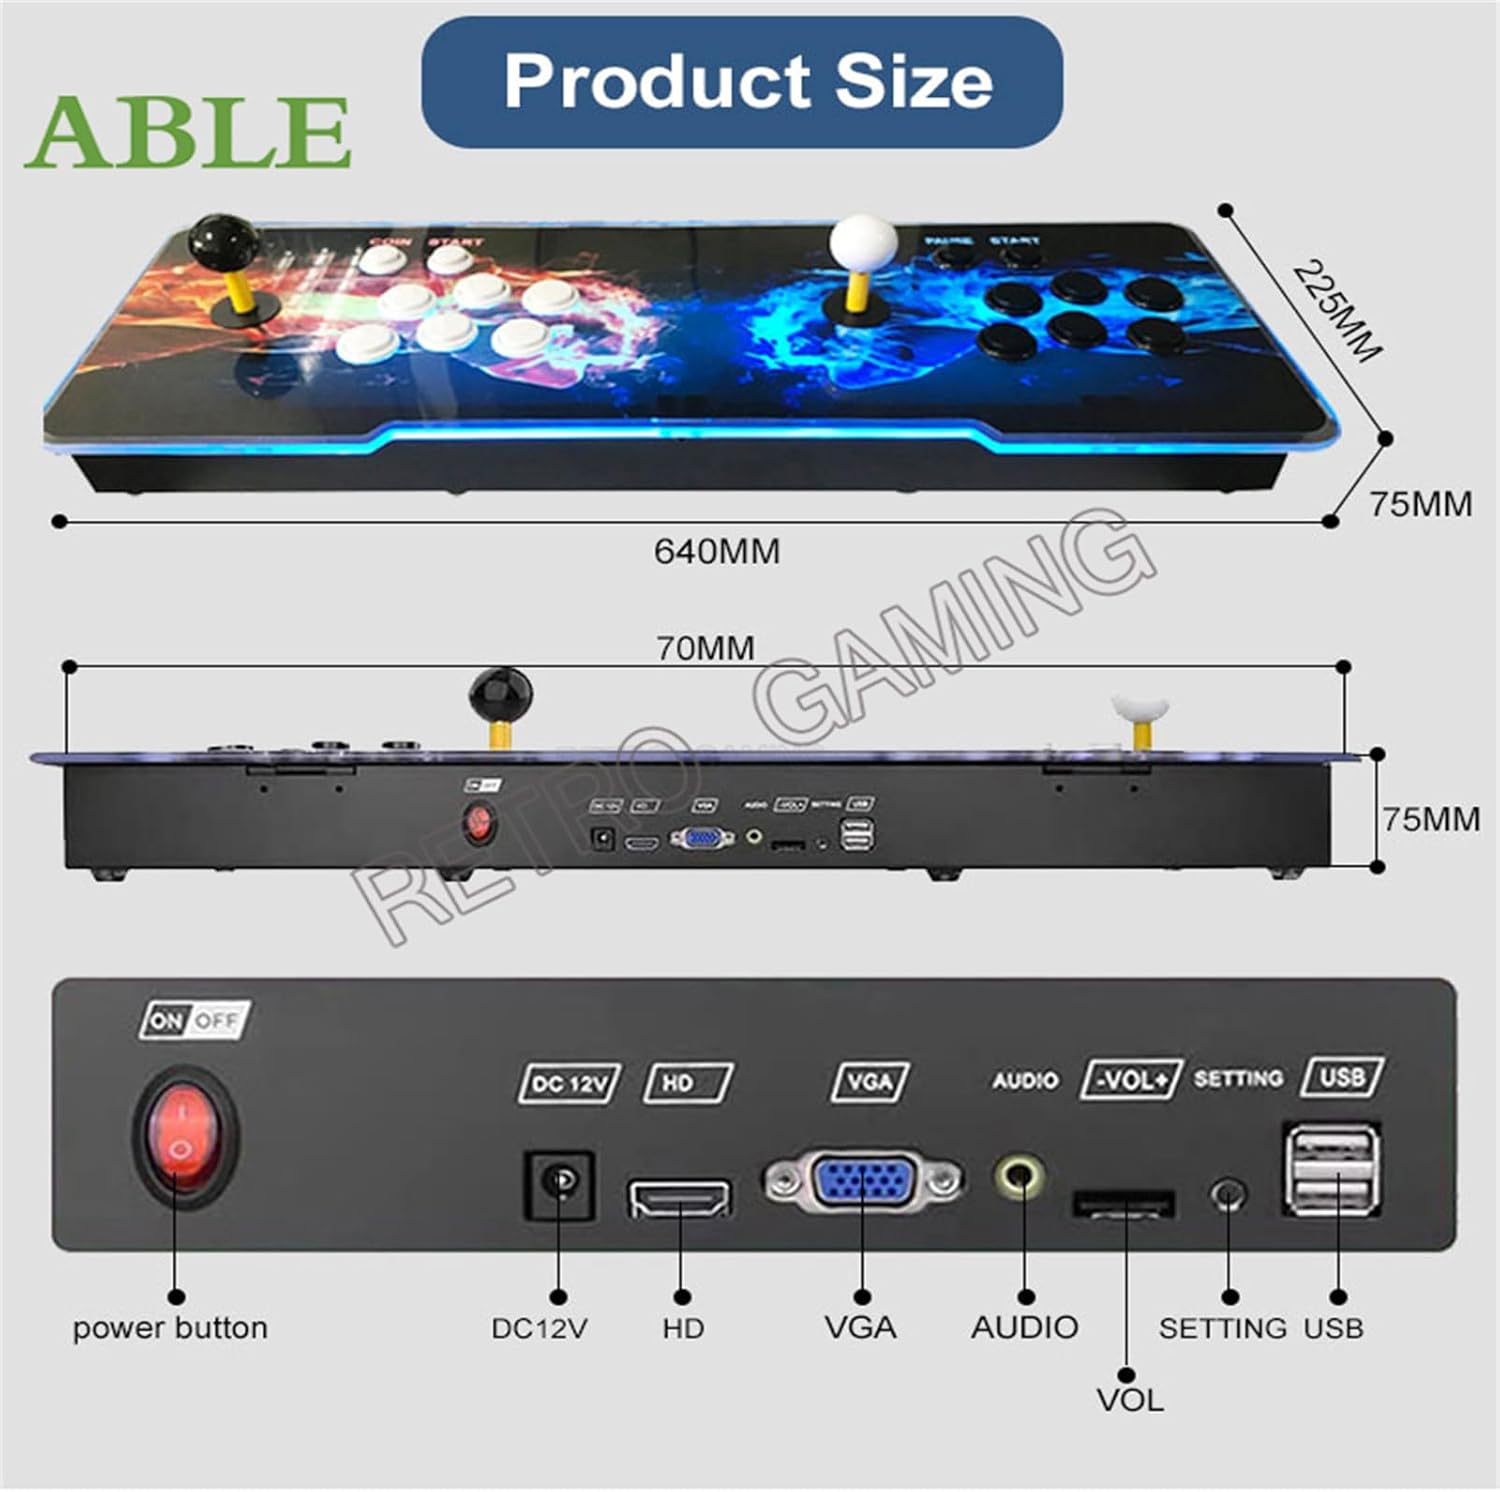
Image: Rear view of the console detailing the power button, DC12V power input, HDMI (HD) output, VGA output, Audio output, Volume controls (-VOL+), Setting button, and USB ports.
- Power Button: Turns the console On/Off.
- DC12V: Power input port.
- HD (HDMI): Connects to an HDMI-compatible display for video and audio output.
- VGA: Connects to a VGA-compatible display for video output.
- Audio: 3.5mm audio output jack.
- -VOL+: Volume adjustment buttons.
- SETTING: Accesses system settings.
- USB: For connecting external USB controllers or USB drives to add games.
5. Setup Instructions
- Connect to Display:
Choose your preferred display connection:
- For HDMI: Connect one end of the provided HDMI cable to the HD port on the console and the other end to an HDMI input on your TV or monitor.
- For VGA: Connect one end of the provided VGA cable to the VGA port on the console and the other end to a VGA input on your TV or monitor. If using VGA, you may need to connect an external speaker system to the Audio port for sound.
- Connect Power: Insert the DC12V power adapter into the DC12V port on the console, then plug the adapter into a power outlet.
- Power On: Press the Power Button on the rear panel to turn on the console.
- Initial Setup: The console will boot up and display the main game selection menu. You may be prompted to select a language if it's the first use.

Image: The arcade console connected to a television, demonstrating 720P HD video output during gameplay.
6. Operating Instructions
6.1 Navigating the Game Menu
Use the joysticks and buttons to navigate the game selection menu. The main screen displays a list of games. Use the joystick to scroll up and down, and the primary action button (usually 'A' or 'X') to select a game.
6.2 System Features
The Pandora Box DX system offers several advanced features:
- Pause/Exit in games: Press the PAUSE/START button during gameplay to pause or exit to the main menu.
- Save/Load Games: Save your game progress and load it later.
- Hide Games: Conceal specific games from the main list.
- Favorite GameList: Mark games as favorites for quick access.
- Search Games: Use the search function to find specific titles.
- Recent games: Access a list of recently played games.
- Game Classification: Games are categorized by genre or system for easier browsing.
- Image Enhancement: Adjust visual settings for improved graphics.
- One Key Switch: Quickly switch between system modes or functions.
- Language Selection: Supports English, Chinese, Korean, Japanese, and Spanish. Access this option via the SETTING button.
6.3 Adding Games via Wi-Fi
The console features a built-in game market allowing you to download additional games via Wi-Fi.
- Navigate to the "Settings" menu using the SETTING button or joystick.
- Select "Wi-Fi" and connect to your local wireless network by entering the password.
- Once connected, access the "Game Market" or "Download Management" section.
- Browse and select games to download. Downloaded games will appear in your game list.

Image: Screenshots illustrating the Wi-Fi connection process, game category browsing, game search, and download progress within the console's interface.
6.4 Adding Games via USB
You can also add games by copying them to a USB drive and inserting it into the console.
- Copy your desired game ROMs to a USB drive.
- Insert the USB drive into one of the USB ports on the console.
- Access the system settings to match the emulator for the new games.
- The newly added games will appear in the game lists after launching.
6.5 Multiplayer Gaming
The console supports up to 4 players by connecting additional external USB gamepads to the USB ports via a USB hub (not included). This allows for an enhanced multiplayer experience.
6.6 Customizable Buttons
The system allows for customization of button mappings. Access this feature through the system settings to configure controls to your preference.
7. Maintenance
- Cleaning: Use a soft, dry cloth to wipe the console's surface. Do not use liquid cleaners or abrasive materials.
- Storage: When not in use, store the console in a cool, dry place away from direct sunlight.
- Software Updates: Periodically check for system updates via the Wi-Fi connection to ensure optimal performance and access to new features.
8. Troubleshooting
- No Power:
- Ensure the power adapter is securely connected to both the console and a working power outlet. Check if the power button is pressed.
- No Video Output:
- Verify that the HDMI or VGA cable is correctly connected to both the console and the display. Ensure your TV/monitor is set to the correct input source (e.g., HDMI 1, VGA). Try a different cable or display if possible.
- No Audio:
- If using HDMI, check your TV's volume. If using VGA, ensure external speakers are connected to the Audio port and are powered on. Adjust the console's volume using the -VOL+ buttons.
- Games Not Loading/Freezing:
- Restart the console. Ensure the game files are not corrupted if you added them via USB. If downloading via Wi-Fi, ensure a stable internet connection.
- Wi-Fi Connection Issues:
- Check your Wi-Fi password. Ensure the console is within range of your wireless router. Restart your router and the console.
9. Specifications
| Model: | Pandora Box DX (Street Fighter Edition) |
| Brand: | WUYJTIF |
| System: | 3D Pandora Saga EX WIFI |
| Processor: | Amlogic S812, ARM Cortex A9 2.0 Ghz |
| GPU: | Mali450MP8 |
| RAM: | 1GB |
| Internal Storage: | 8GB NAND FLASH |
| Memory Card: | 128GB SD card (pre-installed) |
| Pre-installed Games: | 10888 (including 300 3D games) |
| Output Resolution: | HD 1280x720P |
| Hardware Interface: | HDMI, VGA, USB |
| Controller Type: | 8-Way Joystick, 16 Buttons (per player) |
| Number of Players: | 2 (built-in), up to 4 (with external USB controllers) |
| Dimensions (L x W x H): | 25.59 x 9.45 x 2.36 inches (approx. 640mm x 225mm x 75mm) |
| Material: | Plastic |
| Supported Emulators: | MAME, FBA, FC, SFC, PCE, GBA, GBC, MD, PSP, PS, N64 |
| Connectivity: | Wi-Fi for game downloads |

Image: Display showing internal hardware specifications of the Pandora's EX WIFI board, including processor, RAM, storage, and game count.
10. Warranty and Support
WUYJTIF products are manufactured to high-quality standards. For warranty information and technical support, please refer to the seller's policies or contact the retailer where the product was purchased. Keep your proof of purchase for any warranty claims.