ANPABO SX1919
ANPABO 12V 2-Seater Ride On Train Trackless
Model: SX1919 - Instruction Manual
Introduction
This manual provides essential information for the safe assembly, operation, and maintenance of your ANPABO 12V 2-Seater Ride On Train Trackless, Model SX1919. Please read all instructions carefully before use to ensure proper function and safety for the child.

Image: The ANPABO 12V 2-Seater Ride On Train, black and red, with two young children seated, demonstrating its two-seater capacity.
Safety Information
WARNING: Adult supervision is required at all times. This product is intended for children aged 3 years and up. Ensure the child wears appropriate safety gear, such as a helmet, when operating the vehicle. Do not operate near stairs, steep inclines, public roads, or swimming pools. Always ensure the vehicle is used on flat, stable surfaces.
- Material Safety: The train is constructed from non-toxic and odorless materials.
- Remote Control: For younger children, parents can utilize the remote control to manage direction and speed, or to stop the vehicle in emergencies.
- Weight Capacity: The train locomotive has a maximum load capacity of 150 lbs. If additional carriages are attached, the total vehicle load capacity can be up to 300 lbs.
Package Contents
Verify that all components are present before assembly:
- ANPABO 12V Ride On Train Locomotive (Main Unit)
- Rechargeable 12V Battery (pre-installed or separate)
- Charger
- User Manual
- Remote Control (if included with your model)
- Small parts for assembly (e.g., steering wheel, seat back)
Setup and Assembly
The ANPABO Ride On Train features a one-piece molding design, simplifying the assembly process. Only a few basic parts require installation.
- Unpacking: Carefully remove all components from the packaging.
- Wheel Installation: Attach the wheels as per the diagrams in the included quick-start guide. Ensure they are securely fastened.
- Steering Wheel Attachment: Connect the steering wheel to the main unit, ensuring all electrical connections (if any) are properly seated.
- Seat Installation: Secure the main seat and the height-adjustable second seat.
- Battery Connection: If the battery is not pre-installed, connect it according to the polarity markings. Ensure the battery compartment is closed securely.
- Initial Charge: Before first use, fully charge the battery for the recommended duration (refer to the Charging section).
Operating Instructions
Controls Overview

Image: Detail of the train's control panel, showing the red power button, green high/low speed switch, and red forward/backward switch, along with the charging port.
- Power Button: Located on the control panel (red button). Press to turn the train ON or OFF.
- Speed Switch: (Green switch) Selects between high and low speed settings.
- Direction Switch: (Red switch) Controls forward and backward movement.
- Foot Pedal: Press the foot pedal to engage the motor and move the train. Release to brake.
Seating Configuration and Storage
The train locomotive includes two seats, with one being height-adjustable.

Image: A visual guide illustrating the versatility of the second seat, which can be flipped to create a high seat, used as a low seat, or removed to reveal a storage compartment.
- Height-Adjustable Seat: The second (black) seat can be flipped over to provide a higher seating position, accommodating taller children or an adult.
- Extra Storage: Removing the second seat reveals a storage compartment, ideal for toys or snacks.
- Attaching Carriages: For additional seating, optional carriages (sold separately) can be attached to the rear of the locomotive. Ensure the connection mechanism is secure before use.
Audio System and Features

Image: A detailed view of the music panel, featuring a USB port, a 12V power indicator, and a series of lights indicating the battery charge level.
- Music Player: The integrated music panel includes built-in music and early-education stories.
- External Audio: Connect a phone or other device via Bluetooth or USB to play custom music.
- Train Whistle: Activate the realistic train whistle sound using the designated button.
- Headlight: The bright headlight illuminates automatically when the train is in operation.
- Battery Level Indicator: The music panel displays the current power level of the battery.
Charging the Battery
The ANPABO Ride On Train offers two convenient charging methods for its 12V battery.

Image: A visual representation of the two charging options: plugging the charger directly into the train's charging port, or detaching the battery and charging it separately.
- Direct Charging: Plug the charger into the designated charging port on the train's control panel.
- Detachable Battery Charging: Remove the battery from its compartment and connect it directly to the charger. This allows for charging in a separate location.
Ensure the charger is connected to a standard wall outlet. The battery indicator lights on the music panel will show charging progress. Disconnect the charger once the battery is fully charged to prevent overcharging.
Maintenance and Storage
- Cleaning: Wipe the train with a soft, damp cloth. Avoid using harsh chemicals or abrasive cleaners. Do not spray water directly onto electrical components.
- Battery Care: Recharge the battery after each use. If storing for an extended period, charge the battery fully every 30 days to prolong its lifespan. Store the battery in a cool, dry place.
- Wheel Inspection: Regularly check the rubber wheels for wear and tear. The high-quality rubber wheels are designed for durability and quiet operation on various surfaces, including wood floors, without scratching.
- General Inspection: Periodically check all screws, nuts, and connections to ensure they are tight and secure.
- Storage: Store the train in a dry, covered area away from direct sunlight and extreme temperatures.
Troubleshooting
| Problem | Possible Cause | Solution |
|---|---|---|
| Train does not move | Battery is low or not connected; Power switch is off; Loose wire connection; Overload protection activated. | Charge the battery; Turn on the power switch; Check all wire connections; Turn off the train for a few minutes and restart. |
| Train moves slowly | Low battery; Overloaded; Operating on an uneven surface. | Recharge the battery; Reduce load; Move to a flat surface. |
| Music/Sound not working | Volume too low; Loose connection; Audio system malfunction. | Adjust volume; Check connections; Contact customer support if issue persists. |
| Remote control not working | Remote batteries dead; Not paired correctly; Interference. | Replace remote batteries; Re-pair remote with train (refer to remote manual); Move away from sources of interference. |
Specifications
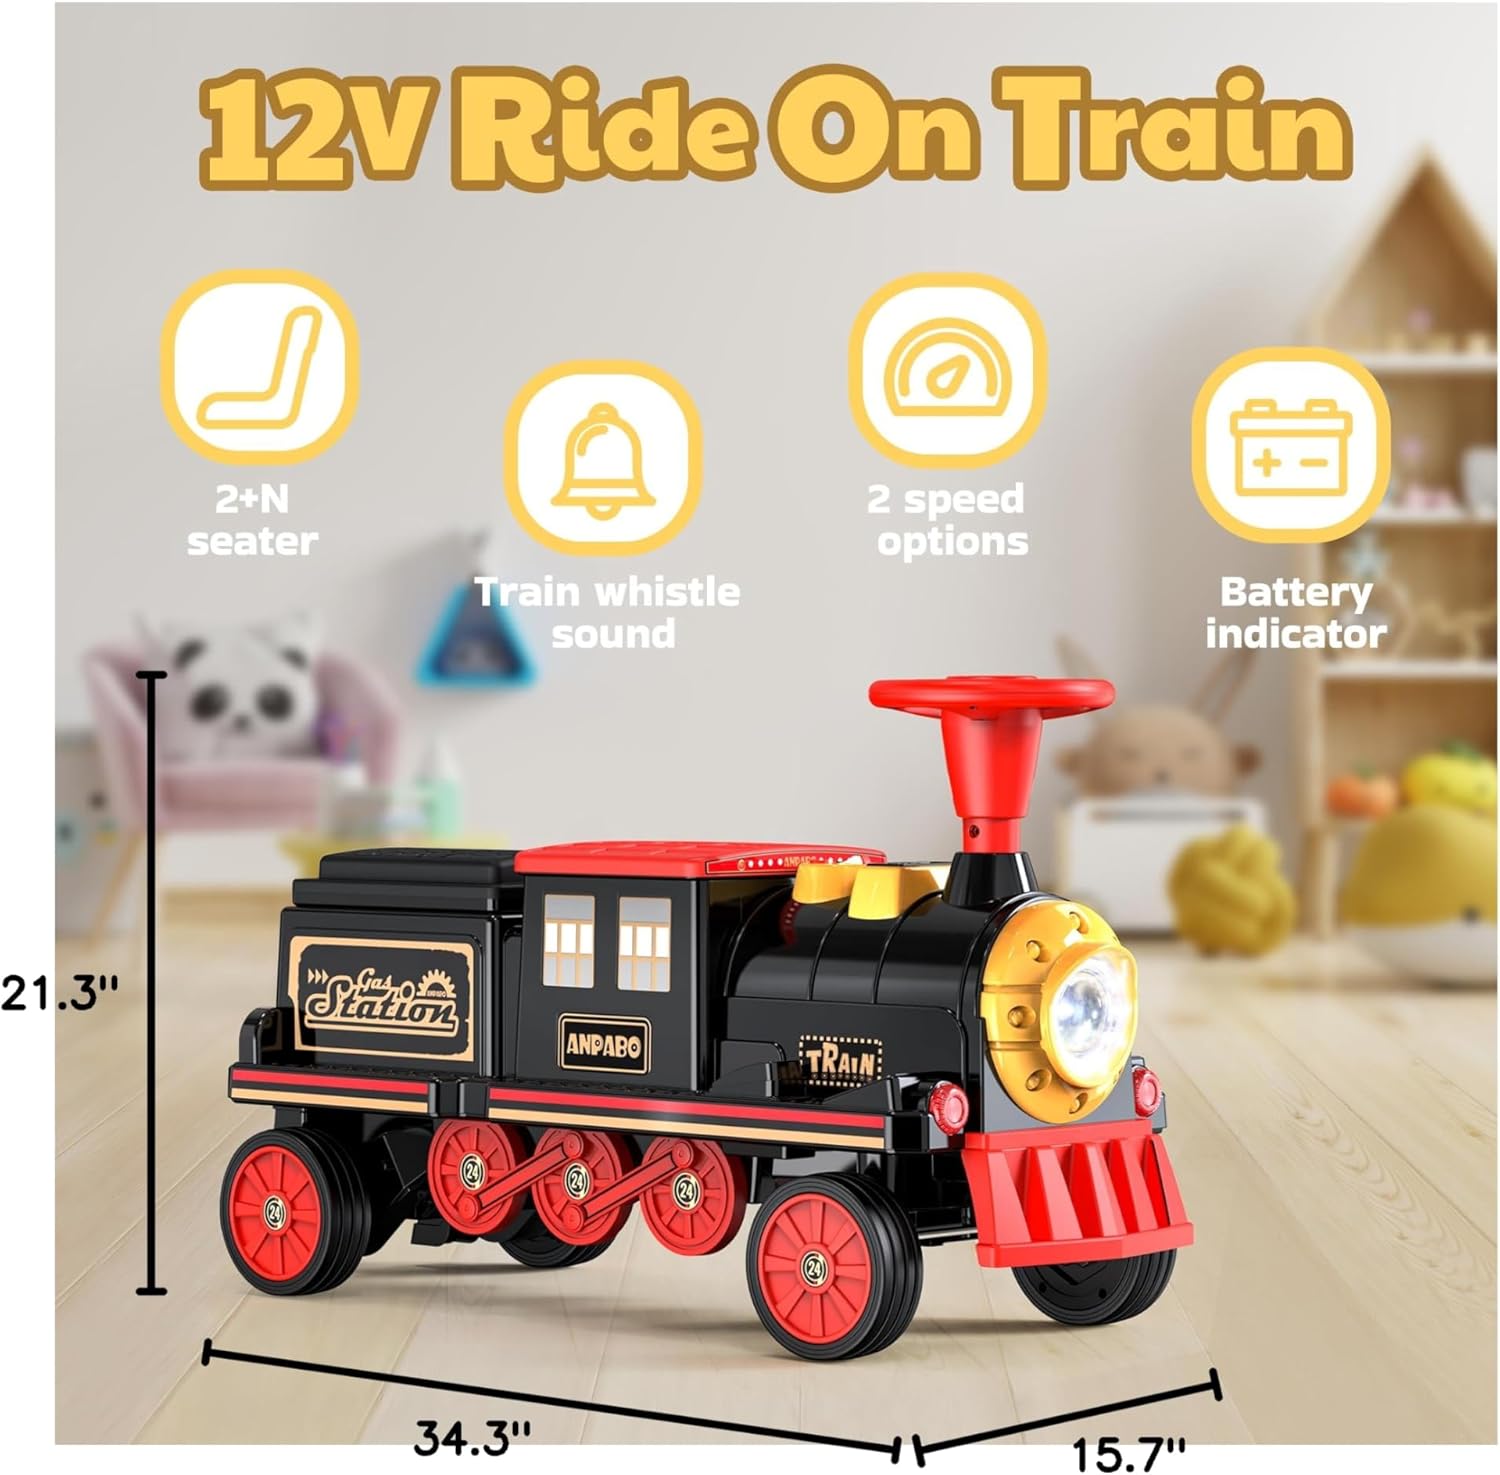
Image: A clear diagram illustrating the product dimensions of the ANPABO Ride On Train, measuring 34.3 inches in length, 15.7 inches in width, and 21.3 inches in height.
| Feature | Detail |
|---|---|
| Model Number | SX1919 |
| Product Dimensions | 34.3 x 15.7 x 21.3 inches |
| Item Weight | 23.8 pounds |
| Battery | 12V (Nonstandard Battery, included) |
| Recommended Age | 3 years and up |
| Max Load Capacity (Locomotive) | 150 lbs |
| Max Load Capacity (with additional carriages) | 300 lbs |
| Wheels | Rubber (wear-resistant, shock-absorbent, quiet) |
Warranty and Support
ANPABO products are manufactured to high-quality standards. For specific warranty details, please refer to the warranty card included with your product or contact ANPABO customer service. If you encounter any issues or require assistance, please reach out to our support team through the retailer where the product was purchased or visit the official ANPABO website for contact information.