Candy Brush ICO4104TWM1_S
Candy CO 4104TWM/1-S Washing Machine User Manual
Model: ICO4104TWM1_S | Brand: Candy Brush
1. Introduction
This user manual provides comprehensive instructions for the safe and efficient operation, installation, and maintenance of your Candy CO 4104TWM/1-S Washing Machine. Please read this manual thoroughly before using the appliance and keep it for future reference.
The Candy CO 4104TWM/1-S is a free-standing front-load washing machine designed for household use. It features a generous 10 kg capacity and a maximum spin speed of 1400 rpm, making it suitable for large families and efficient laundry care. Equipped with smart connectivity, it offers enhanced control and convenience.

Figure 1: Front view of the Candy CO 4104TWM/1-S Washing Machine, showing the control panel, detergent drawer, and large front-loading door.
2. Safety Information
Always adhere to the following safety precautions to prevent personal injury or damage to the appliance.
- Electrical Safety: Ensure the power supply matches the appliance's requirements. Do not use extension cords or adapters. Always unplug the machine before cleaning or maintenance.
- Water Connection: Use new hose sets supplied with the appliance. Do not reuse old hose sets. Ensure all connections are tight to prevent leaks.
- Installation: The appliance must be installed on a firm, level surface. Remove all transit bolts before use. Improper installation can lead to noise, vibration, and malfunction.
- Children and Vulnerable Persons: This appliance can be used by children aged 8 years and above and persons with reduced physical, sensory or mental capabilities or lack of experience and knowledge if they have been given supervision or instruction concerning use of the appliance in a safe way and understand the hazards involved. Children should not play with the appliance. Cleaning and user maintenance shall not be made by children without supervision.
- General Use: Do not wash items that are soiled with flammable liquids. Do not open the door forcefully during operation.
3. Setup and Installation
3.1 Unpacking
Carefully remove all packaging materials, including the polystyrene base and any protective films. Inspect the appliance for any damage. Keep packaging materials out of reach of children.
3.2 Removing Transit Bolts
Before operating the washing machine, it is crucial to remove the transit bolts located at the rear of the appliance. These bolts secure the drum during transport and must be removed to prevent damage during operation. Refer to the diagram in your quick start guide for exact locations. Keep the transit bolts for future transport of the machine.
3.3 Location and Leveling
Place the washing machine on a solid, flat, and stable floor. Ensure there is adequate space around the machine for ventilation and connections. Use a spirit level to check if the machine is perfectly level. Adjust the adjustable feet at the bottom of the machine by turning them clockwise or counter-clockwise until the machine is stable and level. This prevents excessive vibration and noise during operation.
3.4 Water Connection
Connect the cold water inlet hose to the cold water tap and the corresponding inlet valve on the back of the machine. Ensure the rubber washers are correctly seated to prevent leaks. Tighten connections by hand, then use a wrench for a final quarter turn. Do not overtighten.
3.5 Drainage Connection
Position the drain hose into a standpipe or over the edge of a sink, ensuring it is securely fastened to prevent displacement during the drain cycle. The end of the drain hose should be between 60 cm and 100 cm from the floor.
3.6 Electrical Connection
Plug the power cord into a grounded electrical outlet. Ensure the outlet is easily accessible. The electrical supply must comply with the specifications listed on the appliance's rating plate.
3.7 First Use
Before washing laundry for the first time, run an empty wash cycle (e.g., a short program at 60°C) without detergent or laundry. This helps to clean the drum and remove any manufacturing residues.
4. Operating Instructions
4.1 Control Panel Overview
The control panel consists of a program dial, a digital display, and various function buttons. Familiarize yourself with these components for optimal use.

Figure 2: Digital display and function buttons, showing temperature, spin speed, and various program options.
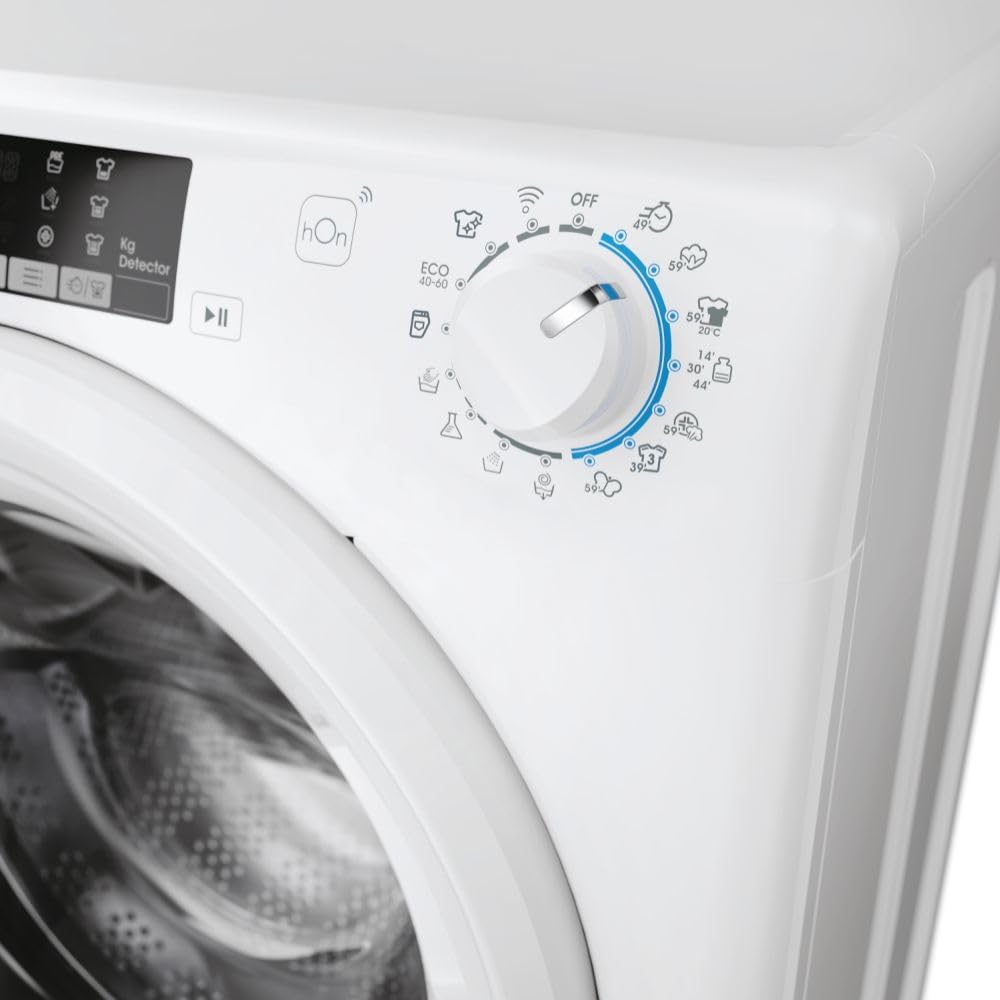
Figure 3: Program selection dial with various wash cycles indicated.
4.2 Loading Laundry
Open the washing machine door. Load laundry loosely into the drum, ensuring not to overload the machine. For best results and to prevent damage, distribute the load evenly. The maximum capacity for this model is 10 kg.

Figure 4: Washing machine drum loaded with laundry, demonstrating proper loading technique.
4.3 Adding Detergent and Softener
Pull out the detergent dispenser drawer located on the top left of the control panel. Add the appropriate amount of detergent to the main wash compartment and fabric softener to its designated compartment. Do not exceed the 'MAX' fill line.

Figure 5: Detergent dispenser drawer pulled out, showing compartments for detergent and softener.
4.4 Selecting a Wash Program
Turn the program dial to select the desired wash program. The machine offers 16 programs, including:
- Cottons: For durable cotton items.
- Synthetics: For synthetic and mixed fabrics.
- Delicates: For fragile items requiring gentle care.
- Wool: Specific program for wool garments.
- Quick Wash (14/30/44 min): For lightly soiled items needing a fast cycle.
- Eco 40-60: Energy-efficient program for normally soiled cotton, linen, or mixed fiber items.
- Steam Function: Reduces wrinkles and refreshes clothes.
4.5 Adjusting Options and Starting a Cycle
After selecting a program, you can adjust additional options using the touch buttons on the display:
- Temperature: Adjust the wash temperature (e.g., 20°C, 30°C, 40°C, 60°C, 90°C).
- Spin Speed: Select the desired spin speed (e.g., 400, 800, 1000, 1400 rpm).
- Delayed Start: Postpone the start of the wash cycle.
- Extra Rinse: Adds an additional rinse cycle.
Press the Start/Pause button to begin the wash cycle. The display will show the remaining time.
4.6 Smart Connectivity (hOn App)
This washing machine features Wi-Fi connectivity, allowing you to control and monitor it remotely via the hOn app. Download the hOn app from your smartphone's app store and follow the in-app instructions to pair your appliance. The app provides additional programs, statistics, and maintenance tips.
5. Maintenance and Care
Regular maintenance ensures the longevity and optimal performance of your washing machine.
5.1 Cleaning the Exterior
Wipe the exterior surfaces with a soft, damp cloth. Do not use abrasive cleaners or solvents.
5.2 Cleaning the Detergent Dispenser
Periodically remove the detergent dispenser drawer and rinse it under running water to remove any detergent residue. Use a small brush if necessary. Reinsert the drawer once clean and dry.
5.3 Cleaning the Drum
Run a maintenance wash (e.g., a hot cycle with a washing machine cleaner or a small amount of vinegar) once a month to prevent odors and mold buildup in the drum.
5.4 Cleaning the Filter
The filter, usually located at the bottom front of the machine, should be cleaned regularly to prevent blockages. Place a shallow container under the filter cap to catch any residual water. Unscrew the cap slowly, drain the water, and remove any lint or foreign objects. Re-secure the cap tightly.
5.5 Door Seal Care
After each wash, wipe the rubber door seal and the inside of the door glass to remove any moisture or lint. Leave the door slightly ajar when not in use to allow air circulation and prevent mold growth.
6. Troubleshooting
If you encounter issues with your washing machine, consult the following table for common problems and their solutions before contacting service.
| Problem | Possible Cause | Solution |
|---|---|---|
| Machine does not start | Power cord not plugged in; Door not closed properly; Program not selected; Start/Pause button not pressed. | Check power connection; Ensure door is firmly closed; Select a program; Press Start/Pause. |
| No water intake | Water tap closed; Water inlet hose kinked; Water supply cut off. | Open water tap; Straighten hose; Check household water supply. |
| Water not draining | Drain hose kinked or blocked; Filter clogged. | Straighten or clear drain hose; Clean the filter (see Section 5.4). |
| Excessive vibration/noise | Transit bolts not removed; Machine not level; Laundry unevenly distributed. | Remove transit bolts (see Section 3.2); Level the machine (see Section 3.3); Redistribute laundry in the drum. |
| Error codes on display | Specific malfunction. | Refer to the full user manual or hOn app for a list of error codes and their solutions. |
7. Specifications
| Feature | Detail |
|---|---|
| Model Number | ICO4104TWM1_S |
| Type | Free-standing Front Load Washing Machine |
| Capacity | 10 kg |
| Max Spin Speed | 1400 rpm |
| Energy Class | A |
| Dimensions (W x H x D) | Approx. 60 cm x 85 cm x 58 cm (Standard depth for 10kg slimline) |
| Weight | 67 kg |
| Color | White |
| Control Type | Button, Rotary Dial |
| Special Features | Delayed Start, Smart Connectivity (Wi-Fi), Steam Function, Kg Mode |
| Included Accessories | Power cable |
Note: Dimensions are approximate. Please refer to the product's technical sheet for precise measurements.
8. Warranty and Support
Your Candy CO 4104TWM/1-S Washing Machine is covered by a manufacturer's warranty. The specific terms and duration of the warranty may vary by region. Please retain your proof of purchase for warranty claims.
For technical assistance, spare parts, or to schedule a service appointment, please contact Candy customer support. You can typically find contact information on the official Candy website or in the documentation provided with your appliance.
Online Resources: For the most up-to-date information, FAQs, and additional support, visit the official Candy website: www.candy-group.com
Ask a question about this manual
Ask about setup, troubleshooting, compatibility, parts, safety, or missing instructions. Manuals+ will review the question and use this page’s manual context to help answer it.