MUST ENERGY 80A
MUST ENERGY 80A MPPT Solar Charge Controller User Manual
Model: 80A
1. Introduction
This manual provides detailed instructions for the installation, operation, maintenance, and troubleshooting of the MUST ENERGY 80A MPPT Solar Charge Controller. Please read this manual thoroughly before installation and use to ensure optimal performance and safety.
The MUST ENERGY PC1800F Series 80A MPPT Solar Charge Controller is designed to efficiently manage power from solar panels to charge various battery types, including lead-acid and lithium batteries. It features Maximum Power Point Tracking (MPPT) technology for high efficiency, multi-stage charging, and comprehensive protection mechanisms.

Figure 1: Front view of the MUST ENERGY 80A MPPT Solar Charge Controller, showing the LCD display and control buttons.
2. Key Features
- High Tracking and Conversion Efficiency: MPPT technology with up to 99% tracking efficiency and 98% conversion efficiency, maximizing solar panel output.
- Versatile Battery Compatibility: Supports 12V, 24V, 36V (manual setting), and 48V battery systems, including lithium, gel, and lead-acid types.
- Advanced Charging: Features a three-stage charging mode and equalization charging function for optimal battery health and longevity.
- Comprehensive Protections: Includes short-circuit, PV reverse polarity, battery overcurrent, load overcurrent, battery reverse polarity, and over-temperature protections.
- User-Friendly Display: LED and LCD display provides real-time information on photovoltaic voltage, battery voltage, battery current, and operating mode.
- Communication Ports: Equipped with RS485 and USB communication ports for monitoring and data exchange.
- Temperature Compensation: Battery Temperature Sensor (BTS) terminal allows for automatic temperature compensation, extending battery life.
- Parallel Operation: Multiple controllers can be used in parallel for increased system capacity.
3. Safety Instructions
Please observe the following safety precautions during installation and operation:
- Ensure all wiring is correctly polarized and securely connected to prevent damage to the controller or other components.
- Do not connect the controller directly to an AC power source.
- Always disconnect the solar panel and battery power before performing any maintenance or wiring changes.
- Install the controller in a well-ventilated area, away from flammable materials and direct sunlight.
- The controller generates heat during operation; ensure adequate airflow around the unit.
- Only qualified personnel should perform installation and maintenance.
- Wear appropriate personal protective equipment (PPE) such as gloves and eye protection during installation.
4. Setup and Installation
4.1 Unpacking
Carefully unpack the controller and inspect it for any shipping damage. The package should include:
- MUST ENERGY 80A MPPT Solar Charge Controller
- USB Cable
- Battery Temperature Sensor (BTS) Cable
- User Manual (English)
4.2 Mounting the Controller
The controller is designed for wall mounting. Choose a location that is:
- Indoors, protected from direct sunlight, rain, and excessive dust.
- Well-ventilated to allow for proper heat dissipation.
- Accessible for wiring and maintenance.
Use appropriate screws and anchors for your wall type to securely mount the unit.
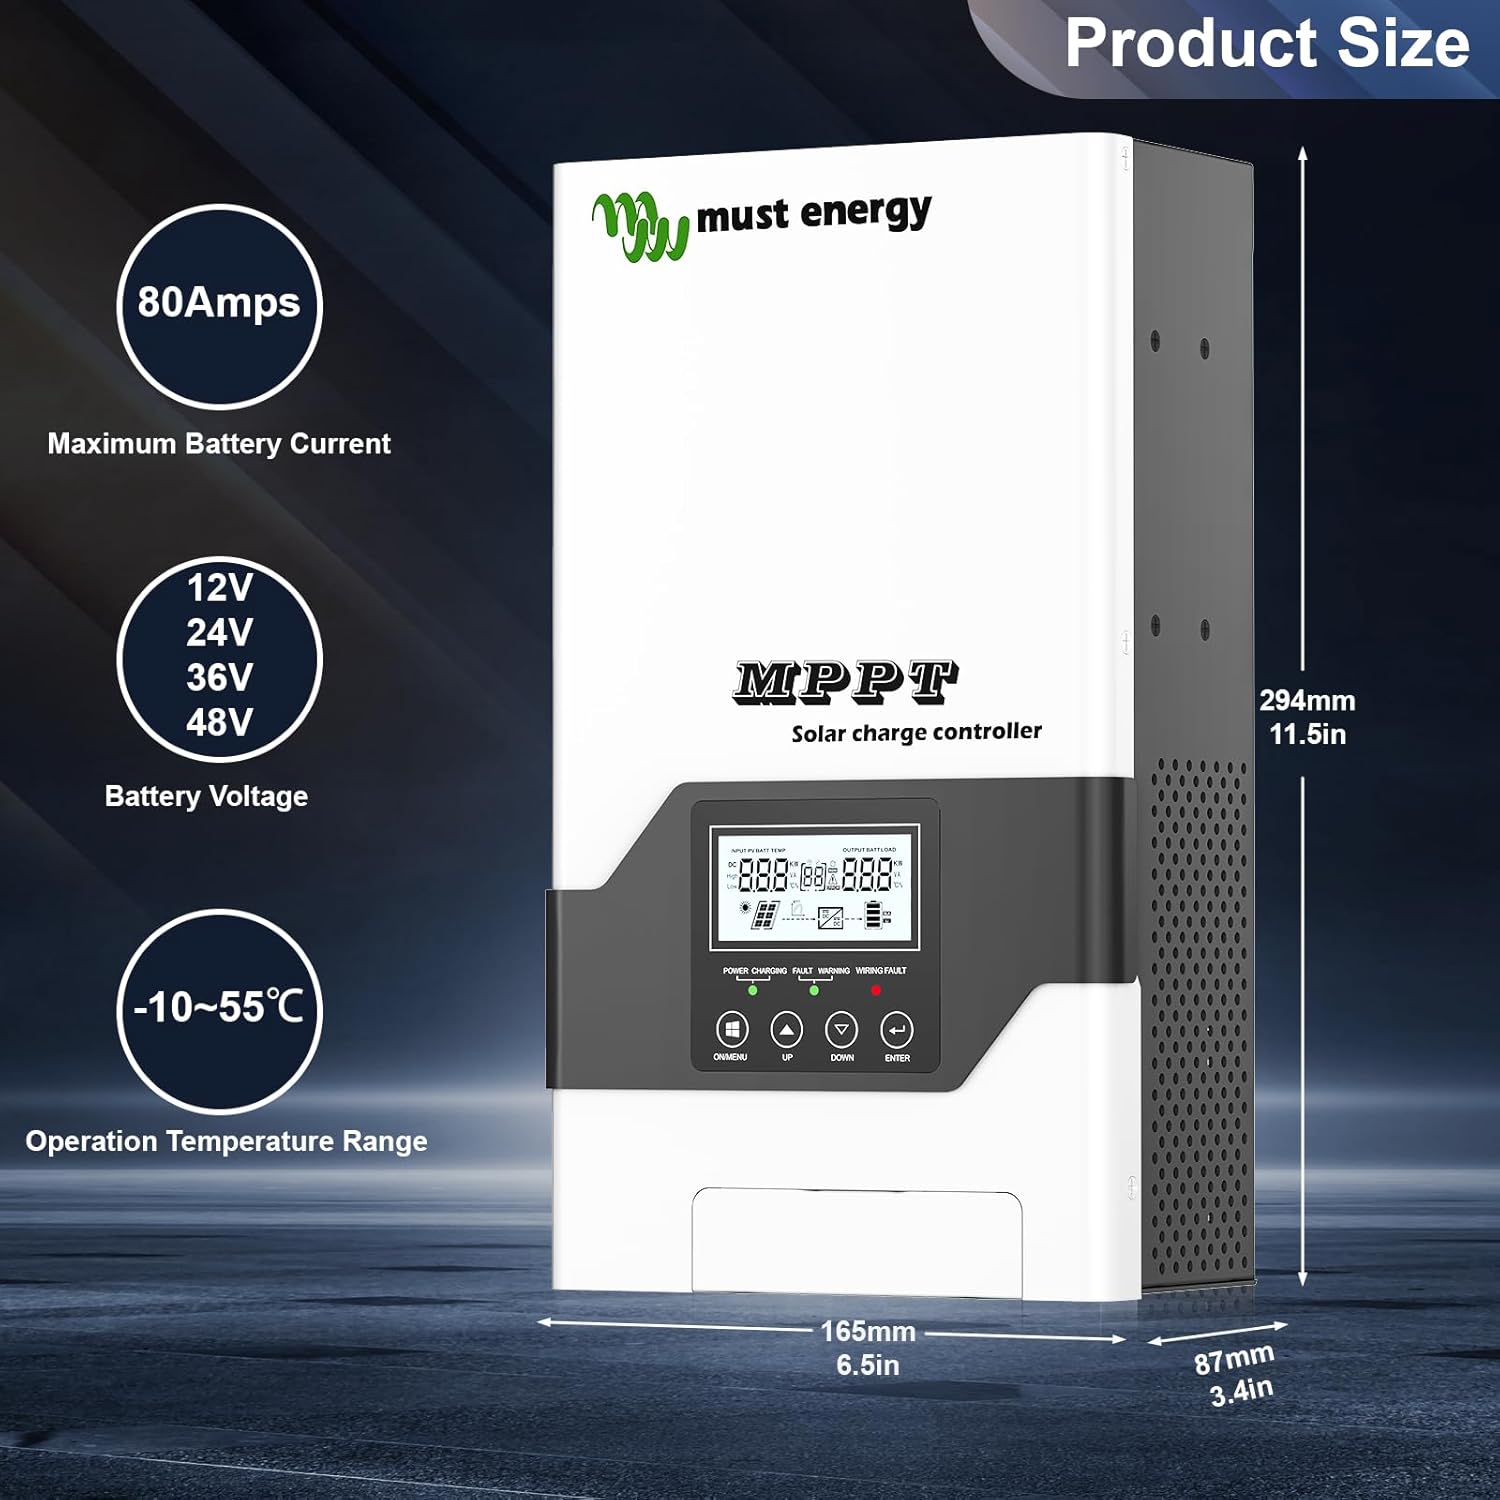
Figure 2: Product dimensions and key specifications, including 80 Amps maximum battery current, 12V/24V/36V/48V battery voltage compatibility, and -10~55°C operation temperature range.
4.3 Wiring Connections
Follow the wiring sequence carefully to avoid damage. Always connect the battery first, then the solar panels.
- Connect the Battery: Connect the positive and negative terminals of the battery to the BAT+ and BAT- terminals on the controller. Ensure correct polarity.
- Connect the Solar Panels: Connect the positive and negative terminals of the solar panel array to the PV+ and PV- terminals on the controller. Ensure correct polarity.
- Connect the Battery Temperature Sensor (BTS): Plug the BTS cable into the dedicated BTS port on the controller. Place the sensor near the battery for accurate temperature readings.
- (Optional) Connect USB/RS485: For PC monitoring or communication, connect the USB or RS485 cable to the respective ports.
Important: The controller cannot be connected directly to a load. It must be used with an inverter if you intend to power AC loads.
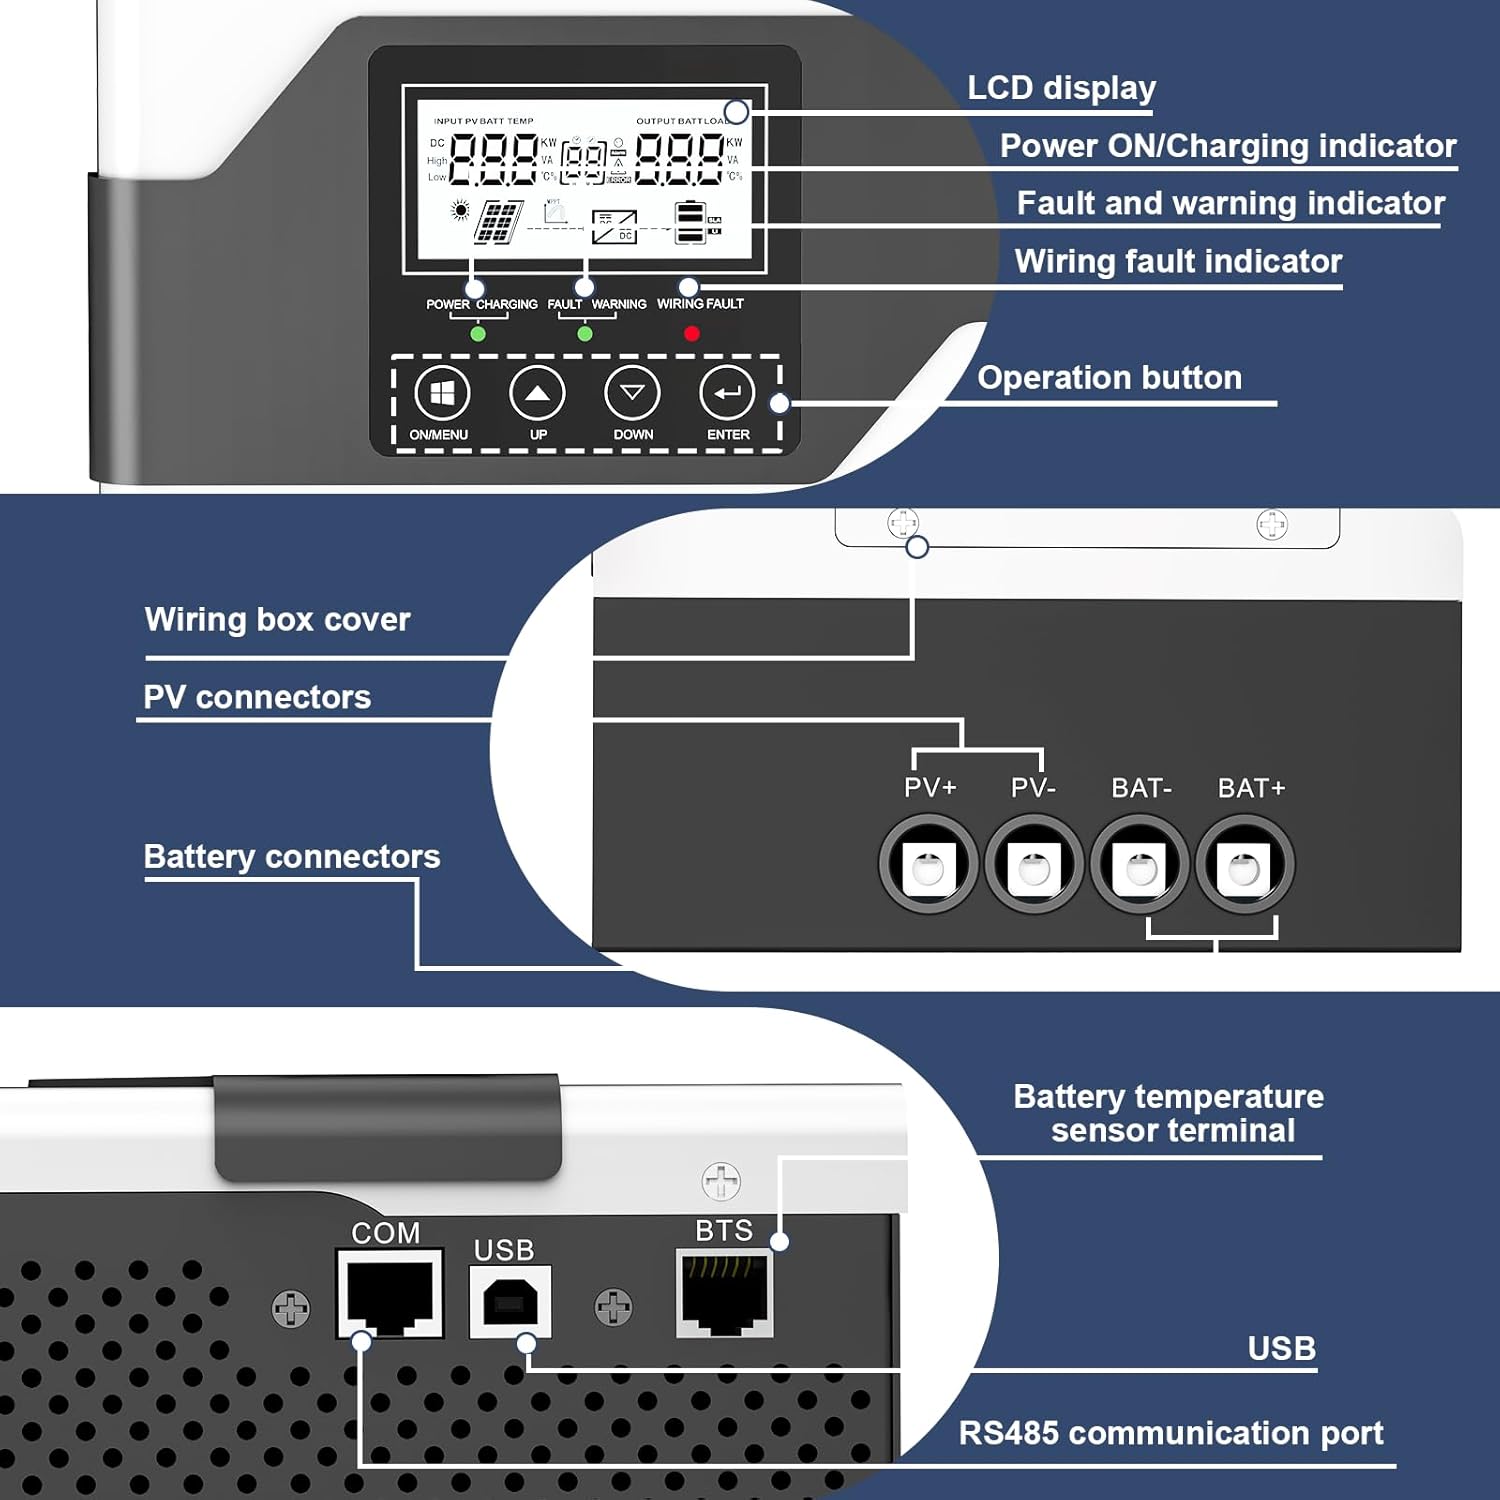
Figure 3: Detailed view of the controller's LCD display, operation buttons, wiring box cover, PV connectors, battery connectors, battery temperature sensor terminal, USB port, and RS485 communication port.

Figure 4: A typical solar power system setup showing the MPPT solar charge controller connected to solar panels, a battery, and an inverter which then powers various AC loads like a TV, kettle, printer, lighting, and camera.
5. Operating Instructions
5.1 Initial Power-Up
Once all connections are secure, the controller will automatically power on. The LCD display will show system information.
5.2 LCD Display and Buttons
The LCD display provides real-time data. Use the buttons below the display to navigate menus and adjust settings:
- ON/MENU: Press to cycle through display screens or enter menu settings.
- UP: Navigate up in menus or increase values.
- DOWN: Navigate down in menus or decrease values.
- ENTER: Confirm selection or save settings.
5.3 Battery Type and Voltage Setting
The controller automatically identifies 12V, 24V, and 48V battery systems. For 36V systems, manual setting is required. Refer to the detailed manual for specific steps to set battery parameters, including type (lithium, gel, flooded) and charging voltages.
5.4 Charging Process
The controller employs a multi-stage charging algorithm (Bulk, Absorption, Float) to optimize battery charging and extend its lifespan. The equalization charging function is available for compatible battery types.
The MPPT technology continuously tracks the maximum power point of the solar array to ensure maximum power harvest, even under varying sunlight conditions.
6. Maintenance
Regular maintenance ensures the longevity and optimal performance of your solar charge controller.
- Check Connections: Periodically inspect all wiring connections for tightness and corrosion. Re-tighten if necessary.
- Clean the Controller: Keep the controller clean and free from dust and debris. Use a dry cloth for cleaning. Do not use liquids.
- Ventilation: Ensure that the ventilation openings are not blocked to allow for proper heat dissipation.
- Battery Inspection: Regularly check battery terminals for corrosion and ensure battery fluid levels (for flooded batteries) are adequate.
- System Performance: Monitor the system's performance via the LCD display or monitoring software to detect any anomalies early.
7. Troubleshooting
This section provides solutions to common issues. For more complex problems, contact technical support.
| Problem | Possible Cause | Solution |
|---|---|---|
| Controller not powering on | Battery not connected or low voltage; reverse polarity. | Check battery connections and voltage. Ensure correct polarity. |
| No charging from solar panels | Solar panels not connected; low PV voltage; reverse polarity; fault. | Check PV connections and voltage. Ensure correct polarity. Check for fault codes on LCD. |
| Battery not fully charged | Insufficient solar input; incorrect battery settings; battery degradation. | Ensure adequate solar panel size and sunlight. Verify battery type and voltage settings. Test battery health. |
| Over-temperature warning | Poor ventilation; high ambient temperature; excessive load. | Improve ventilation around the controller. Reduce load if possible. |
8. Technical Specifications
| Feature | Specification |
|---|---|
| Model Number | 80A |
| Nominal Battery Voltage | 12V / 24V / 48VDC (Auto detection); 36V (Manual setting) |
| Maximum Solar Input Voltage | 145V |
| PV Array MPPT Voltage Range | 15-95V (12V battery) / 30-130V (24V battery) / 45-130V (48V battery) |
| Maximum Input Power | 1250W (12V) / 2500W (24V) / 3750W (36V) / 5000W (48V) |
| Maximum Battery Current | 80 Amps |
| Peak Conversion Efficiency | 98% (MPPT Efficiency 99%) |
| Display Type | LCD |
| Communication Ports | USB, RS485 |
| Operating Temperature Range | -10°C to 55°C |
| Product Dimensions (L x W x H) | 29 x 16 x 8 cm |
| Weight | 3.25 kg |
| Included Components | Solar Charge Controller, USB Cable, BTS Cable |

Figure 5: Detailed product parameters table, including nominal battery voltage, maximum solar input voltage, MPPT voltage range, maximum input power, charging set points for different battery types, protections, mounting, and environmental ratings.
9. Warranty Information
The MUST ENERGY 80A MPPT Solar Charge Controller comes with a 1 Year Warranty on Parts. This warranty covers defects in materials and workmanship under normal use. It does not cover damage caused by improper installation, misuse, accidents, or unauthorized modifications.
Please retain your proof of purchase for warranty claims.
10. Customer Support
For technical assistance, troubleshooting, or warranty inquiries, please contact MUST ENERGY customer support. Refer to the official MUST ENERGY website for the most up-to-date contact information.
Manufacturer: MUST ENERGY
Brand: MUST ENERGY
Website: www.mustenergy.com (Example link, actual link may vary)
Related Documents - 80A
 |
Batguard TD4815F MPPT Solar Charge Controller User Manual User manual for the Batguard TD4815F MPPT Solar Charge Controller by LEADERSOLAR. Details installation, operation, safety, and technical specifications for 60A, 80A, 100A models supporting 12V, 24V, 48V systems with advanced MPPT technology. |
 |
PowMr Solar Product Manual 2024: Controllers, Inverters, Batteries & Systems Comprehensive product manual from PowMr detailing their range of solar controllers, inverters, batteries, and energy storage systems for residential and commercial applications. Includes technical specifications, company profile, and product catalog. |
 |
Batteripoolen: Batteries and Accessories for Summer Activities Discover Batteripoolen's extensive range of quality batteries and accessories for all your summer activities, including marine, camping, motorcycle, solar energy, and classic vehicles. Find the perfect TRUE-FIT battery for your needs. |
 |
PowMr 2024 PV Product Catalog: New Energy, New Life Explore the PowMr 2024 PV Product Catalog from Shenzhen Hehejin Industrial Co., Ltd., featuring solar controllers, inverters, batteries, and energy storage systems for a sustainable future. Discover innovative photovoltaic solutions designed for efficiency and reliability. |
 |
PowMr 2024 PV Product Catalog: Solar Energy Solutions Discover the PowMr 2024 PV Product Catalog, featuring a wide array of solar controllers, inverters, and LiFePO4 batteries. Shenzhen Hehejin Industrial Co., Ltd. offers innovative renewable energy solutions for global markets, emphasizing sustainability and advanced technology. |
 |
PowMr PV Product Catalog 2025: New Energy, New Life Explore the PowMr 2025 PV Product Catalog, featuring a comprehensive range of solar inverters, batteries, and controllers for renewable energy solutions. Discover innovative products designed for efficiency and reliability. |
Ask a question about this manual
Ask about setup, troubleshooting, compatibility, parts, safety, or missing instructions. Manuals+ will review the question and use this page’s manual context to help answer it.