1. Safety Instructions
Always read and understand all safety warnings and instructions before operating this table saw. Failure to follow these instructions may result in electric shock, fire, and/or serious injury.
General Safety Rules:
- Wear appropriate personal protective equipment (PPE): Always wear safety glasses, hearing protection, and a dust mask. Gloves are recommended for handling materials, but avoid loose-fitting gloves near moving parts.
- Keep work area clean and well-lit: Cluttered or dark areas invite accidents.
- Do not operate power tools in explosive atmospheres: Do not use in the presence of flammable liquids, gases, or dust.
- Keep children and bystanders away: Distractions can cause you to lose control.
- Ensure proper electrical connection: The plug must match the outlet. Never modify the plug.
- Avoid accidental starting: Ensure the switch is in the off-position before connecting to power, picking up, or carrying the tool.
- Use a push stick: Always use the provided push stick when feeding small workpieces or when your hands are close to the blade.
- Maintain proper balance and footing: Do not overreach.
- Secure workpiece: Always ensure the workpiece is firmly supported and guided.
- Never bypass safety features: The transparent blade guard and safety switch are designed for your protection.
- Unplug before making adjustments or maintenance: Always disconnect the saw from the power source.
2. Package Contents
Upon unpacking, please verify that all items listed below are present and undamaged. If any parts are missing or damaged, contact customer support immediately.
- PIONEERWORKS Table Saw Unit
- 10-Inch 24-Tooth Carbide Tipped Blade
- Blade Guard
- Metal Stand
- Push Stick
- Wrenches (for assembly and blade changes)
- Rip Fence
- Miter Gauge
- Assembly Manual

Image: All included components and accessories for the table saw.
3. Assembly
The PIONEERWORKS table saw requires some assembly, primarily for the metal stand and attaching the saw unit to it. Follow these general steps:
- Assemble the Metal Stand: Carefully unpack the stand components. Attach the legs and cross-braces using the provided hardware. It is recommended to keep all screws slightly loose until all parts are aligned and in place, then tighten them securely. The stand features triangle supports for enhanced stability.
- Mount the Table Saw Unit: Carefully lift the table saw unit and align it with the pre-drilled holes on the assembled stand. Secure it using the appropriate bolts and nuts.
- Install Blade Guard: Attach the transparent blade guard over the saw blade. Ensure it moves freely and provides adequate protection.
- Attach Rip Fence and Miter Gauge: Familiarize yourself with the rip fence and miter gauge. The rip fence slides along the table and locks into place, while the miter gauge fits into the T-slots on the table.
- Install Side Table Extensions: If applicable, attach the side table extensions to both sides of the main table top. These extensions allow for handling larger workpieces.

Image: Fully assembled PIONEERWORKS table saw with stand and extensions.
4. Components Identification
Refer to the diagram below to identify the main components of your PIONEERWORKS table saw.

Image: Detailed view of the table saw with numbered parts for identification.
- Cross Cutting Fence
- Fence/Rip Fence
- Side Table Lock
- Bevel Angle Lock
- On/Off Switch
- Bevel Angle Adjustment Wheel
- Stand Rubber Foot
- Blade Guard
- Blade Guard Seat
- Dia216mm/10 inch Saw Blade
- Fence/Rip Fence
- Table Insert Plate
- Side Table Extension
- Push Stick
- Table Saw Stand
- Stand Back Support
5. Operation
Before operating, ensure the saw is properly assembled, all safety devices are in place, and you are wearing appropriate PPE.
5.1 Powering On/Off
- To turn on the saw, press the green 'ON' button on the On/Off Switch (5).
- To turn off the saw, press the red 'OFF' button. The saw is also equipped with overload protection for added safety.
5.2 Adjusting Cutting Depth
The blade height can be adjusted to match the thickness of your workpiece. Use the hand wheel (Bevel Angle Adjustment Wheel, 6) to raise or lower the blade. For 90° cross-cutting, the maximum cutting depth is 74mm.
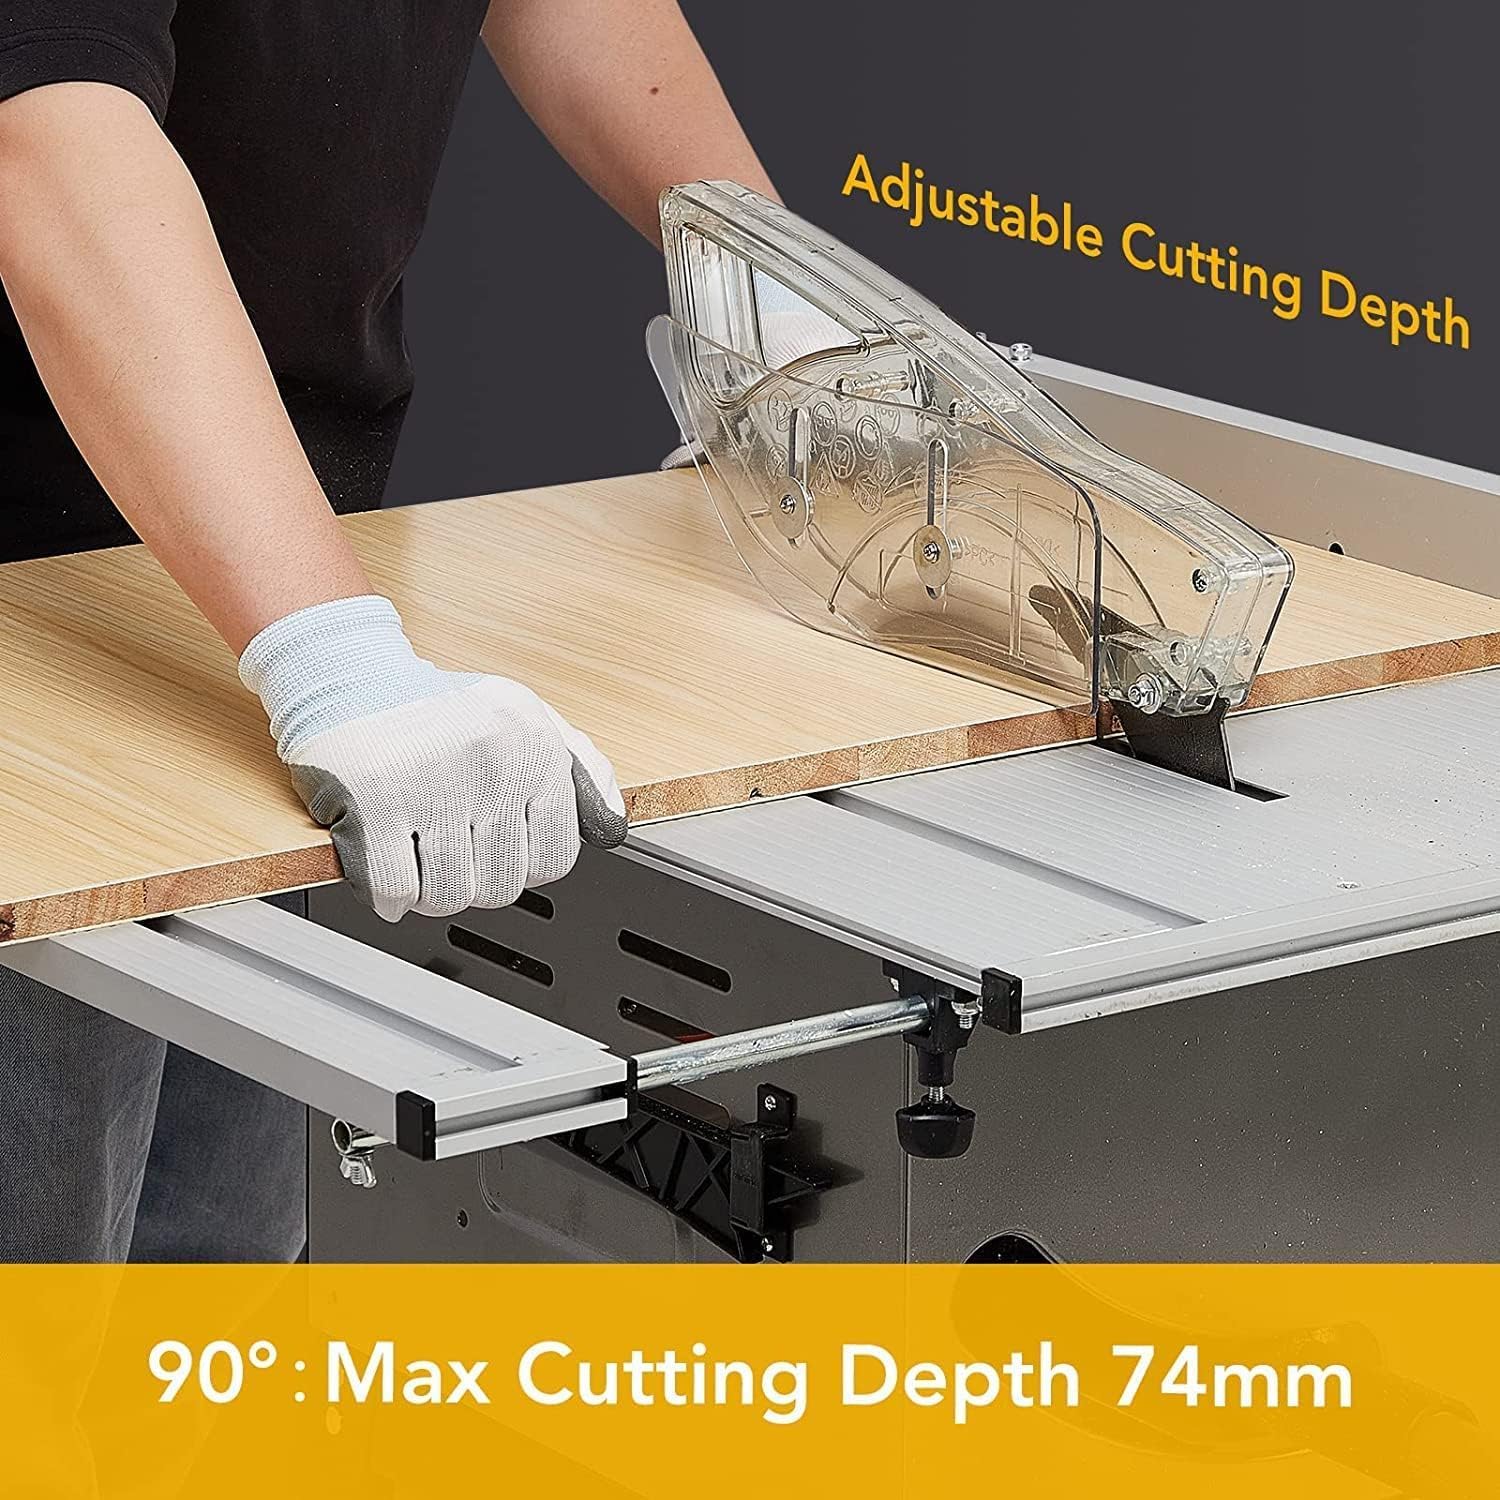
Image: Adjusting the cutting depth for a workpiece on the table saw.
5.3 Bevel Angle Adjustment
This table saw features a rack and pinion bevel control, allowing for bevel cuts from 0° to 45°. To adjust the bevel angle, unlock the Bevel Angle Lock (4), use the Bevel Angle Adjustment Wheel (6) to tilt the blade to the desired angle, and then re-lock the Bevel Angle Lock. The maximum cutting thickness at 45° is 52mm.

Image: Illustrates the 0-45° bevel cutting capability of the saw.
5.4 Using the Push Stick
For safety, always use the Push Stick (14) when feeding small workpieces or when your hands are within 6 inches of the saw blade. This prevents your hands from coming into contact with the rotating blade.
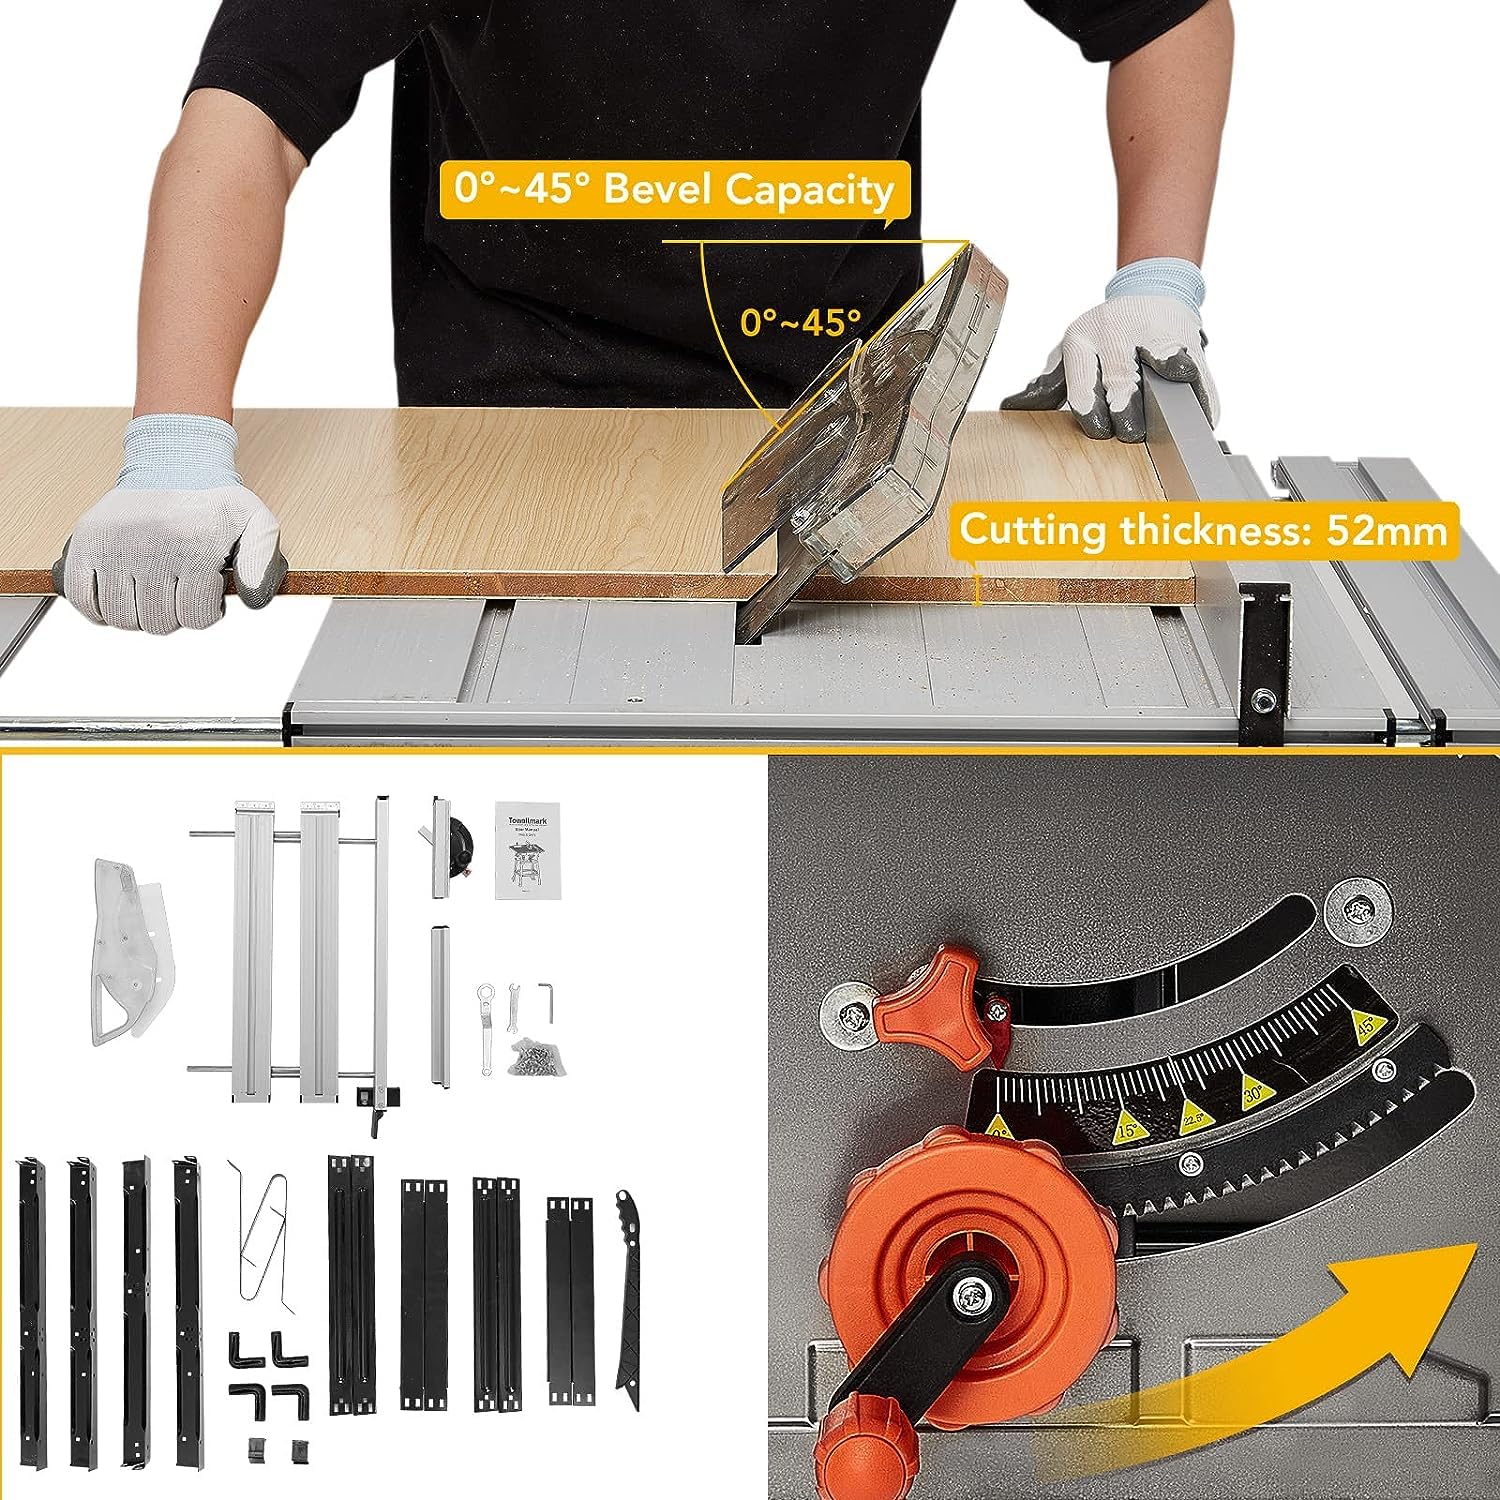
Image: Proper use of the push stick to safely guide material.
5.5 Dust Collection
The table saw is designed with a port at the back for connecting a dust collector. This helps maintain a cleaner working environment by extracting sawdust during operation.

Image: Rear view of the table saw showing the dust collection port in use.
5.6 Operation Video
Watch this video for a demonstration of the PIONEERWORKS 10 inch 15A 5000RPM Portable Table Saw in operation, including cutting various materials.
Video: Demonstration of the PIONEERWORKS 10 inch 15A 5000RPM Portable Table Saw in use.
6. Maintenance
Regular maintenance ensures the longevity and safe operation of your table saw. Always disconnect the power supply before performing any maintenance.
- Cleaning: After each use, clean sawdust and debris from the table, blade guard, and motor housing. Use a brush or compressed air. Avoid using solvents that may damage plastic parts.
- Blade Inspection: Regularly inspect the saw blade for sharpness, damage, or missing teeth. Replace dull or damaged blades immediately. Ensure the blade is always clean.
- Lubrication: Periodically lubricate moving parts such as the blade height adjustment mechanism and bevel adjustment system, as recommended in the full manual.
- Fastener Check: Periodically check all nuts, bolts, and screws for tightness. Tighten any loose fasteners to ensure stability and safety.
- Storage: Store the table saw in a dry, secure location, out of reach of children. The saw has storage parts on the left and right sides for wrenches and the push stick when not in use.
7. Troubleshooting
If you encounter issues with your table saw, refer to the following common troubleshooting steps. For problems not listed here, contact customer support.
| Problem | Possible Cause | Solution |
|---|---|---|
| Saw does not start | No power supply; Overload protection tripped; Faulty switch | Check power cord and outlet; Reset overload protector; Contact service if switch is faulty. |
| Blade not cutting smoothly | Dull or damaged blade; Incorrect blade type for material; Blade alignment issue | Replace blade; Use appropriate blade for material; Check blade alignment. |
| Excessive vibration | Loose fasteners; Damaged blade; Unstable stand | Tighten all fasteners; Replace damaged blade; Ensure stand is securely assembled and on a stable surface. |
| Dust collection ineffective | Dust port clogged; Dust collector not powerful enough; Hose disconnected | Clear dust port; Use a more powerful dust collector; Reconnect hose securely. |
8. Specifications
Key technical specifications for the PIONEERWORKS 10 inch Portable Table Saw:
| Feature | Specification |
|---|---|
| Brand | PioneerWorks |
| Model Number | 01 |
| Power Source | Corded Electric |
| Motor Amperage | 15 Amp |
| No-Load Speed | 5000 RPM |
| Blade Diameter | 10 Inches (216mm) |
| Max Cutting Depth (90°) | 74mm |
| Max Cutting Thickness (45°) | 52mm |
| Bevel Capacity | 0-45° |
| Product Dimensions (L x W x H) | 29" x 24" x 15" |
| Item Weight | 54 Pounds |
| UPC | 196336183262 |
9. Warranty and Support
PIONEERWORKS products are manufactured to high-quality standards. For information regarding warranty coverage, please refer to the warranty card included with your product or visit the official PIONEERWORKS website.
If you require technical assistance, have questions about operation, or need to order replacement parts, please contact PIONEERWORKS customer support. Contact details can typically be found in the included documentation or on the brand's official website.
For additional support, you may visit the PioneerWorks Store on Amazon.