Introduction
The Olelica Automatic Pet Feeder is designed to provide convenient and consistent meal delivery for your pets. With its programmable features, voice recording function, and secure design, it ensures your pet receives their meals on time, every time, promoting healthy eating habits and peace of mind for pet owners. This manual provides detailed instructions for setup, operation, and maintenance of your new pet feeder.

Front view of the Olelica Automatic Pet Feeder, showcasing its design and a portion of kibble in the feeding bowl.
Product Features
- Programmable Feeding Schedule: Set up to 6 meals per day with adjustable portions from 0 to 8 per meal, ensuring precise feeding control. The feeder has a 5L capacity for dry food.

Visual representation of the feeder's programmable feeding schedule capabilities, highlighting meal frequency and portion control.
- 10-Second Voice Recording: Record a personalized message to call your pet to their meal, adding a familiar and comforting sound.

The feeder's voice recording feature, allowing owners to record a message for their pet at meal times.
- Twist-Lock Design: Features a secure lid mechanism to prevent pets from accessing the food reservoir and overeating.
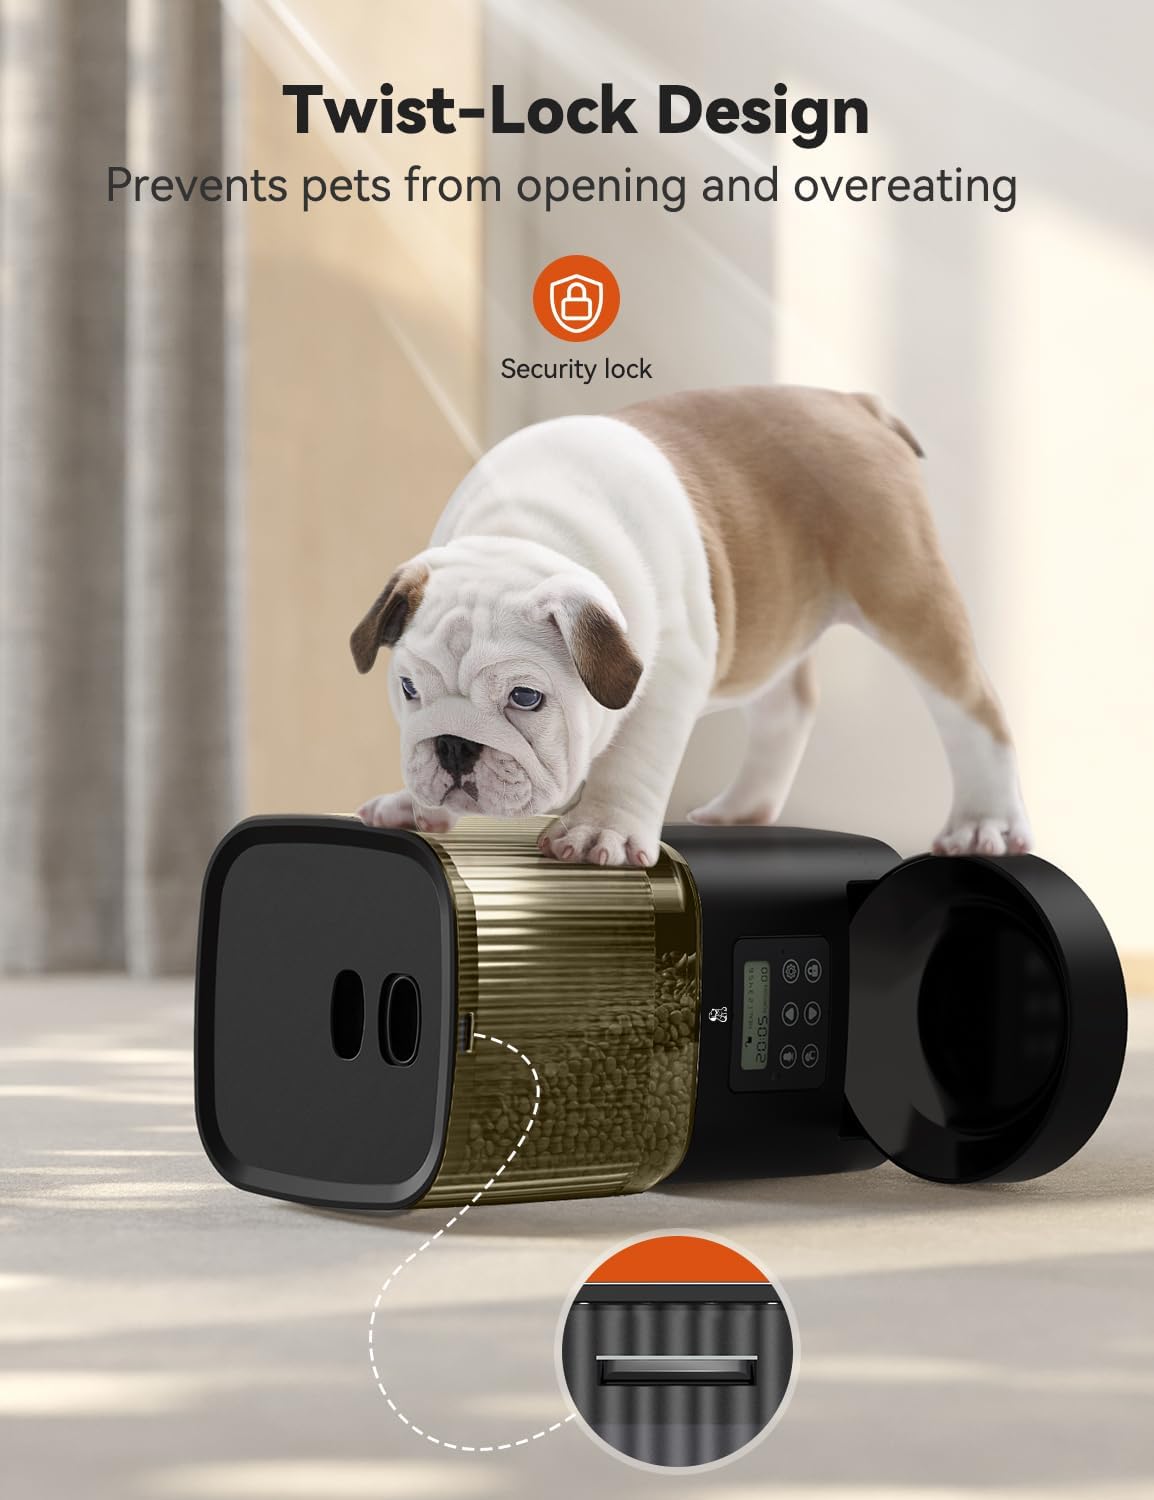
Illustration of the feeder's twist-lock design, designed to keep food secure from curious pets.
- Detachable Components for Easy Cleaning: The food container and bowl are easily detachable for thorough cleaning, ensuring hygiene and fresh food.

The feeder's components are designed for easy detachment and cleaning, promoting food freshness.
- Dual Power Supply: Operates via power adapter or 3 D-batteries (not included) for continuous operation, even during power outages.

The feeder offers dual power options: AC adapter for primary use and D-batteries for backup during power interruptions.
- Dry Food Compatibility: Suitable for various dry food types, with a recommended kibble size of 2-12mm to prevent clogging.

Guidance on compatible dry food types and recommended kibble sizes for optimal feeder performance.
What's Included
Upon unboxing your Olelica Automatic Pet Feeder, please ensure all the following components are present:
- Feeder Base Unit (with control panel and motor)
- Food Reservoir (transparent container)
- Feeding Bowl
- Lid for Food Reservoir
- Power Adapter
- Desiccant Packet (for moisture absorption)
- Instruction Manual (this document)
Setup
Follow these steps to set up your Olelica Automatic Pet Feeder:
- Assemble the Base and Bowl: Place the feeding bowl onto the base unit. Ensure the plastic piece on the bowl aligns with the groove on the base unit for a secure fit.
- Attach the Food Reservoir: Carefully place the transparent food reservoir onto the base unit. Ensure it is seated firmly.
- Insert Desiccant Packet: Locate the compartment under the lid of the food reservoir. Insert the provided desiccant packet into this compartment. This helps absorb moisture and keep the food fresh.
- Secure the Lid: Place the lid onto the food reservoir. Ensure the grooves on the lid align correctly with the reservoir for a tight, twist-lock seal.
- Connect Power: Plug the power adapter into the feeder and then into a wall outlet. For backup power, you may also insert 3 D-batteries into the battery compartment at the bottom of the unit.
- Fill with Food: Open the lid and fill the reservoir with your pet's dry kibble. Ensure the kibble size is between 2-12mm to prevent dispensing issues.
Operating Instructions
The control panel allows you to program the feeder's functions. The display shows current time, meal number, and portion size.
- Set Current Time:
- Press the Settings button (gear icon) to enter time setting mode.
- Use the Up and Down arrows to adjust the hour (military time format).
- Press Settings again to move to minutes, adjust with arrows.
- Press Settings to confirm and exit time setting.
- Program Meal Times and Portions:
- Press the Settings button repeatedly until "MEAL 1" appears on the display.
- Use the Up and Down arrows to set the desired feeding time for Meal 1.
- Press Settings to move to portion adjustment for Meal 1. Use arrows to select portion size (0-8).
- Repeat this process for up to 6 meals ("MEAL 2" through "MEAL 6"). If you do not wish to set a meal, simply skip it by pressing the Settings button.
- After setting all desired meals, continue pressing Settings until the display returns to the current time.
- Record Voice Message:
- Press and hold the Record button (microphone icon) until you hear a beep.
- Speak your message (up to 10 seconds) into the microphone.
- Release the Record button to save. The message will play at each scheduled meal time.
- Manual Feeding:
- Press the Manual Feed button (hand icon) to dispense one portion of food immediately. You can press it multiple times for more portions.
- Lock/Unlock Control Panel:
- To prevent accidental changes, press and hold the Lock button (padlock icon) for 3 seconds to lock the control panel. A lock icon will appear on the display.
- To unlock, press and hold the Lock button again for 3 seconds. The lock icon will disappear.
Maintenance
Regular cleaning ensures the longevity and hygienic operation of your pet feeder.
- Cleaning the Food Reservoir and Bowl: Detach the food reservoir and feeding bowl from the base unit. Wash them with mild soap and water. Rinse thoroughly and ensure they are completely dry before reassembling.
The feeder's components are designed for easy detachment and cleaning, promoting food freshness.
- Cleaning the Base Unit: Wipe the base unit with a damp cloth. Do not submerge the base unit in water, as it contains electronic components.
- Desiccant Packet: Replace the desiccant packet periodically (e.g., every 1-2 months) to maintain optimal moisture absorption and food freshness.
Troubleshooting
If you encounter issues with your feeder, try the following solutions:
- Feeder not dispensing food:
- Check if the food reservoir is empty.
- Ensure the kibble size is within the recommended 2-12mm range. Larger kibble may cause blockages.
- Verify that the feeder is properly powered (either plugged in or batteries are installed and charged).
- Check if the control panel is locked. Unlock it if necessary.
- Display not working:
- Ensure the power adapter is securely plugged in.
- If using batteries, check if they are correctly installed and have sufficient charge.
- Voice recording not playing:
- Ensure a message has been successfully recorded.
- Check the volume settings if available (not explicitly mentioned in data, but common).
Specifications
| Feature | Detail |
|---|---|
| Brand | Olelica |
| Model Name | FT90 |
| Item Model Number | O09 |
| Capacity | 5 Liters |
| Material | BPA free |
| Color | Black |
| Item Dimensions (LxWxH) | 5.98 x 5 x 7 inches |
| Item Weight | 4 pounds |
| Power Source | Power Adapter, 3 D-batteries (not included) |
| Special Features | Voice Recording, Feeding Schedule |
| Target Species | Dog, Cat |
| Recommended Kibble Size | 2-12mm |
Warranty & Support
The Olelica Automatic Pet Feeder comes with a 1-year warranty from the date of purchase. This warranty covers manufacturing defects and malfunctions under normal use. For warranty claims, technical support, or any inquiries, please contact Olelica customer service through the retailer's platform or the contact information provided in your product packaging.
Please retain your proof of purchase for warranty validation.
