1. Introduction
The Ava Adjustable Stroke Wireless Tattoo Pen is designed to provide precision and control for professional tattoo artists. This wireless machine offers an adjustable stroke length from 2.5mm to 4.5mm, allowing for versatile tattooing techniques. It features an intuitive OLED display for real-time monitoring of settings and comes with rechargeable batteries for extended use.

Image 1.1: The Ava Adjustable Stroke Wireless Tattoo Pen in red, showcasing its sleek design and integrated display.
2. Package Contents
Upon opening the package, verify that all components listed below are present and in good condition:
- 1 x Tattoo Machine (Ava Adjustable Stroke Wireless Tattoo Pen)
- 2 x Lithium-ion rechargeable batteries (18500 type)
- 1 x Battery Charger
- 1 x Carry Case
- 2 x Grip Tape

Image 2.1: All items included in the package: the tattoo pen, two batteries, a battery charger, a carry case, and grip tape.
3. Key Features
- Adjustable Stroke: Continuously adjustable stroke from 2.5mm to 4.5mm, offering flexibility for various tattooing styles.
- Wireless Operation: Powered by 18500 Lithium-ion batteries for cordless convenience.
- OLED Display: High-definition screen displays real-time voltage, hertz, session timing, and battery power.
- Ergonomic Design: Features an anti-slip grip for secure and comfortable handling during long sessions.
- Motor: Equipped with an AVA Metal Brushless DC Motor for consistent performance.
- Needle Protrusion: Adjustable needle protrusion from 0-5mm.
- Battery Protection: Integrated circuit protection for battery safety and correct installation.
- Click-Grip Adjustment: Easy adjustment of needle hang.

Image 3.1: Close-up of the OLED display, indicating working voltage, hertz, session time, and battery power. Note: Image shows a black pen, but features apply to the red model.
4. Technical Specifications
| Attribute | Detail |
|---|---|
| Material | Aluminum |
| Motor | AVA Metal Brushless DC Motor |
| Power Intake | 5W |
| Motor Speed | 10500rpm |
| Stroke | 2.5-4.5mm adjustable |
| Needle Protrusion | 0-5mm |
| Battery Type | 18500 Lithium-ion |
| Rated Capacity | 1900mAh |
| Size | 32mm*144mm |
| Weight | 198g (without battery) |
| Compatible Cartridges | Standard size cartridges |
| Water Resistance Level | Not Water Resistant |
5. Safety Information
Read all safety warnings and instructions carefully before using the device to prevent injury or damage.
- Do not immerse in water or any other liquids. This device is not water resistant.
- Keep the device away from direct sunlight, high temperatures, and humid environments.
- Use only the provided batteries and charger. Using incompatible accessories may cause damage or injury.
- Ensure proper battery orientation when inserting to prevent damage to the device or battery.
- Do not attempt to disassemble or modify the device. Repairs should only be performed by qualified personnel.
- Keep out of reach of children.
- Always follow proper sterilization and hygiene protocols for tattooing equipment.
6. Setup Guide
- Charge Batteries: Before first use, fully charge both Lithium-ion batteries using the provided battery charger. The charger typically indicates when charging is complete.
- Insert Battery: Unscrew the bottom cap of the tattoo pen. Insert one charged 18500 Lithium-ion battery into the battery compartment, ensuring correct polarity as indicated inside the compartment. Screw the cap back on securely.
- Attach Cartridge Needle: Insert a standard size cartridge needle into the front end of the tattoo pen. Twist slightly to secure it in place.
- Adjust Needle Protrusion: Rotate the grip of the pen to adjust the needle protrusion to your desired length (0-5mm). The click-grip mechanism allows for precise adjustments.
7. Operating Instructions
- Power On/Off: Press and hold the power button (usually located near the display) for a few seconds to turn the device on or off. The OLED display will illuminate upon power-on.
- Adjust Voltage: Use the '+' and '-' buttons (or similar controls) to adjust the working voltage. The voltage will be displayed on the OLED screen. The recommended working voltage range is 4.5V-12V.
- Adjust Stroke Length: The stroke length is continuously adjustable from 2.5mm to 4.5mm. Rotate the designated ring on the pen body to increase or decrease the stroke. Turning clockwise typically decreases the stroke (Min: 2.5mm), while turning anticlockwise increases it (Max: 4.5mm).
- Monitor Display: The OLED screen provides real-time information:
- Voltage (V): Current operating voltage.
- Hertz (Hz): Motor frequency.
- Timing: Session duration.
- Battery Power: Remaining battery charge indicator.
- Pause Function: Some models may have a pause function, indicated on the display (e.g., "PAUSE"). Refer to the display for current status.
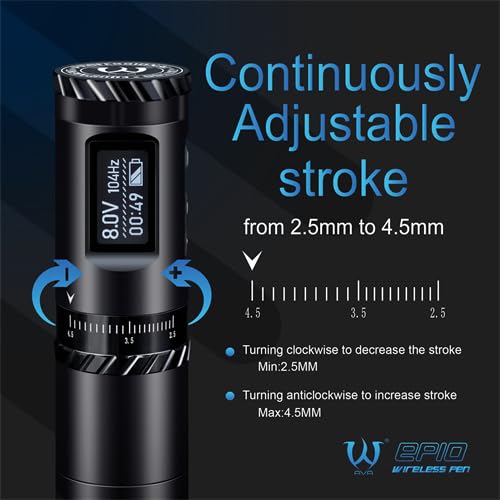
Image 7.1: Detail of the pen body showing the stroke adjustment ring and markings from 2.5mm to 4.5mm. Note: Image shows a black pen, but functionality is identical.

Image 7.2: The OLED display indicating "PAUSE" mode, along with voltage and session time. Note: Image shows a black pen, but display functions are identical.
8. Maintenance
Proper maintenance ensures the longevity and optimal performance of your tattoo pen.
- Cleaning: After each use, wipe down the exterior of the machine with a clean, damp cloth and a suitable disinfectant. Ensure no liquid enters the internal components. Do not use abrasive cleaners.
- Sterilization: The machine itself cannot be autoclaved. Only disposable components (like cartridge needles) should be sterilized according to their manufacturer's instructions.
- Storage: Store the tattoo pen and its accessories in the provided carry case in a cool, dry place, away from direct sunlight and extreme temperatures.
- Battery Care: Store batteries in a cool, dry place when not in use. Avoid fully discharging batteries frequently to prolong their lifespan.
9. Troubleshooting
| Problem | Possible Cause | Solution |
|---|---|---|
| Device does not power on. | Battery is not charged or incorrectly inserted. | Ensure batteries are fully charged and inserted with correct polarity. Try the second battery. |
| Motor stops or runs intermittently. | Low battery, loose connection, or motor obstruction. | Charge or replace battery. Check that the cartridge needle is properly seated. Ensure no debris is obstructing the motor. |
| Device overheats during use. | Prolonged continuous use, high voltage settings, or internal issue. | Allow the device to cool down. Reduce voltage if excessively high. If overheating persists, discontinue use and contact support. |
| Battery drains quickly. | Aging battery, high voltage use, or internal power consumption issue. | Ensure batteries are fully charged before use. Consider replacing batteries if they are old. If the issue persists with new batteries, contact support. |
10. Warranty and Support
For warranty information, technical support, or service inquiries, please contact Hildbrandt customer service. Keep your purchase receipt as proof of purchase.
Manufacturer: Hildbrandt
Contact information can typically be found on the manufacturer's official website or through your point of purchase.


