
Oklagarden DGH450CRP Series Replacement Parts Kit
Instruction Manual: Grill Replacement Parts
For Dyna Glo Grills - Heat Tents & Burner Tubes
Brand: Oklagarden
1. Product Overview
This instruction manual provides detailed information for the installation, operation, and maintenance of Oklagarden grill replacement parts, including heat tents and burner tubes. These components are designed to restore and enhance the performance of compatible Dyna Glo gas grills, ensuring even heat distribution and improved cooking results.

Image 1.1: Complete set of Oklagarden grill replacement parts, including four heat tents and four burner tubes.
2. Specifications
| Component | Description |
|---|---|
| Heat Tents | 3 small heat plates + 1 sear plus burner cover (for 4-burner variant) |
| Burner Tubes | 3 main burners + 1 curved pipe burner (for 4-burner variant) |
| Material | Upgraded Porcelain Steel Cast Iron (Heat Tents), Stainless Steel (Burner Tubes) |
| Package Dimensions | 16.73 x 6.1 x 3.35 inches |
| Item Weight | 1 pound |
| Model Number (Heat Tent) | 70-02-411 Heat Tent |
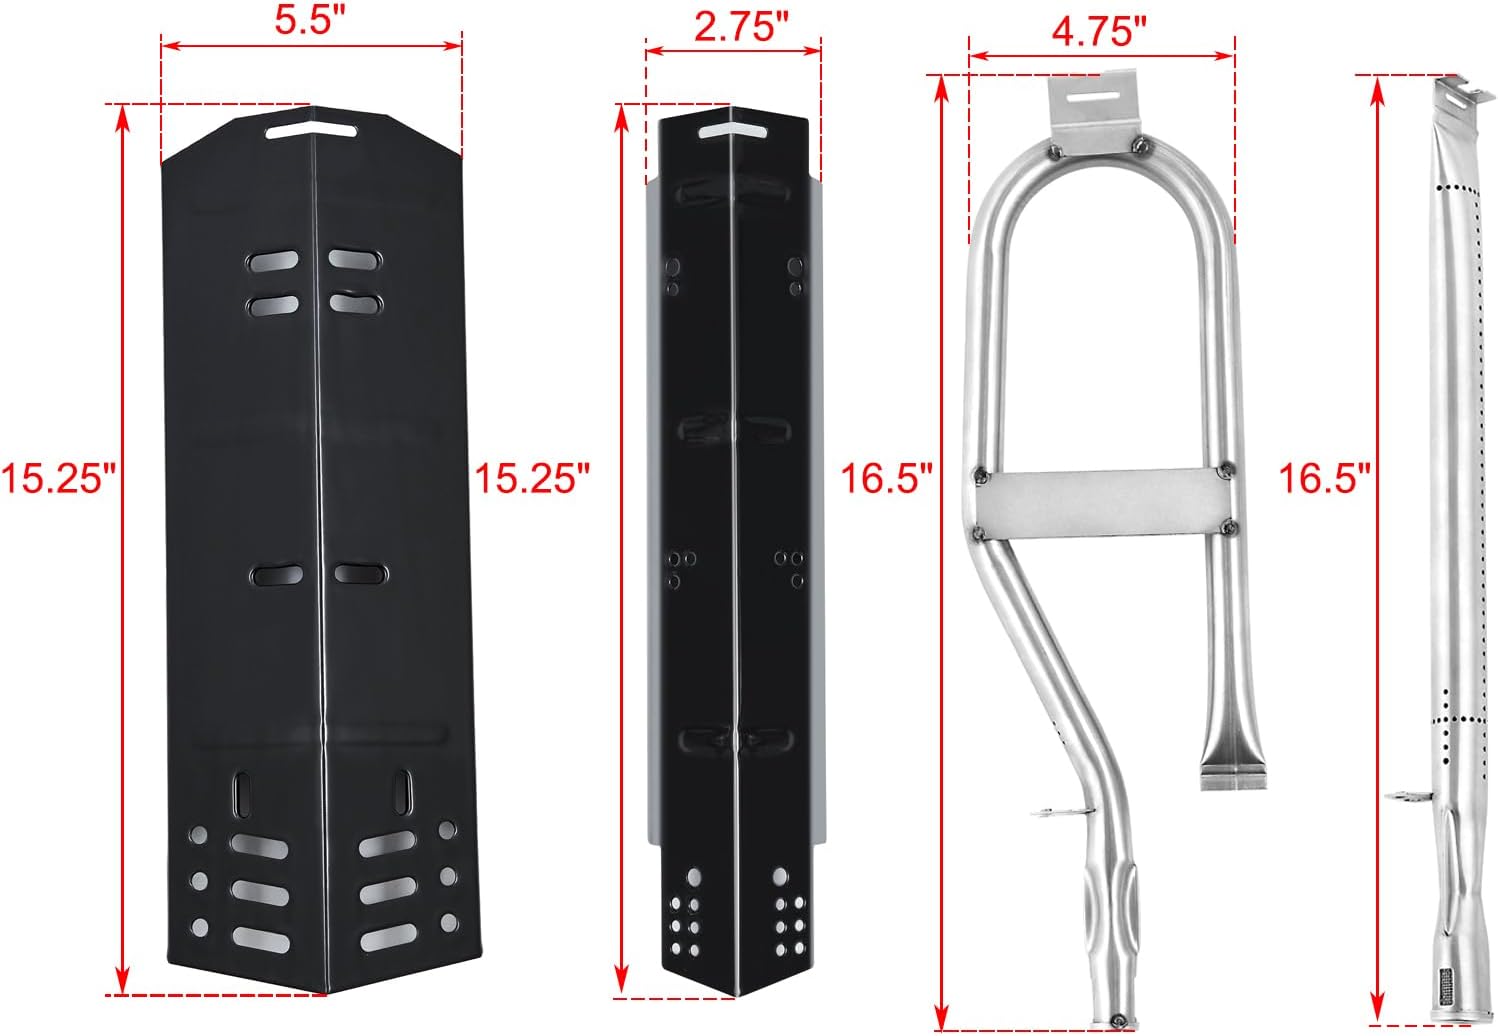
Image 2.1: Detailed dimensions for the heat tents and burner tubes, showing measurements for proper fit.
3. Compatibility
These replacement parts are compatible with various Dyna Glo grill models. Please verify your grill's model number and the dimensions of your existing parts before installation to ensure proper fit.
Compatible Dyna Glo Grill Models:
- 4-Burner Grills: DGH450CRP, DGH450CRP-D, DGH450CRN, DGH450CRN-D, DGH451CRP, DGH451CRP-D.
- 5-Burner Grills: DGH474CRP, DGH474CRP-D, DGH485CRP, DGH485CRP-D, DGH483CRP, DGH483CRP-D, DGH474CRN, DGH481CRP, DGH481CRP-D, DGH481CRN, DGH481CRN-D, DGH474CRN-D.
- 3-Burner Grills: DGH373CRP, DGH373CRP-D, DGH371CRF, DGH371CRF-D.
Compatible Dyna Glo Part Numbers:
- 70-02-615, 70-02-423, 70-02-616, 70-02-617, 70-02-411, 70-01-915, 70-02-412, 70-01-916, 70-02-413.

Image 3.1: Guide on how to verify product compatibility with your grill, including checking model numbers and measuring existing parts.
4. Setup and Installation
Before beginning installation, ensure your grill is completely cool and disconnected from its gas supply. It is recommended to wear protective gloves during this process.
4.1. Removing Old Parts:
- Open the grill lid and remove the cooking grates and warming rack.
- Carefully lift out the old heat tents (flavorizer bars).
- Locate the burner tubes. Depending on your grill model, they may be held in place by screws or simply rest on supports. Remove any fasteners and carefully lift out the old burner tubes.
- Inspect the grill interior for any debris or corrosion and clean as necessary.
4.2. Installing New Burner Tubes:
- Align the new burner tubes with the gas valve orifices at the back of the grill. Ensure the igniter mounting bracket on the burner tube is correctly positioned.
- Gently push the burner tubes onto the orifices. They should fit snugly.
- Secure any fasteners if your grill model requires them.

Image 4.1: Stainless steel burner tube showing the igniter mounting bracket and even fire outlet for correct installation.

Image 4.2: Burner tubes designed for easy installation and efficient heat distribution.
4.3. Installing New Heat Tents:
- Place the new heat tents directly over the installed burner tubes. Ensure they sit securely on their designated supports.
- Confirm that the heat tents cover the burner tubes adequately to protect them from grease and distribute heat.

Image 4.3: Heat tent demonstrating high temperature resistance and ease of cleaning.

Image 4.4: Heat tents designed for corrosion resistance and uniform heat distribution.
4.4. Final Steps:
- Replace the cooking grates and warming rack.
- Reconnect the gas supply and perform a leak test according to your grill's original manual.
- Light the burners to ensure proper operation and even flame.
5. Operating Your Grill with New Parts
The upgraded porcelain steel cast iron heat tents and stainless steel burner tubes are designed to improve your grilling experience. They ensure heat is dispersed more evenly and quickly across the cooking surface, reducing hot spots and promoting consistent cooking.
The heat tents also serve to vaporize drippings from food, returning smoky flavor to your meal and protecting the burner tubes from excess grease buildup.

Image 5.1: Example of a Dyna Glo 4-burner grill with heat tents and burner tubes installed, ready for use.
6. Maintenance
Regular maintenance of your grill replacement parts will extend their lifespan and ensure optimal performance.
6.1. Cleaning Heat Tents:
- Allow the grill to cool completely after each use.
- Scrape off any food residue or grease buildup from the heat tents using a grill brush or scraper.
- For deeper cleaning, remove the heat tents and wash them with warm, soapy water. Rinse thoroughly and dry completely before reinstalling to prevent rust.
6.2. Cleaning Burner Tubes:
- Periodically inspect burner tubes for clogged ports. Use a wire brush or a stiff wire to clear any obstructions.
- Ensure the spider/insect screens at the end of the burner tubes (where they connect to the gas valves) are clear.
- Wipe down the exterior of the burner tubes with a damp cloth if necessary.
Note: The porcelain steel and stainless steel materials are designed for durability and ease of cleaning, contributing to the longevity of your grill.
7. Troubleshooting
7.1. Parts Do Not Fit:
- Verify Model Number: Double-check your grill's model number against the compatibility list in Section 3.
- Measure Existing Parts: Carefully measure your old heat tents and burner tubes and compare them to the dimensions provided in Section 2 (Image 2.1).
- Contact Support: If you are still confused or the parts do not fit despite matching specifications, please contact Oklagarden customer support for assistance.
7.2. Uneven Heating or Low Flame:
- Check Burner Ports: Ensure all burner ports are clear of debris. Use a wire brush to clean them.
- Gas Supply: Verify that your grill's gas tank has sufficient fuel and that the gas line is not kinked or obstructed.
- Regulator Reset: If you suspect a gas flow issue, try resetting your grill's regulator. Turn off the grill and gas tank, disconnect the regulator from the tank, wait a few minutes, then reconnect and slowly open the tank valve.
7.3. Igniter Issues:
- Spark Check: Ensure the igniter electrode is clean and properly positioned near the burner tube's igniter mounting bracket (refer to Image 4.1).
- Igniter Replacement: These replacement parts do not include igniters. If your igniters are faulty, they may need to be replaced separately. Consult your grill's original manual for compatible igniter parts.
8. Warranty and Support
For any questions, concerns, or support regarding your Oklagarden grill replacement parts, please refer to the contact information provided by your retailer or on the official Oklagarden website. Please have your purchase details and grill model information ready when contacting support.
Oklagarden has 20 years of manufacturing experience in grill parts, ensuring quality and compatibility.
Ask a question about this manual
Ask about setup, troubleshooting, compatibility, parts, safety, or missing instructions. Manuals+ will review the question and use this page’s manual context to help answer it.