1. Product Overview
The Newentor Q3 Wireless Weather Station provides accurate indoor and outdoor temperature and humidity readings. It features a large 17.5 cm digital display, atomic clock functionality, and supports up to three remote sensors for comprehensive environmental monitoring.
2. Package Contents
- Newentor Q3 Main Display Unit
- 3 x Wireless Remote Sensors
- Power Adapter
- User Manual (this document)
3. Setup
3.1 Powering the Main Unit
The main display unit can be powered by the included power adapter or by batteries (not included). When using the power adapter, the backlight offers four adjustable brightness levels. When powered by batteries only, the backlight will illuminate for 15 seconds to conserve power.
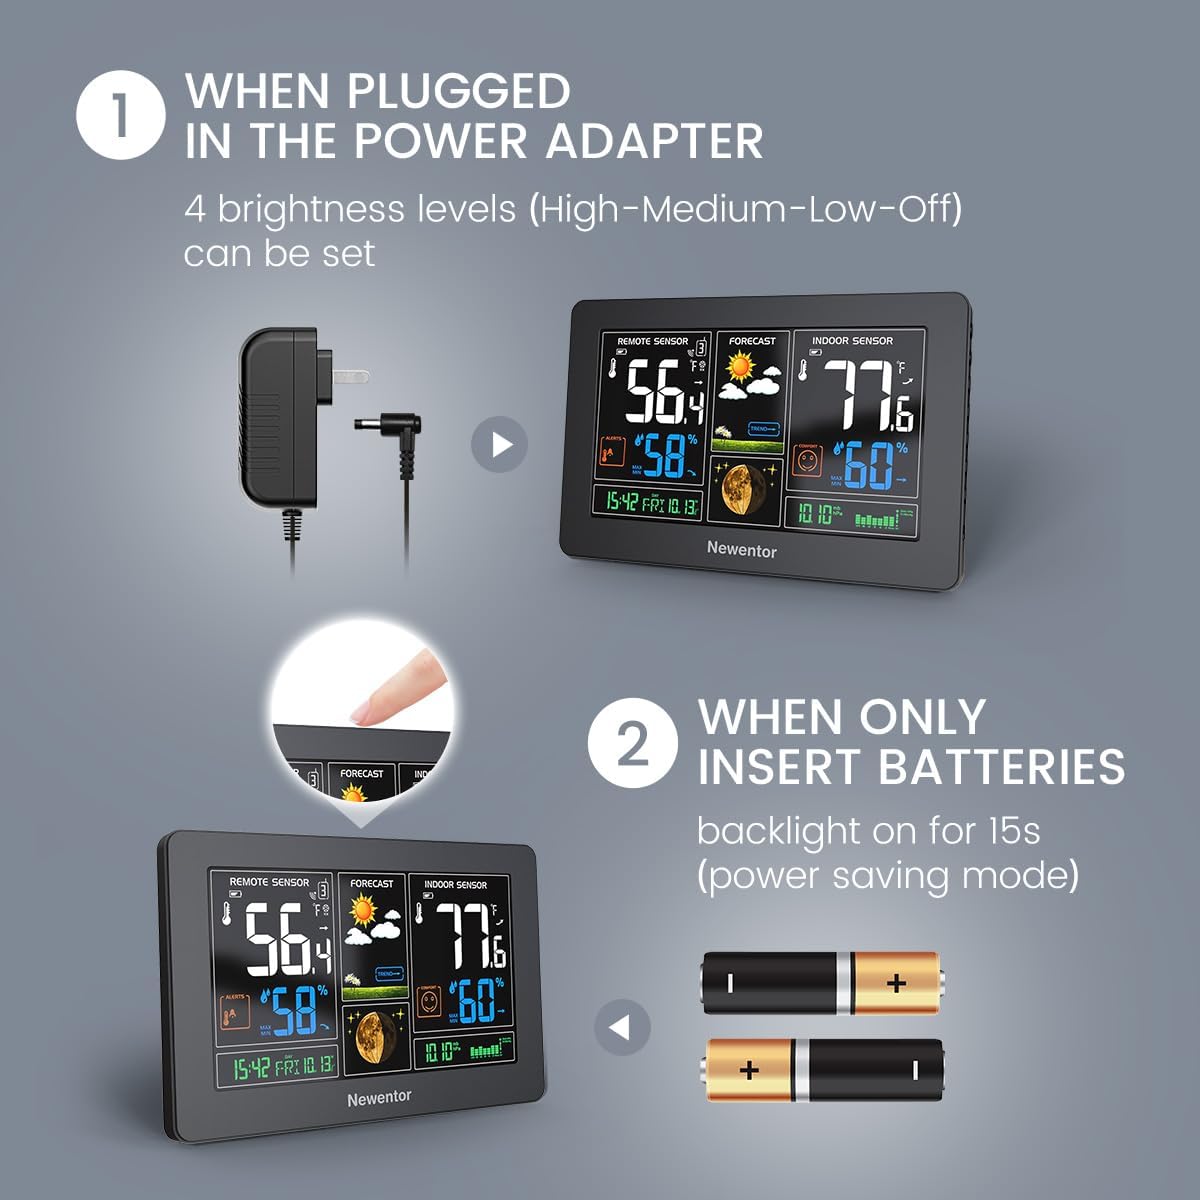
Image: The main display unit showing options for power via an adapter or two AA batteries. The adapter provides continuous backlight, while batteries offer a 15-second backlight.
3.2 Installing Remote Sensors
Each remote sensor requires 2 x AA batteries (not included). Open the battery compartment on the back of each sensor, insert the batteries according to the polarity markings, and close the compartment. Place sensors in desired outdoor or indoor locations, ensuring they are within range of the main unit.
3.3 Initial Connection and Pairing
Once the main unit and sensors are powered, the main unit will automatically search for and connect to the remote sensors. This process may take a few minutes. Ensure sensors are within the 328ft (100m) wireless range for optimal connection. The display will show readings for the main unit's indoor sensor and cycle through the connected remote sensors (CH1, CH2, CH3).

Image: The main weather station display showing indoor and remote sensor readings, with illustrations of three remote sensors placed in different locations (house exterior, bedroom, kitchen) indicating wireless connectivity.
3.4 Atomic Clock Synchronization
The Newentor Q3 features WWVB atomic clock functionality. Upon initial setup, the unit will attempt to synchronize with the atomic clock signal to set the correct time and date automatically. Look for the WWVB icon on the display to confirm successful synchronization. This process can take several hours depending on signal strength and location.

Image: Close-up of the weather station display highlighting the WWVB icon, indicating atomic clock synchronization for accurate time and date.
4. Operating Instructions
4.1 Display Overview
The large LCD display shows various information:
- Remote Sensor Data: Temperature and humidity from the currently displayed remote sensor (CH1, CH2, or CH3).
- Forecast: Weather forecast icons (sunny, cloudy, rainy, etc.).
- Indoor Sensor Data: Temperature and humidity from the main unit's built-in sensor.
- Time and Date: Automatically set by the atomic clock.
- Comfort Level: Indication based on indoor temperature and humidity.
- MAX/MIN Records: Highest and lowest recorded temperatures and humidity.
4.2 Adjusting Backlight Levels
When the main unit is powered by the adapter, you can adjust the backlight brightness. Press the 'LIGHT' button (or similar, refer to specific button layout on your device) to cycle through 100%, 70%, 30%, and 0% (off) brightness levels.

Image: The weather station display shown with three different backlight intensity levels (100%, 70%, 30%, and 0% off), illustrating the adjustable brightness feature when plugged in.
4.3 USB Charging Function
The main unit includes a USB output interface, allowing you to charge small electronic devices. The input voltage is 110-220V, providing an output voltage of 5V and an output current of 1A.

Image: A close-up of the weather station's side, showing the USB output interface and adapter charging interface, with a phone being charged via the USB port.
4.4 Temperature Unit Selection
Press the '°C/°F' button (usually located on the back or side of the main unit) to switch between Celsius and Fahrenheit temperature displays.
5. Maintenance
5.1 Battery Replacement
Replace batteries in remote sensors when the low battery indicator appears on the main display for that specific channel. For the main unit, if using batteries, replace them when the display dims or functions become erratic.
5.2 Cleaning
Wipe the main unit and sensors with a soft, damp cloth. Do not use abrasive cleaners or solvents, as these may damage the display or casing. Ensure no moisture enters the battery compartments or electronic components.
5.3 Optimal Sensor Placement
For accurate outdoor readings, place remote sensors in a shaded area, away from direct sunlight and heat sources. Ensure they are protected from direct rain and snow. For indoor use, place them in areas representative of the room's temperature and humidity, away from vents or appliances that generate heat or moisture.
6. Troubleshooting
6.1 No Remote Sensor Reading
- Check Batteries: Ensure batteries in the sensor are fresh and correctly inserted.
- Range: Move the sensor closer to the main unit. Obstacles like thick walls or metal objects can reduce range.
- Re-pair: Remove batteries from both the main unit and the sensor. Reinsert batteries into the sensor first, then into the main unit. Allow a few minutes for re-pairing.
6.2 Atomic Clock Not Syncing
- Location: Place the main unit near a window, away from electronic devices that may cause interference.
- Time of Day: Synchronization is often better at night.
- Manual Sync: Refer to the specific button on your device (often labeled 'WAVE' or 'RCC') to initiate a manual synchronization attempt.
6.3 Inaccurate Readings
- Sensor Placement: Ensure sensors are not in direct sunlight, near heat sources, or in areas with high humidity (e.g., directly above a humidifier).
- Ventilation: Ensure sensors have adequate airflow around them.
7. Specifications
| Model Number | Q3 |
| Dimensions (L x W x H) | 2.54 x 20.32 x 12.7 cm |
| Weight | 680 grams |
| Power Source | Battery Powered (Main Unit: 2xAA, Sensors: 2xAA each) / AC Adapter |
| Material | Acrylonitrile Butadiene Styrene (ABS) |
| Display Type | LCD |
| Wireless Range | Up to 328 ft (100m) in open air |
| UPC | 889086025141 |
8. Warranty and Support
Newentor products are designed for reliability and performance. For warranty information or technical support, please refer to the contact details provided on the product packaging or visit the official Newentor website. Please retain your proof of purchase for warranty claims.


