1. Introduction
The Tapo A200 Solar Panel is designed to provide continuous power to your compatible Tapo battery cameras, ensuring uninterrupted operation. Featuring high-efficiency monocrystalline silicon cells and IP65 weatherproof rating, it is built for reliable outdoor performance.
2. Product Overview
The Tapo A200 Solar Panel is engineered to efficiently convert solar energy into electrical power for your Tapo cameras. Its robust design ensures durability in various outdoor conditions.
- Non-Stop Power Supply: Enjoy a non-stop power supply with a high charging power up to 4.5W. You need only 30 minutes of standard sunlight a day to keep your cameras working.
- High-Efficiency Solar Cells: Made of premium monocrystalline silicon cells, Tapo A200 captures abundant solar energy and converts into electric energy efficiently.
- IP65 Weatherproof: Keep your solar panel durable from rain and dust with IP65 weatherproof.
- Flexible Installation & Light Capture: 4M charging cable offers flexible installation anywhere you desire and 360 adjustable bracket offers wider capture of light.
- Compatible with: Tapo C425, Tapo C420, Tapo C400.

Figure 1: Tapo A200 Solar Panel - Front View
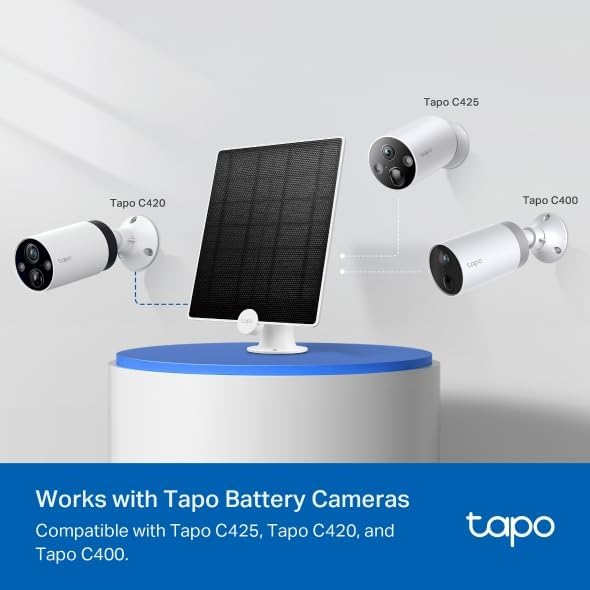
Figure 2: Front view of the Tapo A200 Solar Panel.
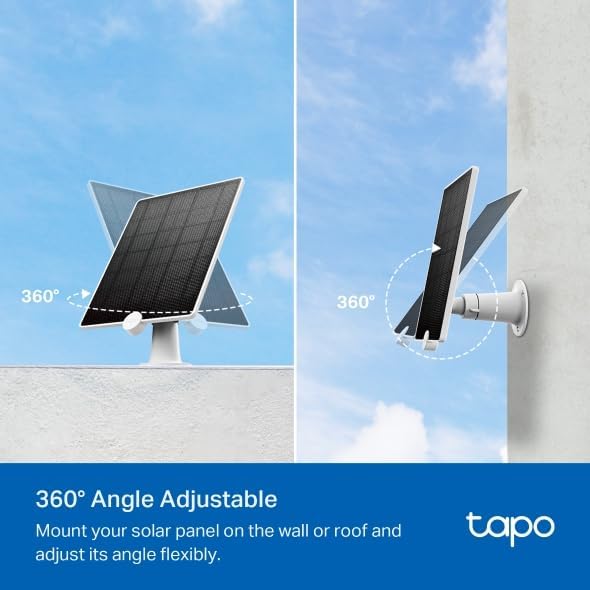
Figure 3: Side view of the Tapo A200 Solar Panel.
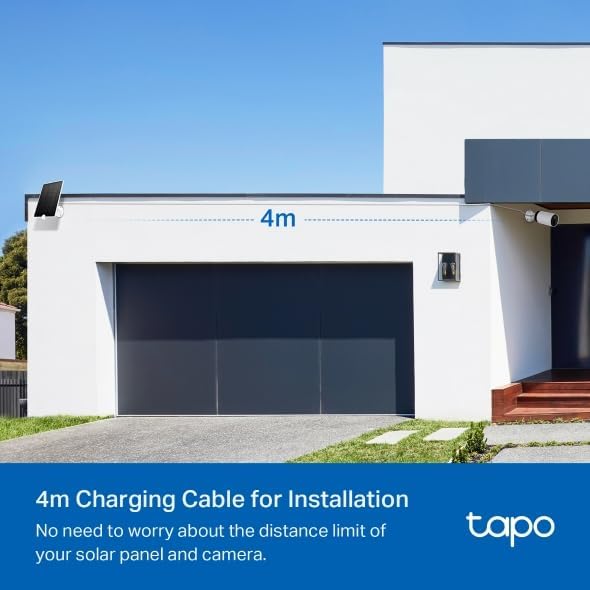
Figure 4: Back view of the Tapo A200 Solar Panel.

Figure 5: Detail of the Micro USB charging cable for the Tapo A200 Solar Panel.
3. Setup
Proper setup ensures optimal performance and continuous charging for your Tapo camera. The solar panel comes with a 4-meter (13-foot) charging cable and a 360-degree adjustable bracket for flexible placement.
- Choose a Location: Select a location that receives at least 30 minutes of direct standard sunlight daily. Ensure the cable can reach your compatible Tapo camera.
- Mount the Bracket: Use the included screws and anchors to securely mount the adjustable bracket to a wall or roof.
- Attach the Solar Panel: Slide the solar panel onto the mounted bracket.
- Adjust the Angle: Utilize the 360-degree adjustable bracket to angle the solar panel for maximum sunlight exposure throughout the day.
- Connect to Camera: Plug the Micro USB charging cable into the charging port of your Tapo battery camera.

Figure 6: Tapo A200 Solar Panel connected to a compatible camera.
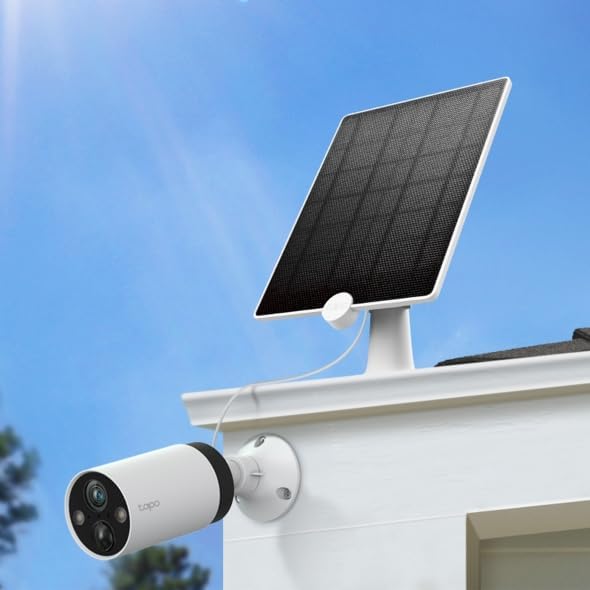
Figure 7: Diagram illustrating the installation process of the Tapo A200 Solar Panel.

Figure 8: Example of flexible installation with the 4M cable and adjustable bracket.
Setup Video Guide:
Video 1: Official installation guide for the Tapo A200 Solar Panel. This video demonstrates the step-by-step process of mounting and connecting the solar panel to your Tapo camera.
4. Operating
The Tapo A200 Solar Panel operates by converting sunlight into electrical energy to power your compatible Tapo battery cameras. It is designed for non-stop power supply with high charging efficiency.
- Continuous Charging: The solar panel provides up to 4.5W of charging power, ensuring your camera's battery remains topped up with as little as 30 minutes of standard sunlight per day.
- Smart Power Management: The Tapo camera's internal battery management system optimizes charging from the solar panel, preventing overcharging and ensuring battery longevity.
- Compatibility: The Tapo A200 is specifically designed to work seamlessly with Tapo C425, Tapo C420, and Tapo C400 battery cameras.
Figure 9: Tapo A200 Solar Panel showing compatibility with Tapo C425, C420, and C400 cameras.
Operating Video Guide:
Video 2: A review of the Tapo Solar Panel, demonstrating its charging capabilities and how it keeps compatible cameras powered.
5. Maintenance
To ensure the longevity and optimal performance of your Tapo A200 Solar Panel, follow these simple maintenance guidelines:
- Cleaning: Periodically wipe the surface of the solar panel with a soft, damp cloth to remove dust, dirt, or debris that may accumulate and reduce efficiency. Avoid using harsh chemicals or abrasive materials.
- Weather Protection: The IP65 weatherproof rating ensures protection against rain and dust. However, in extreme weather conditions like heavy snow or hail, it is advisable to clear the panel to maintain optimal sunlight exposure.
- Cable Inspection: Regularly check the charging cable for any signs of wear, damage, or loose connections. Ensure it remains securely plugged into the camera.
6. Troubleshooting
If your Tapo A200 Solar Panel is not charging your camera as expected, consider the following troubleshooting steps:
- Sunlight Exposure: Ensure the solar panel receives adequate direct sunlight. Obstructions like tree branches, buildings, or heavy shade can significantly reduce charging efficiency. Adjust the panel's angle if necessary.
- Cable Connection: Verify that the Micro USB charging cable is securely connected to both the solar panel and the Tapo camera. A loose connection can prevent charging.
- Tapo App Battery Status: Check the battery status of your camera within the Tapo app. The app provides detailed insights into battery level and usage, which can help diagnose charging issues.
- Extreme Weather: In prolonged periods of overcast weather, heavy snow, or freezing temperatures, solar charging efficiency may be reduced. The camera's internal battery should provide backup power during these times.
7. Specifications
| Feature | Detail |
|---|---|
| Brand | Tapo |
| Model | Tapo A200 |
| Material | Monocrystalline Silicon |
| Product Dimensions | 6.88"L x 0.69"W x 9.37"H |
| Item Weight | 1.1 Pounds |
| Efficiency | High Efficiency |
| Connector Type | Micro USB Type B |
| Included Components | Solar Panel; Mounting Bracket, Screws, Anchors, Template; Waterproof Gaskets |
| Maximum Voltage | 5.2 Volts |
| Maximum Power | 4.5 Watts |
| Special Feature | Weatherproof (IP65) |
8. Warranty and Support
Your Tapo A200 Solar Panel comes with comprehensive support options to ensure your satisfaction.
- Protection Plans: Extend your product's coverage with available protection plans:
- 3-Year Protection Plan: $5.99
- 4-Year Protection Plan: $7.99
- Complete Protect: $16.99/month (renews monthly until cancelled)
- Customer Support: For any questions, technical assistance, or warranty claims, please contact TP-Link support:
- Phone: (866) 225-8139
- Website: myproducts.tp-link.com/us
- Email: support.USA@tp-link.com


