
1. Introduction
Thank you for choosing the Bebebao P1 Wearable Hands-Free Breast Pump. This manual provides essential information for the safe and effective use of your breast pump. Please read it thoroughly before first use and keep it for future reference.

Image: The Bebebao P1 wearable breast pump, showcasing its compact and ergonomic design.
2. Important Safety Information
Always follow basic safety precautions when using electrical products, especially when children are present. Failure to follow these instructions could result in electric shock, fire, or serious injury.
- Do not immerse the motor unit in water or other liquids.
- Keep the device away from heat sources.
- Use only the provided power adapter for charging.
- Inspect all components before each use for damage. Discard and replace any damaged parts.
- This product is for personal use only. Do not share with others.
- Consult a healthcare professional if you experience pain or discomfort during pumping.
- Ensure all parts are clean and dry before assembly and use.
3. Package Contents
Your Bebebao P1 breast pump package should contain the following items:
- 1 x P1 Motor Unit
- 1 x Milk Collector Cup (240ml capacity)
- 1 x 24mm Flange
- 1 x Silicone Diaphragm
- 1 x Valve
- 1 x USB Charging Cable
- 1 x User Manual
4. Product Features
The Bebebao P1 breast pump is designed for convenience and efficiency:
- Lightweight and Portable: Easy to carry for on-the-go pumping.
- Quiet Design: Discreet operation.
- Hands-Free: Allows for multitasking during pumping sessions.
- Large Capacity Lithium Battery: Provides extended use between charges.
- Multiple Modes: Offers various suction patterns for comfort and efficiency.
- Anti-Reflux Design: Prevents milk backflow and contamination.
- Food-Grade Material: Made from BPA-free and safe materials.

Image: Visual representation of the Bebebao P1 breast pump's key features, including portability, quiet operation, hands-free design, long battery life, and multiple modes.

Image: Diagram illustrating the anti-reflux design of the Bebebao P1 breast pump, showing how it prevents milk from flowing back into the motor unit.

Image: Close-up of food-grade, BPA-free material pellets, emphasizing the safety of the materials used in the Bebebao P1 breast pump.
5. Assembly Instructions
Before assembling, ensure all parts are clean and sterilized according to the cleaning instructions.
- Step 1: Wash Hands. Always start by washing your hands thoroughly.
- Step 2: Assemble Valve and Diaphragm. Insert the valve into the bottom of the milk collector cup. Ensure the silicone diaphragm is securely placed on top of the valve.
- Step 3: Attach Flange. Press the 24mm flange firmly onto the milk collector cup.
- Step 4: Connect Motor Unit. Align the motor unit with the assembled milk collector cup and press down firmly until it clicks into place.
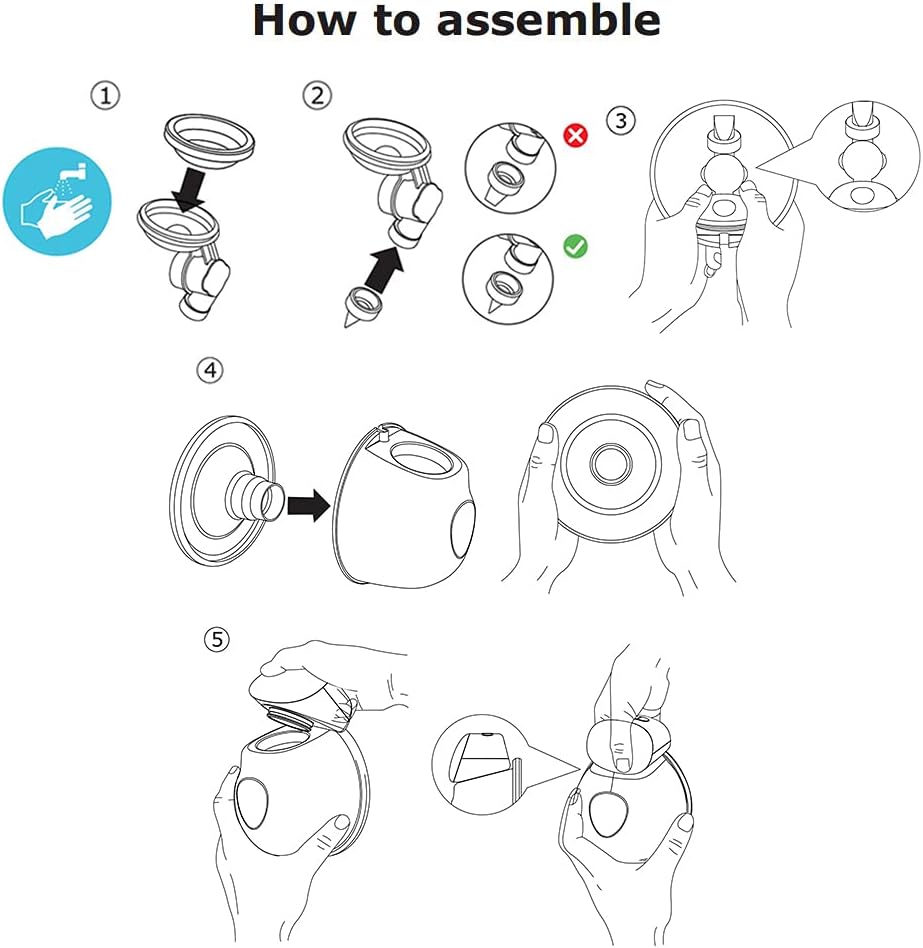
Image: Step-by-step visual guide for assembling the Bebebao P1 breast pump components, including hand washing, valve and diaphragm placement, flange attachment, and motor unit connection.
6. Charging the Device
The Bebebao P1 breast pump features a large capacity lithium battery. Before first use, fully charge the device.
- Connect the provided USB charging cable to the charging port on the motor unit.
- Plug the other end of the USB cable into a compatible USB power adapter (not included) or a computer USB port.
- The indicator lights on the motor unit will show the charging status. Refer to the device's display for full charge indication.
- A full charge typically takes approximately 2-3 hours.
7. Operating Instructions
Ensure the breast pump is fully charged and correctly assembled before use.

Image: A woman wearing the Bebebao P1 breast pump discreetly under her clothing, demonstrating its hands-free and wearable nature.
- Positioning: Place the assembled breast pump directly onto your breast, ensuring your nipple is centered within the flange. The flange should create a comfortable seal around your breast.
- Power On: Press and hold the power button (usually indicated by a circle with a vertical line) on the motor unit to turn the pump on.
- Mode Selection: The pump typically starts in a massage mode to stimulate milk let-down. Use the mode button (if available, often indicated by a wave or droplet icon) to switch between massage and expression modes.
- Adjust Suction Level: Use the '+' and '-' buttons to increase or decrease the suction intensity to a comfortable level. Start with a low setting and gradually increase.
- Pumping Session: Pump for approximately 15-20 minutes per breast, or until milk flow slows significantly.
- Power Off: Press and hold the power button to turn the pump off.
- Remove Pump: Gently break the seal around your breast before removing the pump.
- Store Milk: Carefully detach the milk collector cup and transfer the milk to a suitable storage container.
8. Cleaning and Maintenance
Proper cleaning and maintenance are crucial for hygiene and the longevity of your breast pump. The milk collector cup and flange are dishwasher safe.
8.1 After Each Use
- Disassemble all parts that come into contact with milk (milk collector cup, flange, diaphragm, valve).
- Rinse these parts immediately with cold water to remove milk residue.
- Wash thoroughly with warm, soapy water using a dedicated brush.
- Rinse again with clean water.
- Allow parts to air dry completely on a clean drying rack. Do not use a cloth to dry, as this can transfer germs.
- Wipe the motor unit with a clean, damp cloth. Do not submerge the motor unit in water.
8.2 Sterilization
- Sterilize all milk-contacting parts at least once a day, especially for newborns or infants with compromised immune systems.
- Methods include boiling water for 5 minutes, steam sterilization, or using a dishwasher with a sanitizing cycle.
- Ensure parts are completely dry before storing or reassembling.
9. Troubleshooting
If you encounter issues with your Bebebao P1 breast pump, refer to the following common problems and solutions:
| Problem | Possible Cause | Solution |
|---|---|---|
| No suction or weak suction |
|
|
| Pump not turning on |
|
|
| Milk leaking from the pump |
|
|
10. Specifications
- Model: P1
- Flange Diameter: 24 mm
- Milk Collector Capacity: 240 ml (8 oz)
- Power Source: Rechargeable Lithium Battery (USB charging)
- Material: Food-grade, BPA-free plastic and silicone
- Dishwasher Safe Parts: Milk collector cup, flange, valve, diaphragm (motor unit is not dishwasher safe)
- Package Dimensions: 20 x 16 x 9.4 cm
- Weight: Approximately 350 grams

Image: Diagram showing the dimensions of the Bebebao P1 breast pump, including height, width, and flange size (24mm), along with the 240ml / 8oz capacity.
11. Warranty and Support
For warranty information or customer support, please refer to the contact details provided with your purchase documentation or visit the official Bebebao website. Keep your proof of purchase for any warranty claims.


