Introduction
The WEIDDW Laser Level 360 Self Leveling 16 Lines is a versatile tool designed for precise leveling in various applications, including picture hanging, construction, tile installation, and woodworking. It features advanced green laser technology for enhanced visibility and clarity, offering both horizontal and vertical lines for comprehensive coverage. This manual provides detailed instructions for setup, operation, maintenance, and troubleshooting to ensure optimal performance and longevity of your device.
Package Contents
Upon opening your WEIDDW Laser Level package, please verify that all components listed below are present and in good condition:

Image: The WEIDDW Laser Level with all its accessories, including the main unit, battery, charger, remote control, various mounting brackets, and a carrying bag.
- 1 x 4D Laser Level Unit
- 1 x 4800mAh Lithium Battery (included)
- 1 x DC Charger
- 1 x Remote Control
- 1 x Professional Magnetic Rotating Bracket
- 1 x Upper Wall Bracket
- 1 x Upper Wall Iron Plate
- 1 x Fine Tuning Base / Lifting Table
- 1 x Portable Bag
- 1 x Diagonal Adapter (Small Splint)
Setup
1. Battery Installation and Charging
The laser level is powered by a 4800mAh lithium battery. Ensure the battery is fully charged before first use.
- Insert the provided lithium battery into the battery compartment on the side of the laser level unit.
- Connect the DC charger to the Type-C interface on the laser level. The body battery level display will show charging progress.

Image: The laser level connected to its charger via a Type-C interface, indicating battery charging.
2. Mounting Options
The WEIDDW Laser Level offers multiple mounting solutions for various applications:
- Tabletop/Floor Placement: For basic leveling, simply place the unit on a stable, flat surface.
- Lifting Table: Use the fine-tuning base/lifting table to adjust the height of the laser lines precisely.
- Tripod Mounting: The unit is compatible with standard tripods (1/4"-20 thread). Attach the laser level to a tripod for elevated or stable positioning.
- Magnetic Bracket: Utilize the professional magnetic rotating bracket to attach the laser level to metallic surfaces.
- Wall Mounting: Use the upper wall bracket and iron plate for secure attachment to walls, allowing for precise vertical and horizontal alignment.
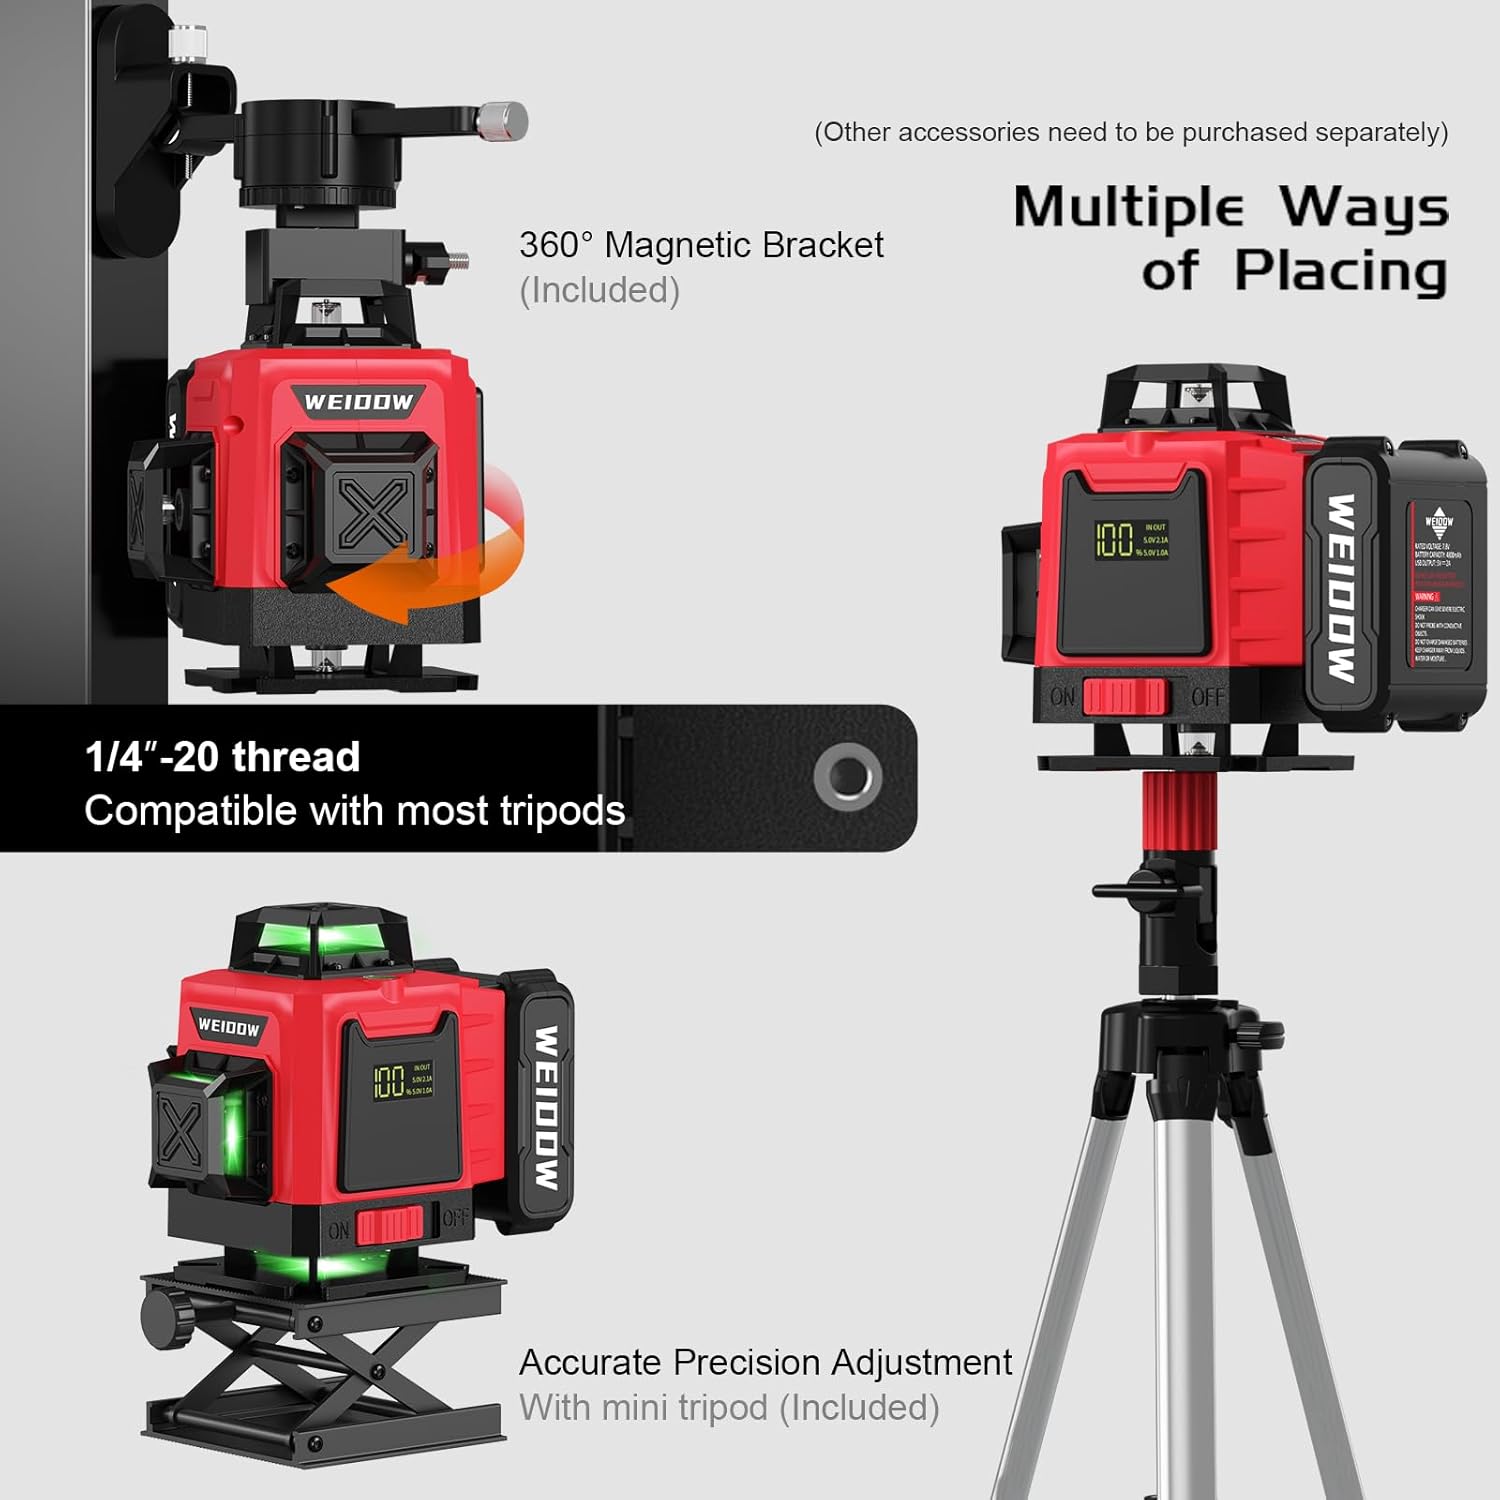
Image: Demonstrates the laser level being used with a 360-degree magnetic bracket and mounted on a tripod for various placement options.
Operating Instructions
1. Power On/Off
To power on the device, slide the ON/OFF switch located on the side of the unit to the "ON" position. To power off, slide the switch to "OFF".
2. Self-Leveling Mode
In auto-leveling mode, the laser level will automatically level itself within a 4° range. If the device is outside this range, it will emit a beeping sound to indicate it is off-level. Adjust the position of the laser level until the beeping stops and the laser lines stabilize.
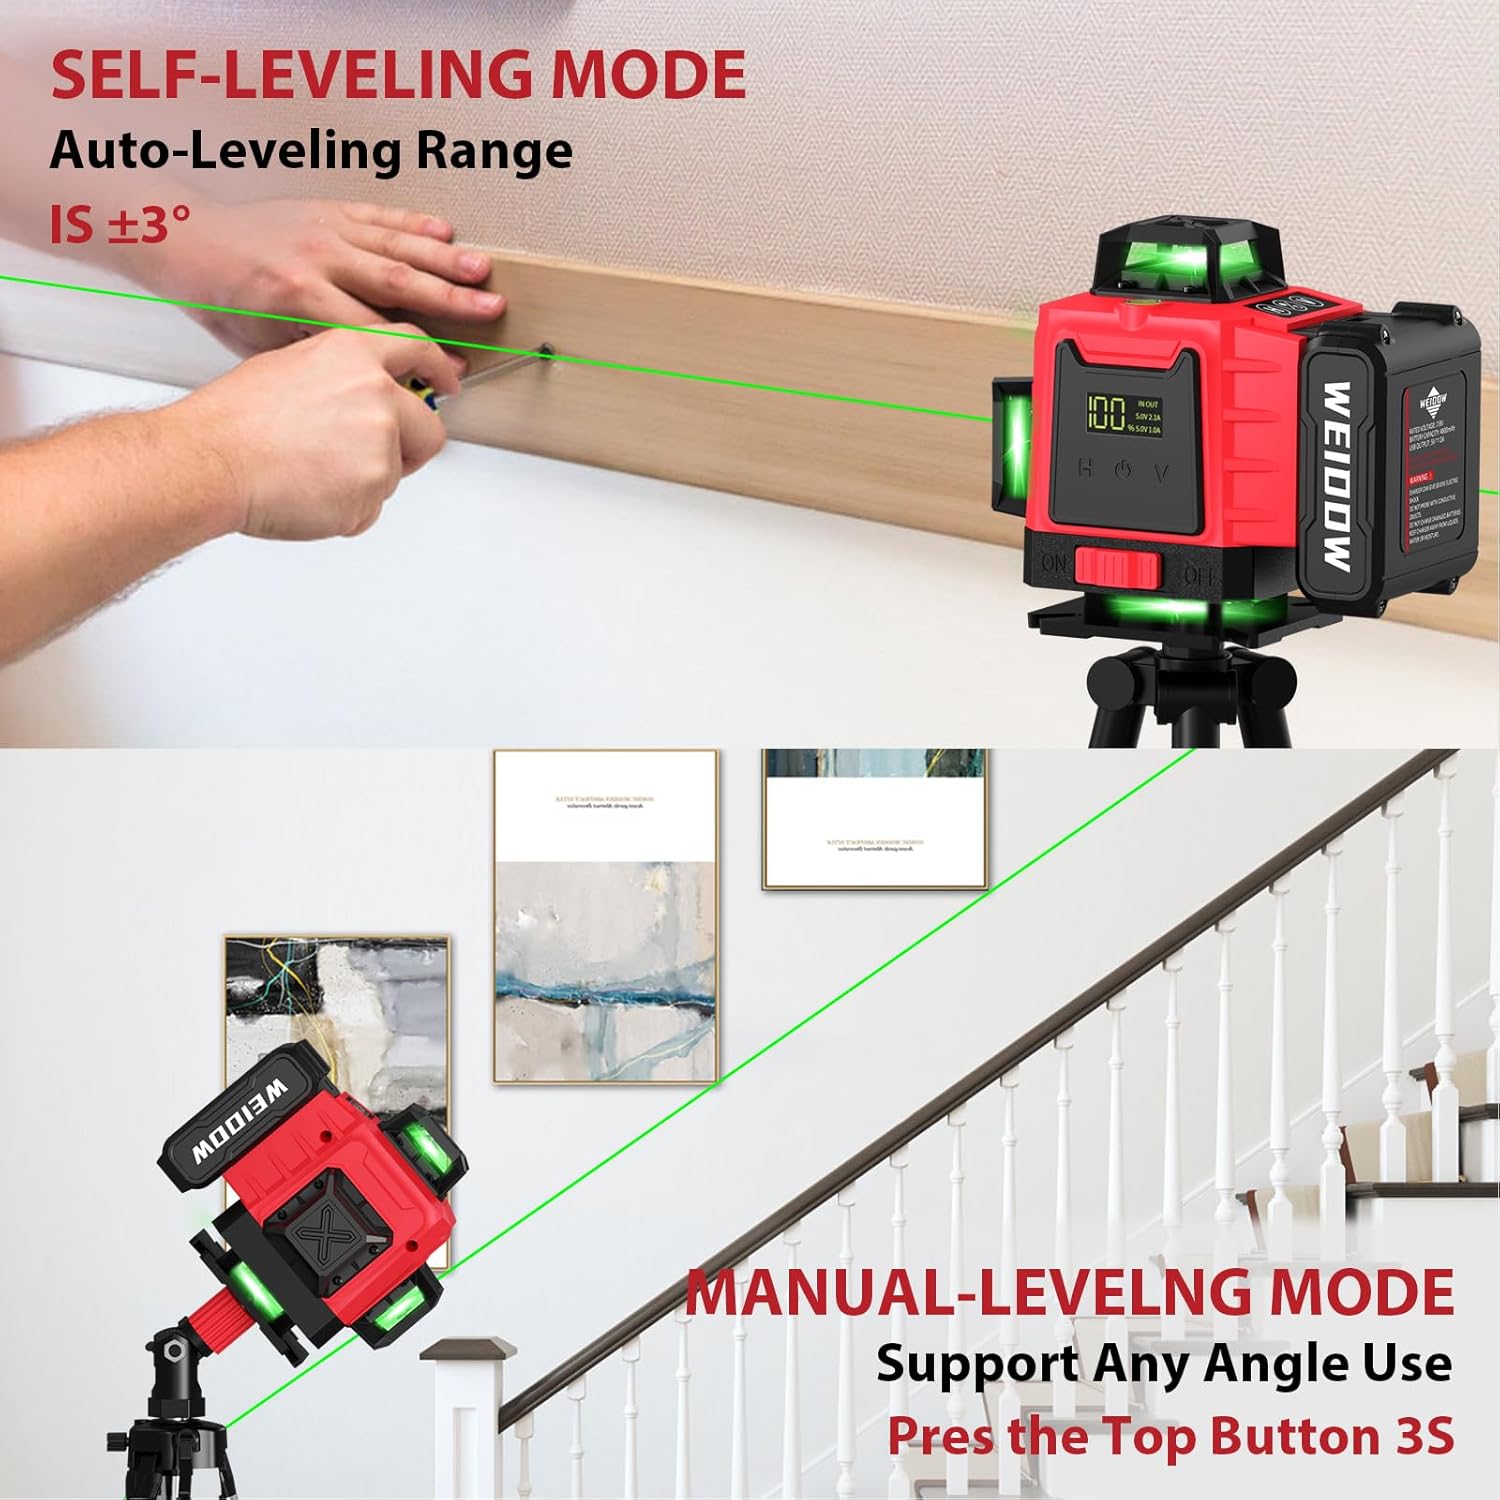
Image: Top shows the laser level in self-leveling mode, projecting a horizontal line. Bottom shows the laser level in manual mode, projecting diagonal lines for sloped applications.
3. Manual Mode (Locking Lines at Any Angle)
For applications requiring sloped lines, activate the manual mode:
- Long press the function button (often marked with a diagonal line icon) for 3 seconds to activate manual mode. The laser lines will flash to indicate manual mode is active.
- In this mode, the laser lines can be locked at any desired angle.
- Long press the function button again for 3 seconds to exit manual mode and return to self-leveling mode.
4. Switching Laser Modes (Horizontal/Vertical)
The laser level features 2x360° horizontal planes and 2x360° vertical planes. Use the "H" and "V" buttons on the control panel or remote control to switch between different laser line configurations:
- Press the "H" button to activate or deactivate horizontal laser lines.
- Press the "V" button to activate or deactivate vertical laser lines.
- Combine "H" and "V" to project both horizontal and vertical lines simultaneously, creating a full 4D coverage.
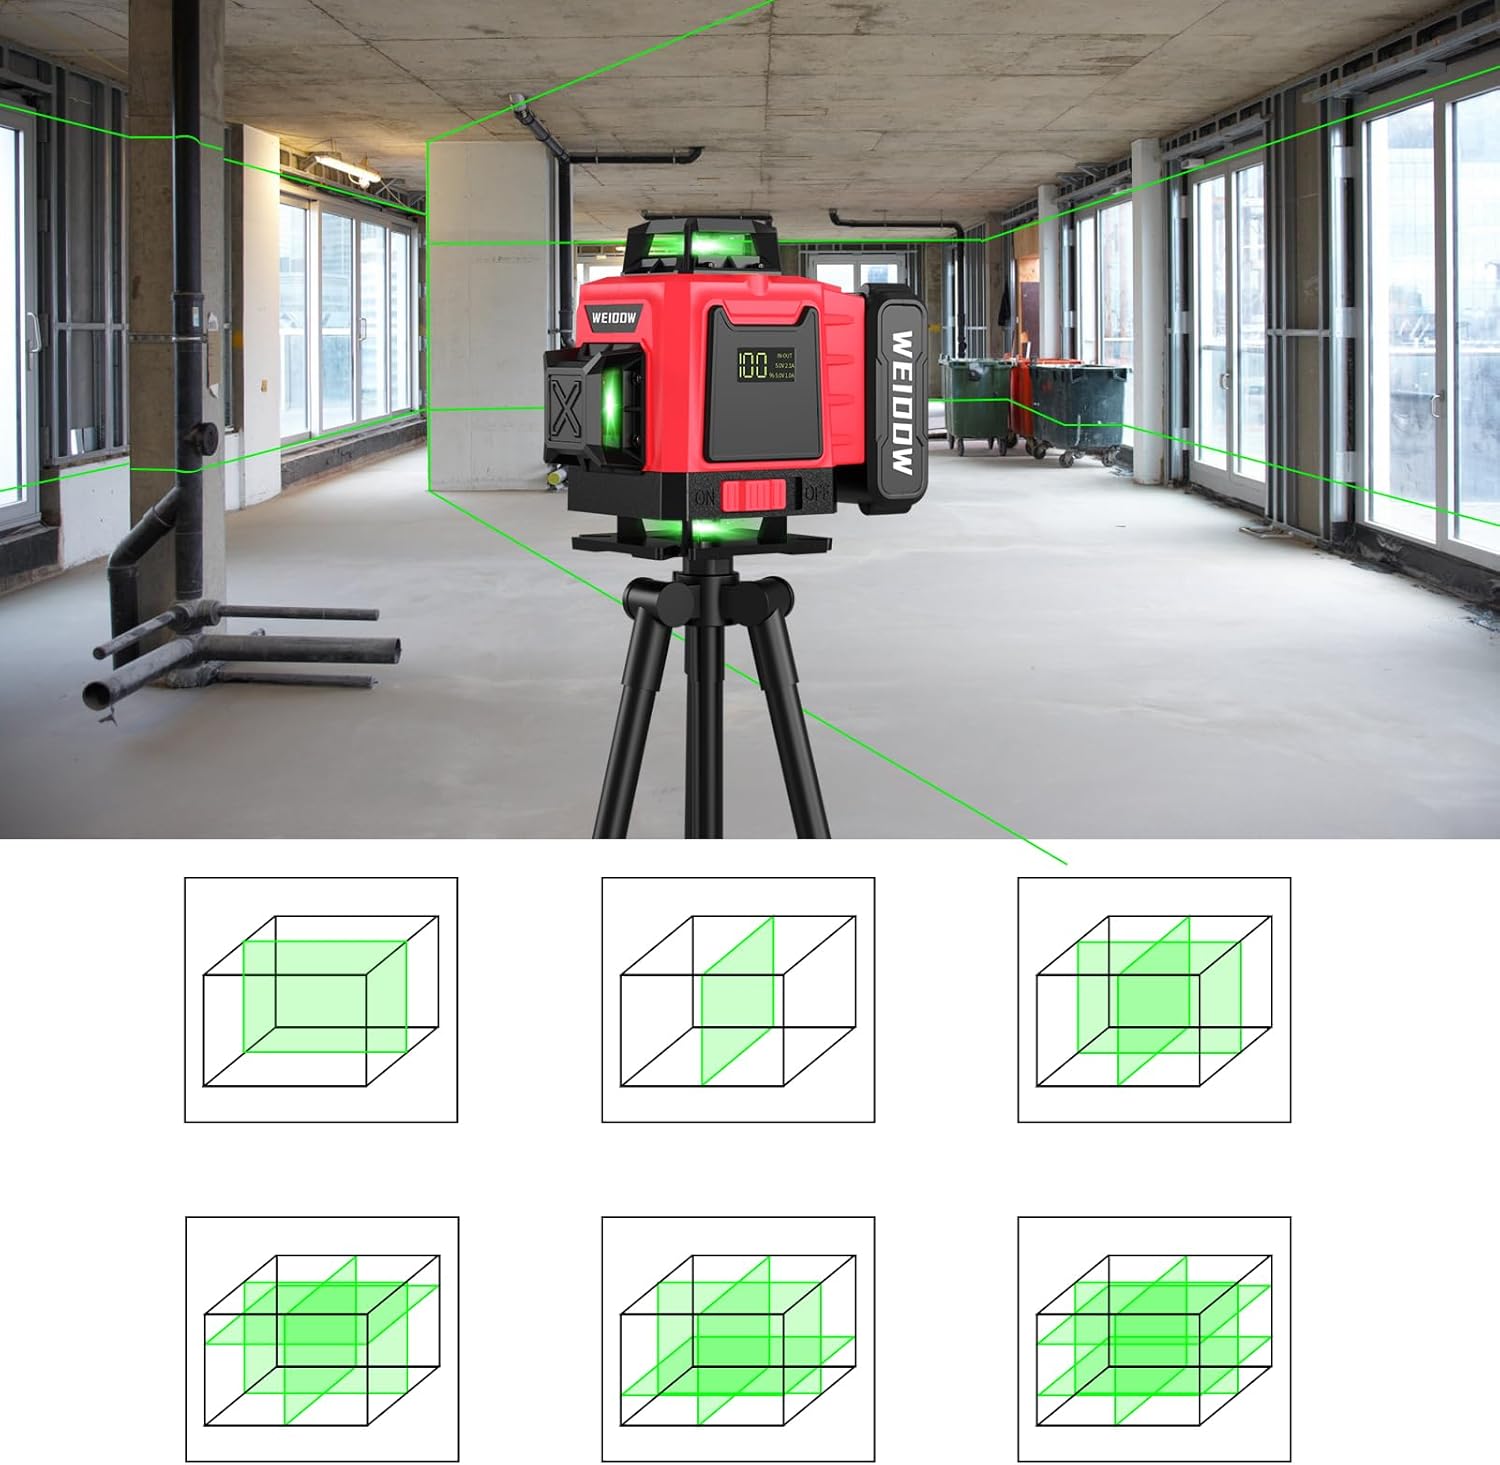
Image: Illustrates the different combinations of horizontal and vertical laser lines that can be projected by the 4D laser level, providing full room coverage.
5. Pulse Mode
To extend the working distance of the laser lines up to 200 feet, activate the pulse mode. This mode is particularly useful for outdoor applications or when using a laser line detector.

Image: The laser level operating in pulse mode, extending its range up to 200 feet when used with a compatible line laser detector.
6. Remote Control Operation
The included remote control allows for convenient operation from a distance, enabling you to adjust laser modes without touching the unit.
- Use the "H" and "V" buttons on the remote to control horizontal and vertical lines.
- The remote also allows for brightness adjustment: long press "H" to bold brightness, long press "V" to reduce brightness.

Image: Close-up of the laser level's remote control, highlighting its buttons for horizontal (H) and vertical (V) line control, and brightness adjustment.
Product Specifications
| Feature | Description |
|---|---|
| Laser Lines | 16 Lines (2x360° Horizontal, 2x360° Vertical) |
| Laser Color | Green |
| Self-Leveling Range | ±4° |
| Accuracy | ±2mm at 9 meters (1/13 inch at 30 feet) |
| Working Distance (Pulse Mode) | Up to 200 feet |
| Battery Capacity | 4800mAh Lithium Ion |
| Continuous Working Time | Over 8 hours (with all 16 lines fully opened) |
| Power Source | Battery Powered (Type-C interface) |
| Material | Aluminum, Alloy Steel, Metal |
| Safety Class | Class II, <1mW power output |
| Item Weight | 3.34 pounds |
| Model Number | SSR-360-S1 |
Maintenance
- Cleaning: Regularly wipe the laser level with a soft, dry cloth. Do not use abrasive cleaners or solvents. Ensure the laser emission windows are clean for optimal visibility.
- Storage: Store the device in its portable bag in a cool, dry place when not in use. Avoid extreme temperatures and direct sunlight.
- Battery Care: Charge the battery regularly, even if not in frequent use, to maintain its lifespan. Avoid fully discharging the battery for extended periods.
- Handling: Handle the laser level with care. While durable, dropping or subjecting it to strong impacts can affect its calibration and performance.
Troubleshooting
| Problem | Possible Cause / Solution |
|---|---|
| Laser level is beeping continuously. | The device is out of its self-leveling range (±4°). Adjust the position of the laser level until it is on a more level surface and the beeping stops. |
| Laser lines are dim or not visible outdoors. | Activate Pulse Mode to extend visibility up to 200 feet, especially useful with a laser line detector in bright conditions. Green lasers are generally 5 times brighter than red beams. |
| Battery indicator shows low charge despite recent charging. | Ensure the charger is properly connected and the power source is active. If the issue persists, the battery may need replacement or further troubleshooting. |
| Laser lines are not straight or accurate. | Ensure the device is in self-leveling mode (not manual mode) and on a stable surface. If calibration issues persist, contact customer support. |
Official Product Video
Video: This video demonstrates the key features and operation of the WEIDDW Laser Level, including battery installation, power-on, self-leveling, and switching between horizontal and vertical laser lines. It also showcases the various mounting options and the remote control functionality.
Warranty and Support
For warranty information, technical support, or any inquiries regarding your WEIDDW Laser Level, please refer to the contact details provided in your product packaging or visit the official WEIDDW website. Keep your purchase receipt as proof of purchase for warranty claims.