FILTA 2f0b905e-b558-4f8d-9106-9f75a68b2a3f
Filta Smart Lock User Manual
Model: 2f0b905e-b558-4f8d-9106-9f75a68b2a3f
1. Introduction
The Filta Smart Lock offers advanced security and convenience for your home or office. This 5-in-1 keyless entry system provides multiple unlocking options including Bluetooth App control, fingerprint recognition, password entry, traditional key access, and IC card unlocking. Designed for ease of use and robust security, this manual will guide you through the installation, setup, and operation of your new smart lock.

Image: Filta Smart Lock with its accompanying mobile application interface.
2. Safety Information
Please read all instructions carefully before installation and use. Retain this manual for future reference.
- Do not attempt to disassemble or repair the lock yourself. This may void the warranty and cause damage.
- Use only specified batteries (4 AA batteries). Do not mix old and new batteries or different types of batteries.
- Avoid exposing the lock to direct sunlight, rain, or extreme temperatures.
- Keep the fingerprint sensor clean and dry for optimal performance.
- Ensure all screws are tightened securely during installation to prevent loosening.
- Regularly check the battery level and replace batteries promptly when low to avoid lockouts.
3. Package Contents
Verify that all components are present before beginning installation:
- Exterior Smart Lock Assembly (with keypad and fingerprint sensor)
- Interior Smart Lock Assembly (with battery compartment and thumb turn)
- Mounting Plate
- Deadbolt Latch
- Strike Plate
- Strike Box
- Installation Screws (various sizes)
- Physical Keys (2)
- IC Cards (2)
- Installation Template
- User Manual
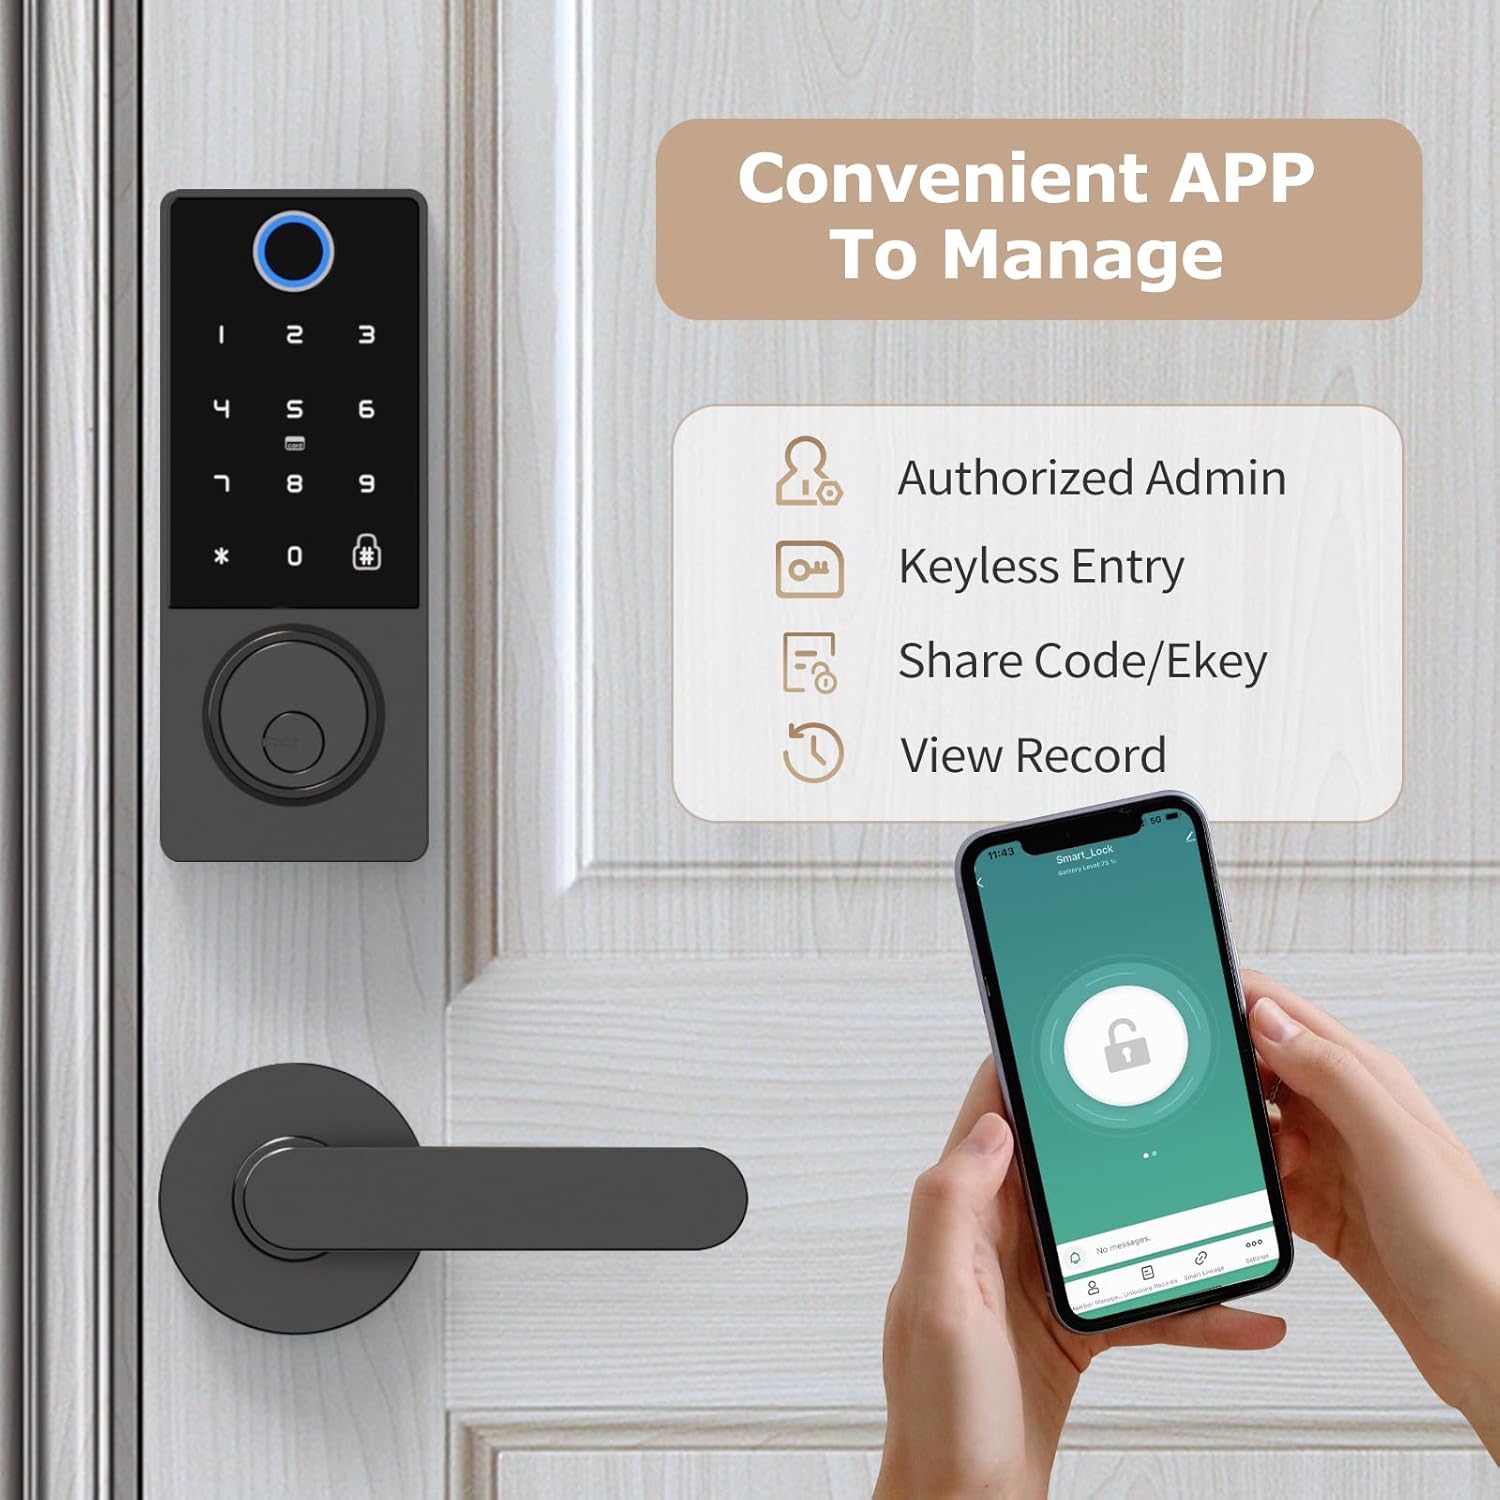
Image: All components included in the Filta Smart Lock package.
4. Specifications
| Feature | Detail |
|---|---|
| Brand | FILTA |
| Model Number | 2f0b905e-b558-4f8d-9106-9f75a68b2a3f |
| Lock Type | Deadbolt |
| Unlocking Methods | Bluetooth App, Fingerprint, Password, Key, IC Card |
| Connectivity | Bluetooth |
| Material | Zinc Alloy |
| Color | Black |
| Power Source | 4 AA Batteries (not included) |
| Door Thickness Compatibility | 1 5/16" ~ 2" (33mm - 50mm) |
| Bore Hole Diameter | 2 1/8" (54mm) |
| Bore Hole Backset | 2 3/8" or 2 3/4" (60mm or 70mm) |
5. Installation Guide
Follow these steps carefully to install your Filta Smart Lock. A screwdriver is the only tool required.
5.1. Door Compatibility Check
Ensure your door meets the following specifications for proper installation:
- Door Thickness: 1 5/16" ~ 2" (33mm - 50mm)
- Bore Hole Diameter: 2 1/8" (54mm)
- Bore Hole Backset: 2 3/8" or 2 3/4" (60mm or 70mm)

Image: Door preparation diagram with measurements for thickness, bore hole diameter, and backset.
5.2. Step-by-Step Installation
- Adjust the Deadbolt Latch: If necessary, adjust the deadbolt latch to fit your door's backset (60mm or 70mm). The bolt can be adjusted by twisting and pulling/pushing.
- Install the Deadbolt Latch: Slide the deadbolt latch into the door edge hole. Ensure the bolt is centered and the "UP" arrow is facing upwards. Secure it with the provided screws.
- Install Exterior Assembly: Slide the lock spindle and wire connector from the exterior smart lock assembly through the deadbolt latch and the door hole. Ensure the exterior assembly sits flush against the door.
- Install Mounting Plate: Thread the wire connector through the mounting plate. Secure the mounting plate to the door using the long screws, ensuring it is aligned and stable.
- Connect Wires and Install Interior Assembly: Connect the wire connector from the exterior assembly to the wire connector port on the interior smart lock assembly. Carefully tuck excess wires into the door cavity. Align the interior assembly with the mounting plate and secure it with screws.
- Install Batteries: Open the battery compartment on the interior assembly. Insert 4 AA batteries, ensuring correct polarity. Close the battery box securely.
- Test Lock Core: Before closing the battery cover, use a physical key to test if the lock core is properly installed and the deadbolt operates smoothly.
Video: Detailed installation guide and app connection for the Filta Smart Lock.
This video demonstrates the physical installation steps and initial app setup, including adjusting the deadbolt, securing components, and connecting the wiring.
6. App and Lock Setup
Your Filta Smart Lock can be managed and configured via the dedicated mobile application.
6.1. App Installation and Account Registration
- Download the 'Tuya Smart' or 'Smart Life' app from your device's app store (iOS App Store or Google Play Store).
- Open the app and register a new account using your email address or phone number. Follow the on-screen prompts to complete the registration and verification process.
6.2. Connecting the Lock to the App (Bluetooth)
- Ensure Bluetooth is enabled on your smartphone.
- Open the app and tap 'Add Device' or the '+' icon.
- The app will search for nearby Bluetooth devices. Select 'Smart_Lock' from the discovered devices.
- Follow any additional prompts to confirm the connection. Once connected, you can control the lock via the app.
6.3. Adding Users and Unlocking Methods via App
The app allows you to manage various unlocking methods and user permissions.
- Adding Fingerprints: Navigate to 'Fingerprint Management' in the app. Tap 'Add Fingerprint' and follow the instructions to place your finger on the lock's sensor multiple times until registered.
- Adding Passwords: Go to 'Password Management'. Tap 'Add Password' to create a new permanent or temporary password. You can also generate a random password.
- Adding IC Cards: Select 'Card Management'. Tap 'Add Card' and present the IC card to the lock's sensor to register it.
- Adding Members: In 'Member Management', you can add family members (with full control) or other members (with limited permissions) to access the lock.
6.4. Adjusting Lock Settings via App
Within the app's settings, you can customize various aspects of your lock:
- Voice Volume: Adjust the voice prompts volume (Mute, Level-1, Level-2, Normal).
- Device Language: Change the language of the lock's voice prompts (e.g., English, Simplified Chinese).
- Motor Rotation Direction: Set the correct door opening direction (Left door opening, Right door opening) to ensure proper lock operation.
- Automatic Lock: Enable or disable the automatic locking feature and set the delay time.
7. Operating Instructions
Your Filta Smart Lock offers multiple convenient ways to secure and access your property.

Image: Visual representation of the five unlocking methods available for the smart lock.
7.1. Unlocking the Lock
- Fingerprint: Place your registered finger on the fingerprint sensor. The lock will unlock if the fingerprint is recognized.
- Password: Enter your registered password on the keypad, then press the '#' key. The lock will unlock if the password is correct.
- IC Card: Present your registered IC card to the card reader area on the lock. The lock will unlock if the card is recognized.
- Bluetooth App: Open the app, select your lock, and tap the unlock icon. You may need to hold the unlock button in the app.
- Physical Key: Insert the physical key into the keyhole and turn to unlock, just like a traditional lock.
7.2. Locking the Lock
- Automatic Locking: If enabled in the app settings, the lock will automatically lock after a set delay once the door is closed.
- Manual Locking: From the outside, press the '#' key on the keypad. From the inside, turn the thumb turn to the locked position.
- Bluetooth App: Open the app, select your lock, and tap the lock icon.
7.3. Adding Fingerprint/Password Directly on Lock (Admin Mode)
You can add fingerprints and passwords directly on the lock without the app, typically after initial setup. This requires entering administrator mode.
- Enter Admin Mode: Press '2' then '#' on the keypad.
- Add Fingerprint: Place your finger on the sensor multiple times as prompted until successfully registered.
- Add Password: Enter your desired password (6-8 digits) and press '#'. Re-enter the password and press '#' to confirm.
7.4. Changing Normally Open Mode
This mode keeps the lock unlocked until manually locked.
- Activate/Deactivate: Press '3' then '#' on the keypad. The lock will confirm the change.
7.5. Changing Language
To change the voice prompt language directly on the lock:
- Change Language: Press '4' then '#' on the keypad. The lock will cycle through available languages.
8. Maintenance
Proper maintenance ensures the longevity and optimal performance of your smart lock.
- Cleaning: Wipe the lock's surface and fingerprint sensor with a soft, dry cloth. Avoid abrasive cleaners or solvents.
- Battery Replacement: Replace all four AA batteries when the low battery indicator appears or when the lock's voice prompts indicate low power. Do not wait until batteries are completely drained.
- Firmware Updates: Periodically check the mobile app for any available firmware updates for your lock. Updates can improve performance and security.
- Mechanical Check: Occasionally check that all screws are tight and the deadbolt operates smoothly without obstruction.
9. Troubleshooting
If you encounter issues with your Filta Smart Lock, refer to the following common problems and solutions:
| Problem | Possible Cause | Solution |
|---|---|---|
| Lock not responding | Dead batteries | Replace all 4 AA batteries. Use the emergency USB power port if completely drained. |
| Fingerprint not recognized | Dirty sensor, unregistered fingerprint, incorrect placement | Clean the sensor. Re-register fingerprint if needed. Ensure proper finger placement. |
| Password not working | Incorrect password, unregistered password | Verify the password. Add or reset password via app or directly on the lock. |
| App cannot connect to lock | Bluetooth off, app permissions, lock too far | Ensure Bluetooth is on. Grant necessary app permissions. Move closer to the lock. Restart app/phone. |
| Deadbolt not extending/retracting smoothly | Misalignment, obstruction, loose screws | Check alignment of lock components and strike plate. Remove any obstructions. Tighten all screws. |
10. Warranty and Support
FILTA provides a limited warranty for this smart lock. Please refer to the warranty card included in your package for specific terms and conditions. For technical support, troubleshooting assistance, or warranty claims, please contact FILTA customer service through the following channels:
- Email: support@filta.com
- Website: Visit the official FILTA website for FAQs and support resources.
- Amazon Store: You can also reach out via the FILTA Store on Amazon.
Please have your product model number (2f0b905e-b558-4f8d-9106-9f75a68b2a3f) and purchase information ready when contacting support.
Related Documents - 2f0b905e-b558-4f8d-9106-9f75a68b2a3f
 |
FILTA Smart Lock D6 Instruction Manual This document provides comprehensive instructions for the FILTA Smart Lock Model D6, covering installation, setup via the Tuya Smart app, personalization options, offline mode operations, and frequently asked questions. It details how to install, configure, and use the smart lock for enhanced home security. |
 |
Filta Activ8 Battery Powered Vacuum Head - Enhance Commercial Cleaning Efficiency Discover the Filta Activ8 Battery Powered Vacuum Head, a world-first patented technology designed to revolutionize commercial cleaning. Doubles as a stand-alone sweeper, cuts vacuuming time by up to 50%, and offers ergonomic benefits. |
 |
FILTA Vacuum Cleaner Bag Compatibility Guide | Find Your Perfect Bag Find the correct FILTA vacuum cleaner bag for your AEG, Bosch, Karcher, Miele, and many other brands. This comprehensive reference guide lists models and compatible bag codes for optimal vacuum performance. |
 |
PR electronics 9106 HART Transparent Repeater Product Manual Comprehensive product manual for the PR electronics 9106 HART Transparent Repeater. Details technical specifications, applications, installation, safety certifications (SIL2/SIL3, ATEX, IECEx, FM, UL), and operational guidance for industrial automation systems. |
 |
New World Pet Products Exercise Pen Assembly Instructions Detailed assembly instructions for New World Pet Products exercise pens, models B550-24 through B558-48. Learn how to set up, connect, and secure your pet playpen. |