VEVOR Commercial Slushy Machine, 6 L x 2 Tanks
VEVOR Commercial Slushy Machine User Manual
Model: Commercial Slushy Machine, 6 L x 2 Tanks (6LX2)
Brand: VEVOR
1. Introduction
This manual provides essential information for the safe and efficient operation, maintenance, and troubleshooting of your VEVOR Commercial Slushy Machine. Please read this manual thoroughly before initial use and retain it for future reference. Proper understanding and adherence to these instructions will ensure optimal performance and longevity of the appliance.
2. Safety Instructions
- Always ensure the machine is plugged into a grounded three-hole socket.
- Do not operate the machine with damaged cords or plugs.
- Keep hands clear of moving parts, especially the mixing stirrers, during operation.
- Ensure the sugar content of beverages is above 13% to prevent the mixing container from freezing solid and damaging the machine.
- Do not use alcoholic beverages with alcohol content exceeding 13%.
- The initial fill of ingredients should not be less than two-thirds of the bowl capacity.
- Ingredients should exceed the evaporator level, and their temperature should not exceed 35°C (95°F).
- Unplug the machine before cleaning or performing any maintenance.
- This appliance is designed for commercial and home use as specified; do not use for purposes other than intended.
3. Product Overview
3.1. Specifications
| Attribute | Detail |
|---|---|
| Brand | VEVOR |
| Model | Commercial Slushy Machine, 6 L x 2 Tanks (6LX2) |
| Capacity | 2 x 6 Liters (1.6 US Gallons per tank) |
| Power | 700W |
| Voltage | 110V |
| Material | Stainless Steel Body, Food-Grade Polycarbonate (PC) Tanks |
| Dimensions (L x W x H) | 15.3 x 17.9 x 23.8 inches |
| Item Weight | 96 Pounds |
| Special Feature | Auto Cleaning |
| Included Components | Slushy Machine, Tank Sealing Rings, Piston Sealing Rings, Tube of Grease |
3.2. Key Features
- Large Capacity: Features two 6L (1.6 US gallon) tanks, capable of producing up to 50 cups of frozen beverages.
- Durable Construction: Built with a thickened stainless steel body and food-grade PC tanks for durability and easy maintenance.
- Efficient Mixing: Dual broadened mixing stirrers with 360-degree rotation ensure consistent slush texture and reduce sediment.
- Powerful Cooling System: Equipped with a 700W compressor and copper condenser for rapid refrigeration, energy efficiency, and low noise operation.
- User-Friendly Control: A brief control panel with digital displays for gear and shaping ratio, one-touch operation, rebound handles, and a detachable drip tray.
- Automatic Cleaning Mode: Simplifies cleaning process, saving time and effort.
- Versatile Application: Ideal for making various cold drinks including margaritas, slushies, frozen coffee, fruit drinks, and smoothies.

Figure 1: VEVOR Commercial Slushy Machine. This image displays the overall appearance of the machine with its dual tanks and control panel.

Figure 2: Large Capacity & Premium Material. This image highlights the 6L (1.6 Gallon) tank capacity, the dual widened stirrers, food-grade PC cylinder, and the stainless steel body, emphasizing the machine's ability to make up to 50 cups.
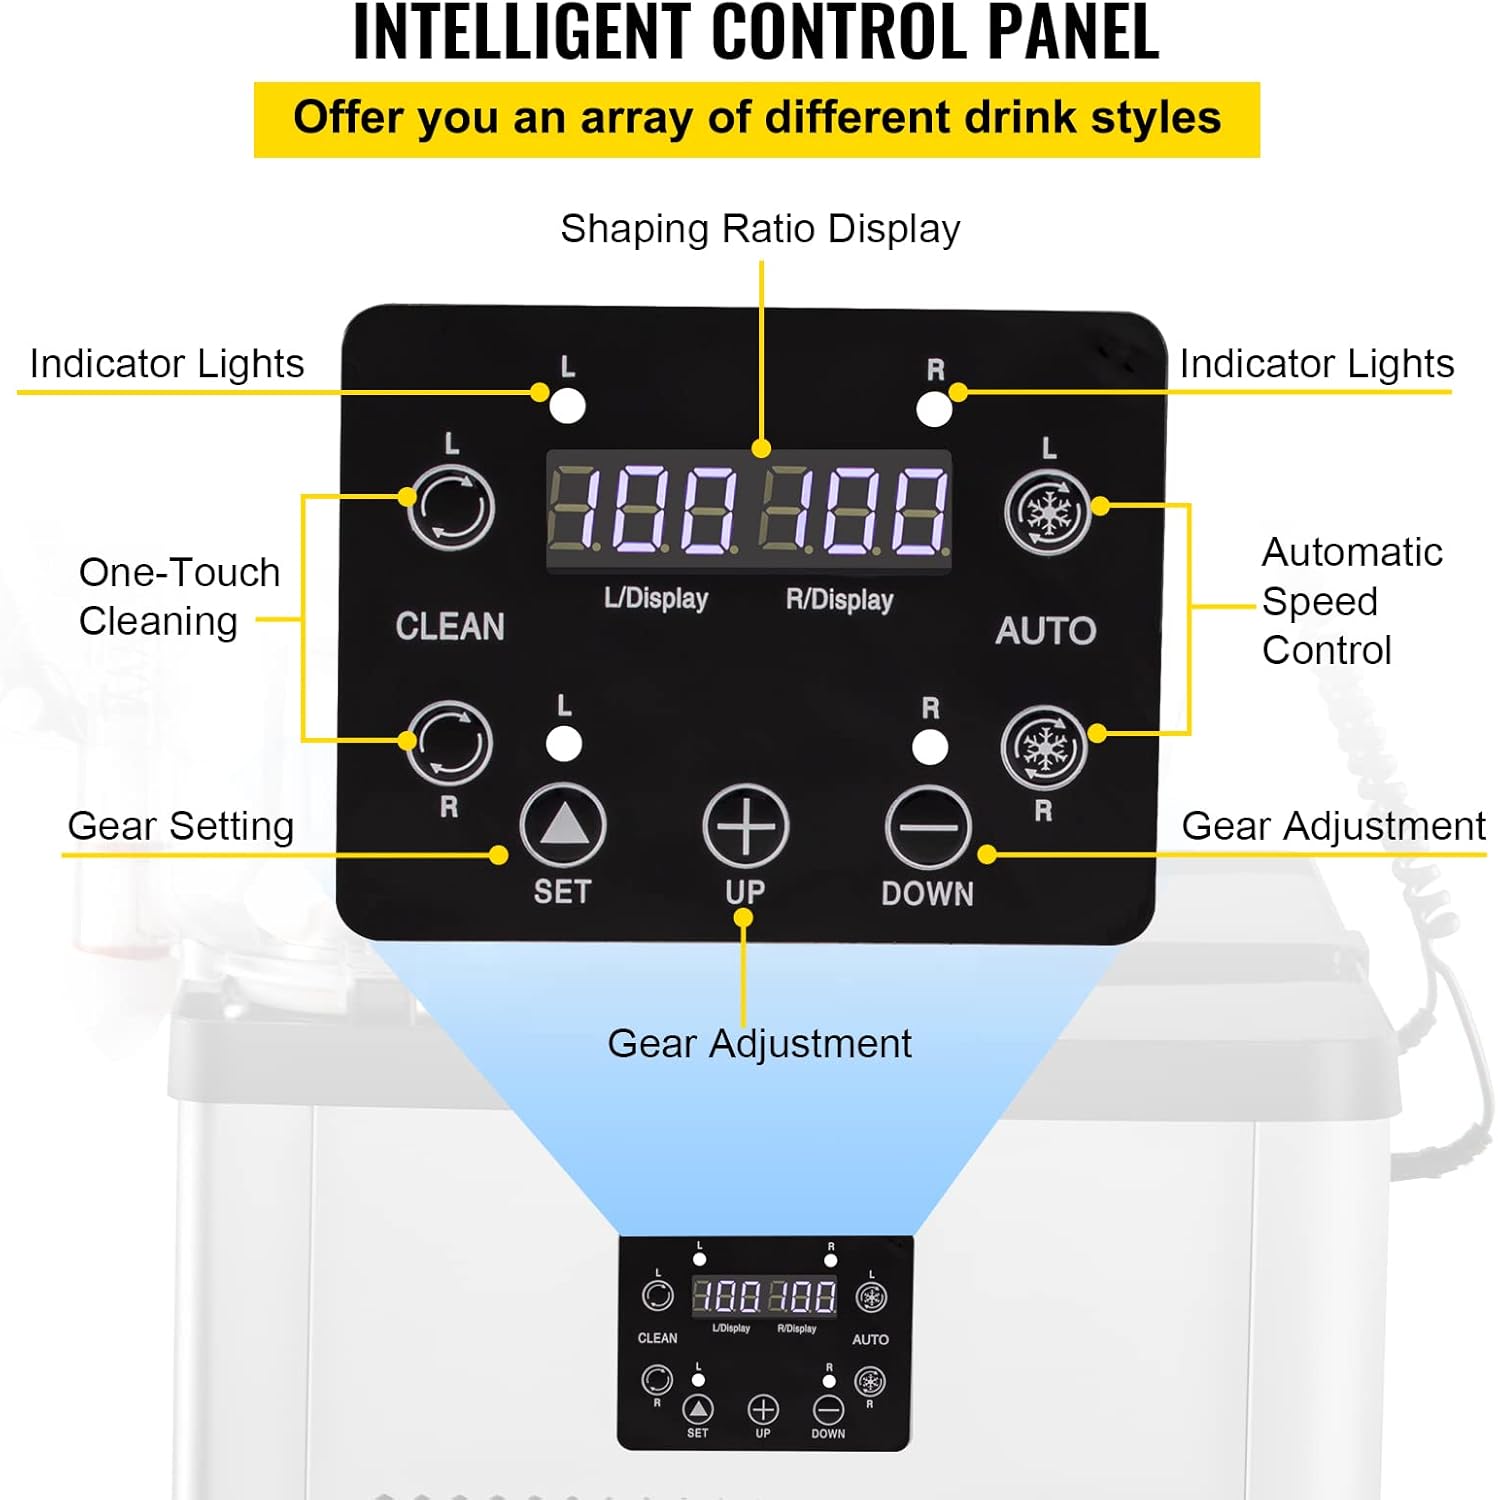
Figure 3: Intelligent Control Panel. This image provides a detailed view of the control panel, labeling its various functions such as indicator lights, shaping ratio display, one-touch cleaning, automatic speed control, gear setting, and gear adjustment buttons.
4. Setup
4.1. Unpacking and Placement
Carefully unpack the slushy machine from its packaging. Ensure all components are present and undamaged. Place the machine on a stable, level surface with adequate ventilation around it. Avoid placing it near heat sources or in direct sunlight.
4.2. Initial Cleaning
Before first use, thoroughly clean all parts that will come into contact with beverages. This includes the tanks, lids, agitators, and dispensing handles. Use mild soap and warm water, then rinse thoroughly. Ensure all parts are completely dry before reassembly.
4.3. Assembly
- Ensure the seal rings are properly seated in their grooves on the bowls. You may smear the seal rings with Vaseline for easier installation and a better seal.
- Place the tanks onto the main unit, ensuring they are securely seated and aligned with the internal mechanisms.
- Install the agitators into the tanks. Rotate them around to align with the card slot for proper fit.
- Attach the dispensing handles, ensuring the white piston and spring are correctly installed and lubricated with Vaseline after cleaning.
- Close the lids securely on top of the tanks.
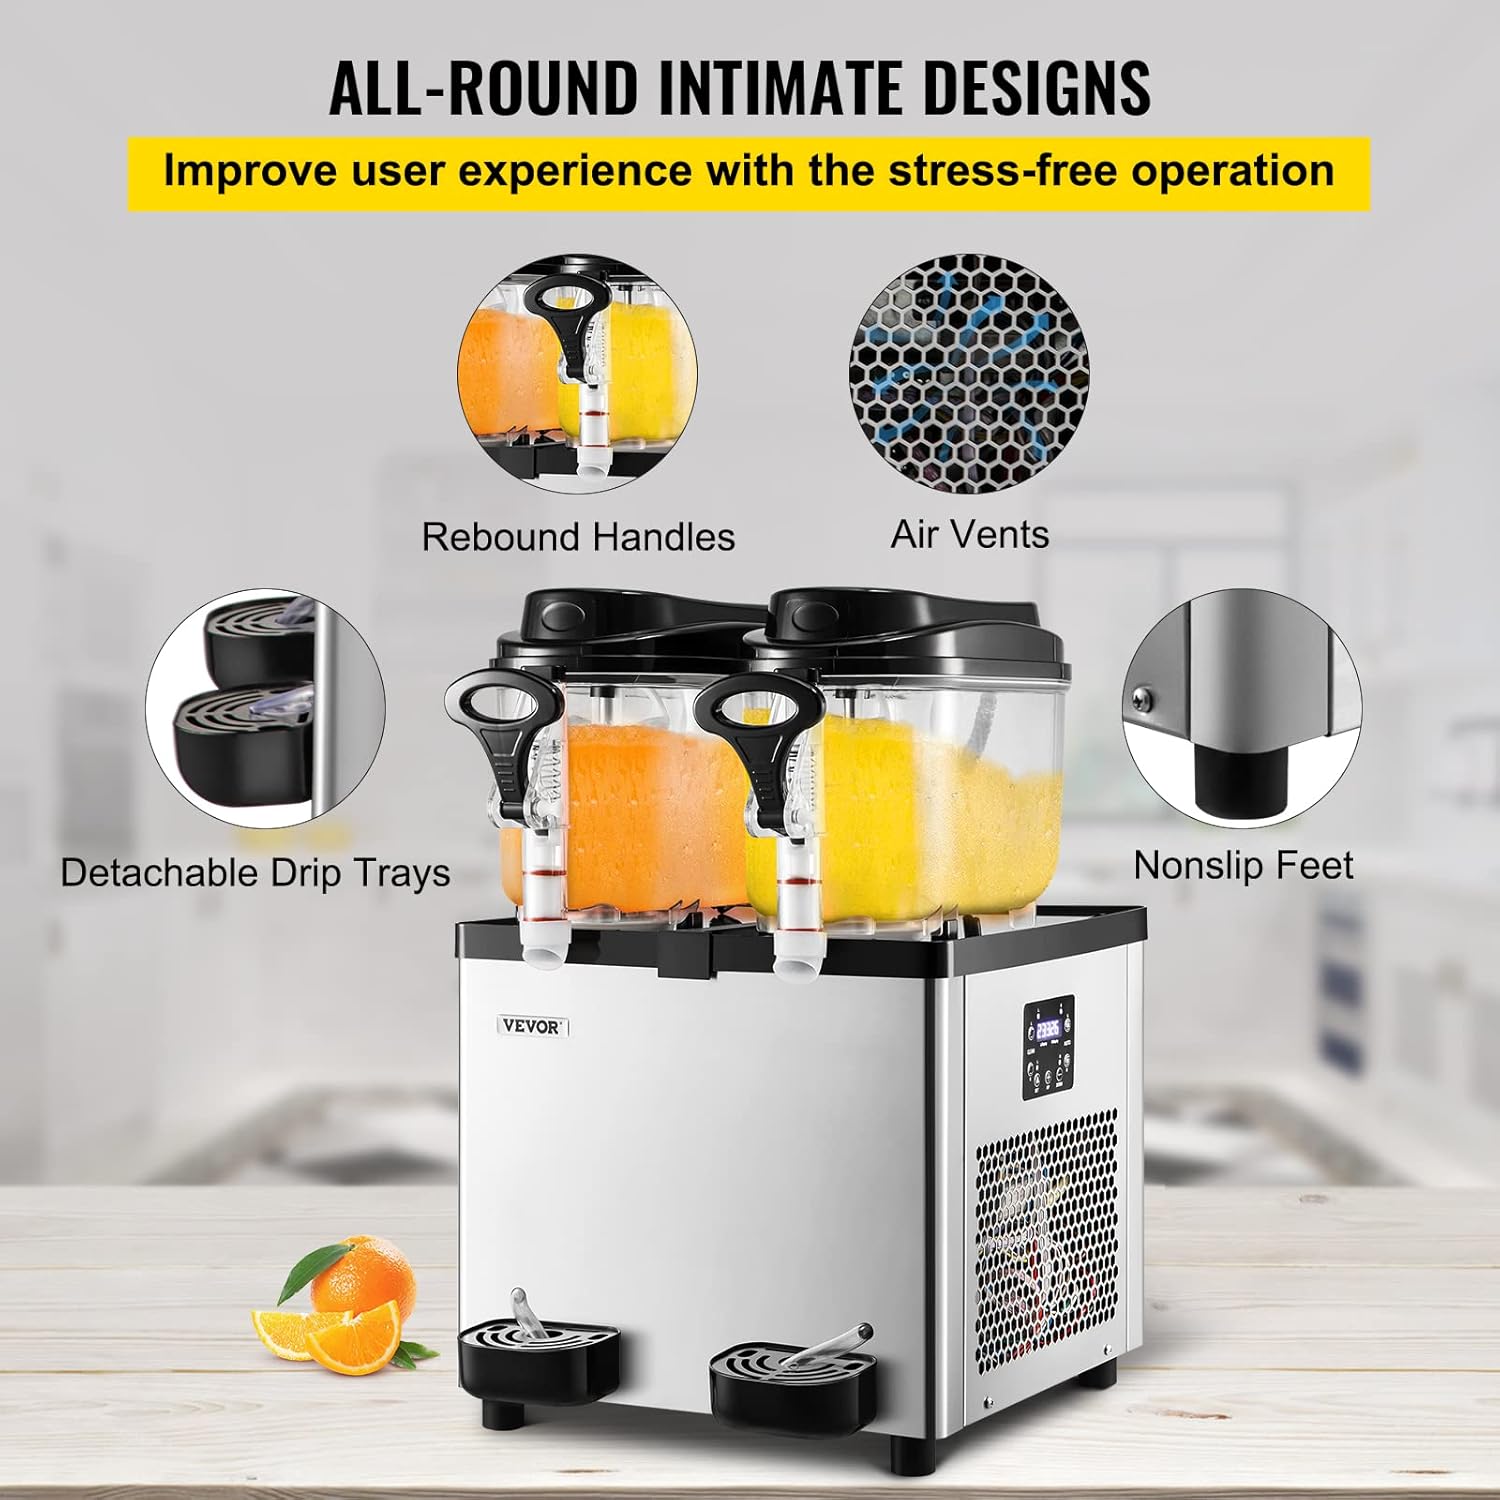
Figure 4: All-Round Intimate Designs. This image illustrates the practical design elements such as rebound handles for easy dispensing, air vents for cooling, detachable drip trays for cleanliness, and non-slip feet for stability.
Video 1: VEVOR Commercial Slushy Machine Setup and Cleaning Guide. This video demonstrates the initial setup, ingredient preparation, operation, and cleaning procedures for the slushy machine.
5. Operating Instructions
5.1. Preparation Before Use
- Plug the power supply into a three-hole grounded socket.
- Press the "L" and then the "R" keys of the CLEAN button to make both agitators run. This is for initial mixing or cleaning.
- Open the lid and pour in the prepared ingredients. For optimal results and to prevent damage, prepare sugar and water in a 1:6.5 ratio. The first charge should not be less than two-thirds of the bowl. The ingredients should exceed the evaporator, and their temperature should not exceed 35°C (95°F).
- Stir the ingredients evenly for about two minutes.
5.2. Making Slushies
- After stirring, press the "L" and "R" keys of CLEAN again to turn off the cleaning operation.
- Then, press the "L" and "R" keys of AUTO to start making slushie. The machine will typically run for about an hour to produce slushie.
- As slushie is used up, add ingredients in time to keep the bowl at least two-thirds full.
- Important Note on Sugar Content: If the sugar content is insufficient (below 13%), the mixture will freeze solid, causing a "--" failure and preventing proper slush formation. If this occurs, add more sugar or juice concentrate until snowmelt occurs.
- Alcoholic Beverages: When making slush with alcoholic drinks, set the gear to 2 to 3. If the shape is still incomplete, it can be adjusted to 4 to 5 gears. Always ensure sufficient sugar content.
5.3. Adjusting Hardness
The hardness of the slush can be adjusted to suit your preference.
- Long press the "SET" key for 5 seconds. The left display (L/Display) will blink, showing the current gear (e.g., 05).
- Click the "UP" key to increase the hardness of the ingredients.
- Press "SET" again to switch to the right display (R/Display) to adjust the hardness of the second tank separately.
- The maximum hardness setting is typically 04-05, and the minimum adjustment is about 02.
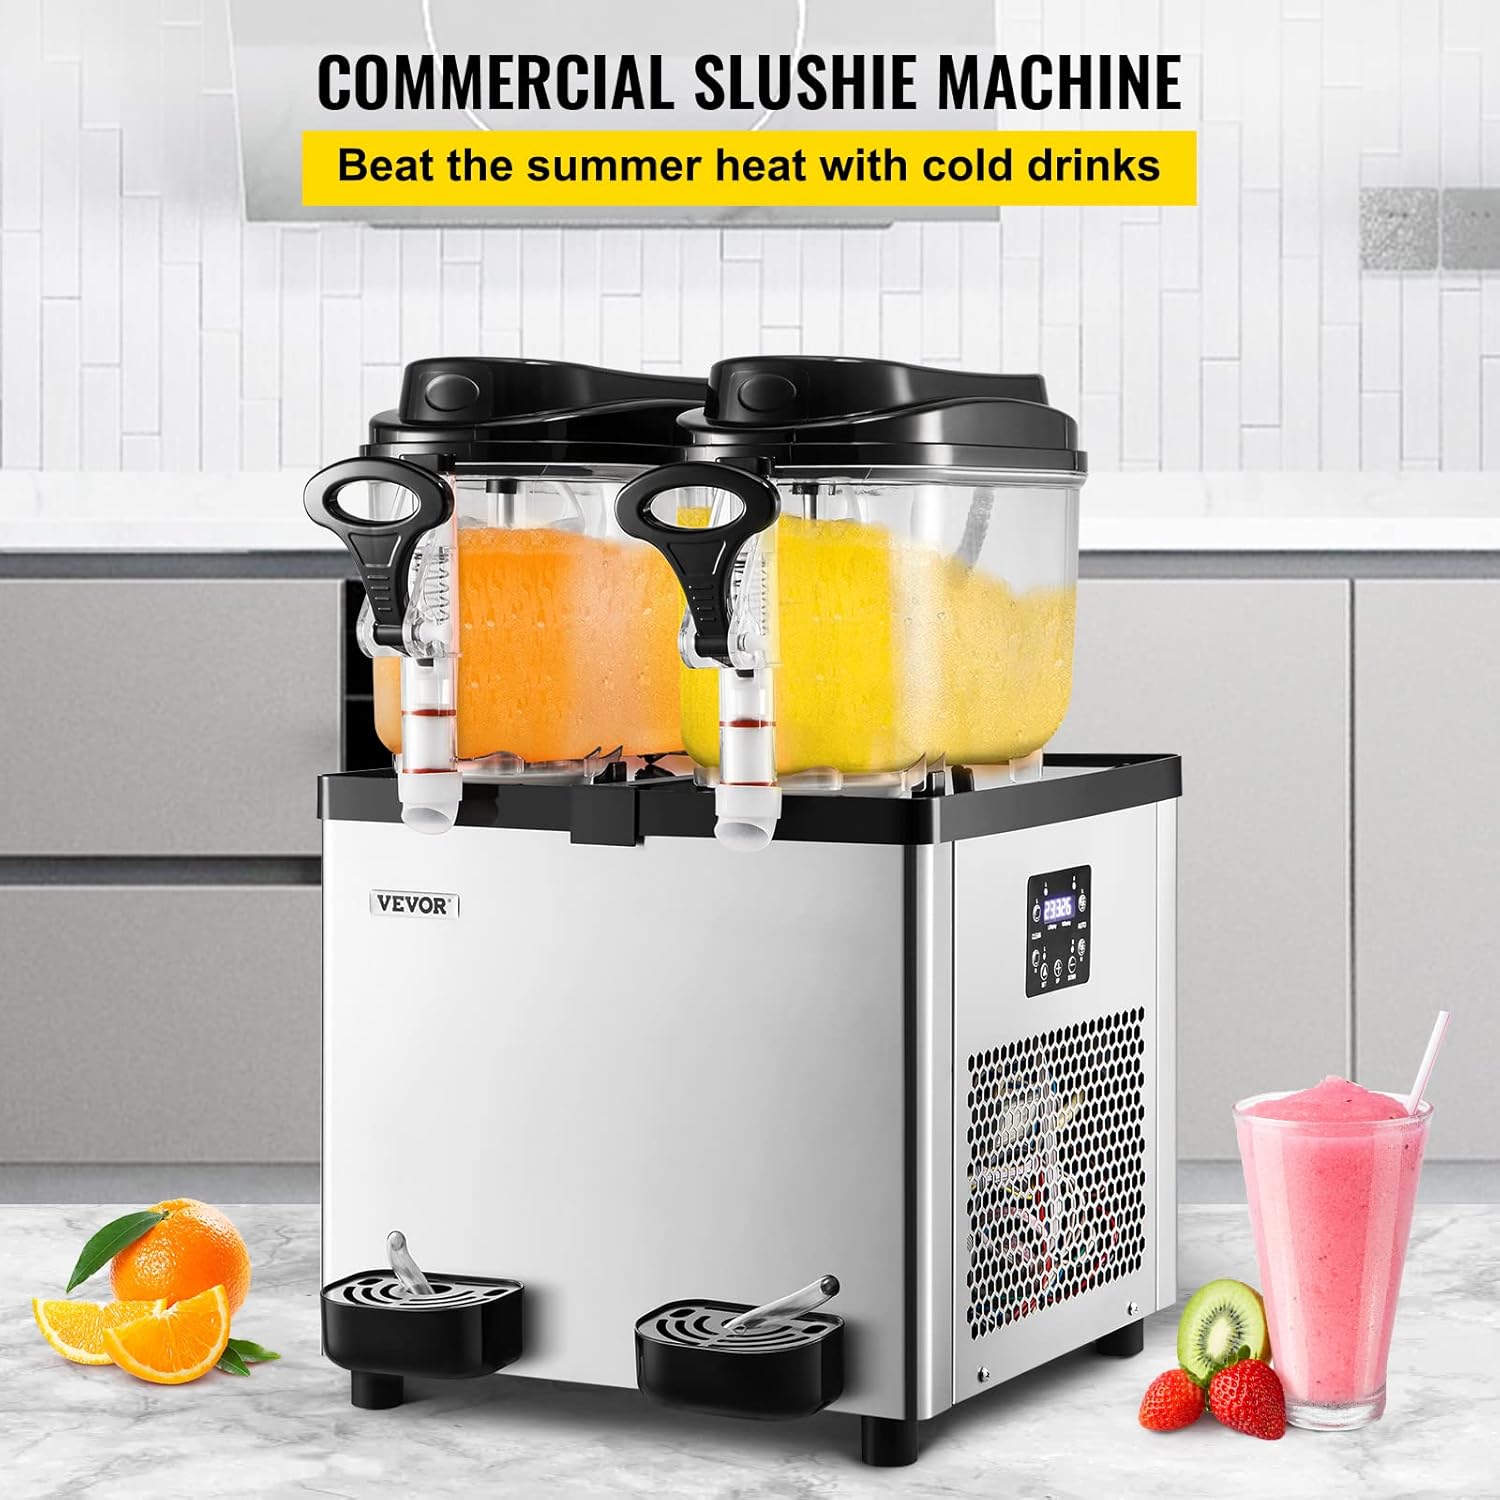
Figure 5: Commercial Slushie Machine in Use. This image shows the machine actively producing slush, demonstrating its commercial application.
6. Maintenance
6.1. Daily Cleaning
- When the machine is no longer used at night, press the "L" and "R" keys of AUTO first to stop the production.
- Then, press the "L" and "R" keys of CLEAN to turn on the cleaning function.
- Run the cleaning cycle for about 30 minutes. This will melt any remaining frozen ingredients.
- Release all ingredients from the tanks.
- After all ingredients have been poured out, open the cover, remove the agitators, and take out the bowls.
- Clean the bowls, agitators, and dispensing components with mild soap and warm water. Rinse thoroughly.
- Remove the seal rings from the bowls and the piston seal rings from the dispensing handles. Clean them and smear with Vaseline before reinstallation.
- Wipe the exterior of the machine clean with a damp cloth.
6.2. Deep Cleaning and Storage
Periodically perform a deep clean by disassembling all removable parts and cleaning them thoroughly. Ensure all parts are completely dry before reassembling or storing the machine. Store the machine in a cool, dry place when not in use for extended periods.

Figure 6: Fast Cooling System. This image highlights the internal components responsible for efficient cooling, including the 700W compressor and efficient condenser, ensuring quick slush preparation and low noise.
7. Troubleshooting
- Machine not turning on: Check power connection and ensure the machine is plugged into a functional outlet. Verify the power switch is in the ON position.
- Slush not forming or freezing solid:
- Ensure the sugar content of your mixture is above 13%. Insufficient sugar will cause the mixture to freeze into ice cubes rather than slush.
- Adjust the hardness setting (gear) using the control panel. Increase the gear number for harder slush, decrease for softer.
- Verify that the ingredients exceed the evaporator level in the tanks.
- Machine making unusual noises or vibrating excessively:
- Check if the machine is placed on a stable and level surface.
- Ensure all components, especially the tanks and agitators, are correctly assembled and seated.
- If the issue persists, contact customer support.
- Leaking from dispensing handles:
- Check the piston seal rings and ensure they are properly installed and lubricated.
- Verify that the dispensing handle is fully closed after use.
- Error Code "--" displayed: This typically indicates that the mixture has frozen solid due to insufficient sugar content. Follow the steps for "Slush not forming or freezing solid" to resolve.
8. Warranty and Support
VEVOR products typically come with a standard warranty. For specific warranty details, including coverage period and terms, please refer to the warranty card included with your product or visit the official VEVOR website. If you encounter any issues or require technical assistance, please contact VEVOR customer support. Have your product model number and purchase information ready when contacting support.
For additional support and resources, you may visit the VEVOR Store on Amazon.
Ask a question about this manual
Ask about setup, troubleshooting, compatibility, parts, safety, or missing instructions. Manuals+ will review the question and use this page’s manual context to help answer it.