1. Introduction
This manual provides detailed instructions for the setup, operation, and maintenance of your LOFICOPER Wireless Indoor Outdoor Thermometer Hygrometer Weather Station. Please read this manual thoroughly before use to ensure proper functionality and longevity of the device.

Image 1.1: The LOFICOPER Weather Station is suitable for various indoor and outdoor environments, including warehouses, bedrooms, greenhouses, and offices, providing essential environmental data.
2. Product Overview
2.1 Package Contents
- 1 x Main Display Unit (Hygrometer Thermometer)
- 1 x Wireless Remote Sensor
- 1 x User Manual
2.2 Key Features
- Multifunctional Display: Shows indoor/outdoor temperature and humidity, 7 weather forecast icons, air pressure, calendar, and time on a 4.4-inch screen.
- Weather Forecast: Predicts weather conditions for the next 12 to 24 hours based on atmospheric pressure changes.
- High Precision: Equipped with a high-precision sensor, refreshing data every 30 seconds. Temperature accuracy is ±2°C (±0.5°F) and humidity accuracy is ±2%.
- Wide Measuring Range: Temperature range: -40°C to 70°C (-40°F to 158°F). Humidity range: 1% to 99%.
- Stable Wireless Transmission: Supports a transmission distance of up to 328 ft (100m) in open areas.
- Alarm Clock & Snooze Function: Includes a customizable alarm with a snooze feature.
- Backlight: LCD screen features a backlight that stays on for 10 seconds when activated.

Image 2.1: The main display unit and the wireless remote sensor of the LOFICOPER Weather Station.

Image 2.2: The 4-inch LCD screen features a backlight for improved visibility in low-light conditions, activating for 10 seconds.
3. Setup
3.1 Battery Installation
- Main Unit: Open the battery compartment on the back of the main display unit. Insert 3 AAA batteries (not included), ensuring correct polarity (+/-). Close the compartment.
- Remote Sensor: Open the battery compartment on the back of the remote sensor. Insert 2 AA batteries (not included), ensuring correct polarity (+/-). Close the compartment.
Note: It is recommended to install batteries in the remote sensor first, then in the main unit, to facilitate immediate pairing.
3.2 Sensor Placement
Place the remote sensor in your desired outdoor location. Ensure it is protected from direct sunlight and heavy precipitation for accurate readings and extended lifespan. The maximum transmission distance is 328 ft (100m) in an open area. Walls and other obstructions may reduce this range.

Image 3.1: The indoor station and outdoor remote sensor should be placed within 328 feet (100m) for optimal wireless transmission.
3.3 Initial Pairing
After installing batteries in both units, the main display unit will automatically search for the remote sensor. The outdoor temperature and humidity readings should appear on the display within a few minutes. If readings do not appear, ensure both units are within range and try re-inserting batteries.
4. Operation
4.1 Display Layout
The main display unit features a clear LCD screen with various indicators:

Image 4.1: Labeled diagram of the main display unit, indicating the position of various readings and functions.
- Touch Backlight button
- 12/24 hour format indicator
- Time display
- Weather Forecast icons
- Outdoor Temperature
- Indoor Temperature
- Indoor Humidity
- Outdoor Humidity
- Air Pressure
- Month/Date display
- Alarm indicator
4.2 Setting Time and Date
Refer to the physical user manual included in your package for specific button functions and sequences to set the time, date, and 12/24 hour format. Typically, a 'MODE' or 'SET' button is used to enter setting mode, and 'UP'/'DOWN' or '+'/'–' buttons adjust values.
4.3 Temperature Unit Selection (°C/°F)
A dedicated button (often labeled °C/°F or similar) allows you to switch between Celsius and Fahrenheit temperature units. Press this button to toggle the display.
4.4 Alarm Clock and Snooze Function
The device includes an alarm clock. Consult your physical manual for instructions on setting the alarm time and activating the snooze function. The snooze duration is typically a fixed interval (e.g., 5-10 minutes).

Image 4.2: The display shows icons for the alarm clock and snooze function, indicating their active status.
4.5 Weather Forecast Interpretation
The weather station displays 7 different icons to indicate the predicted weather for the next 12-24 hours. These forecasts are based on changes in atmospheric pressure.
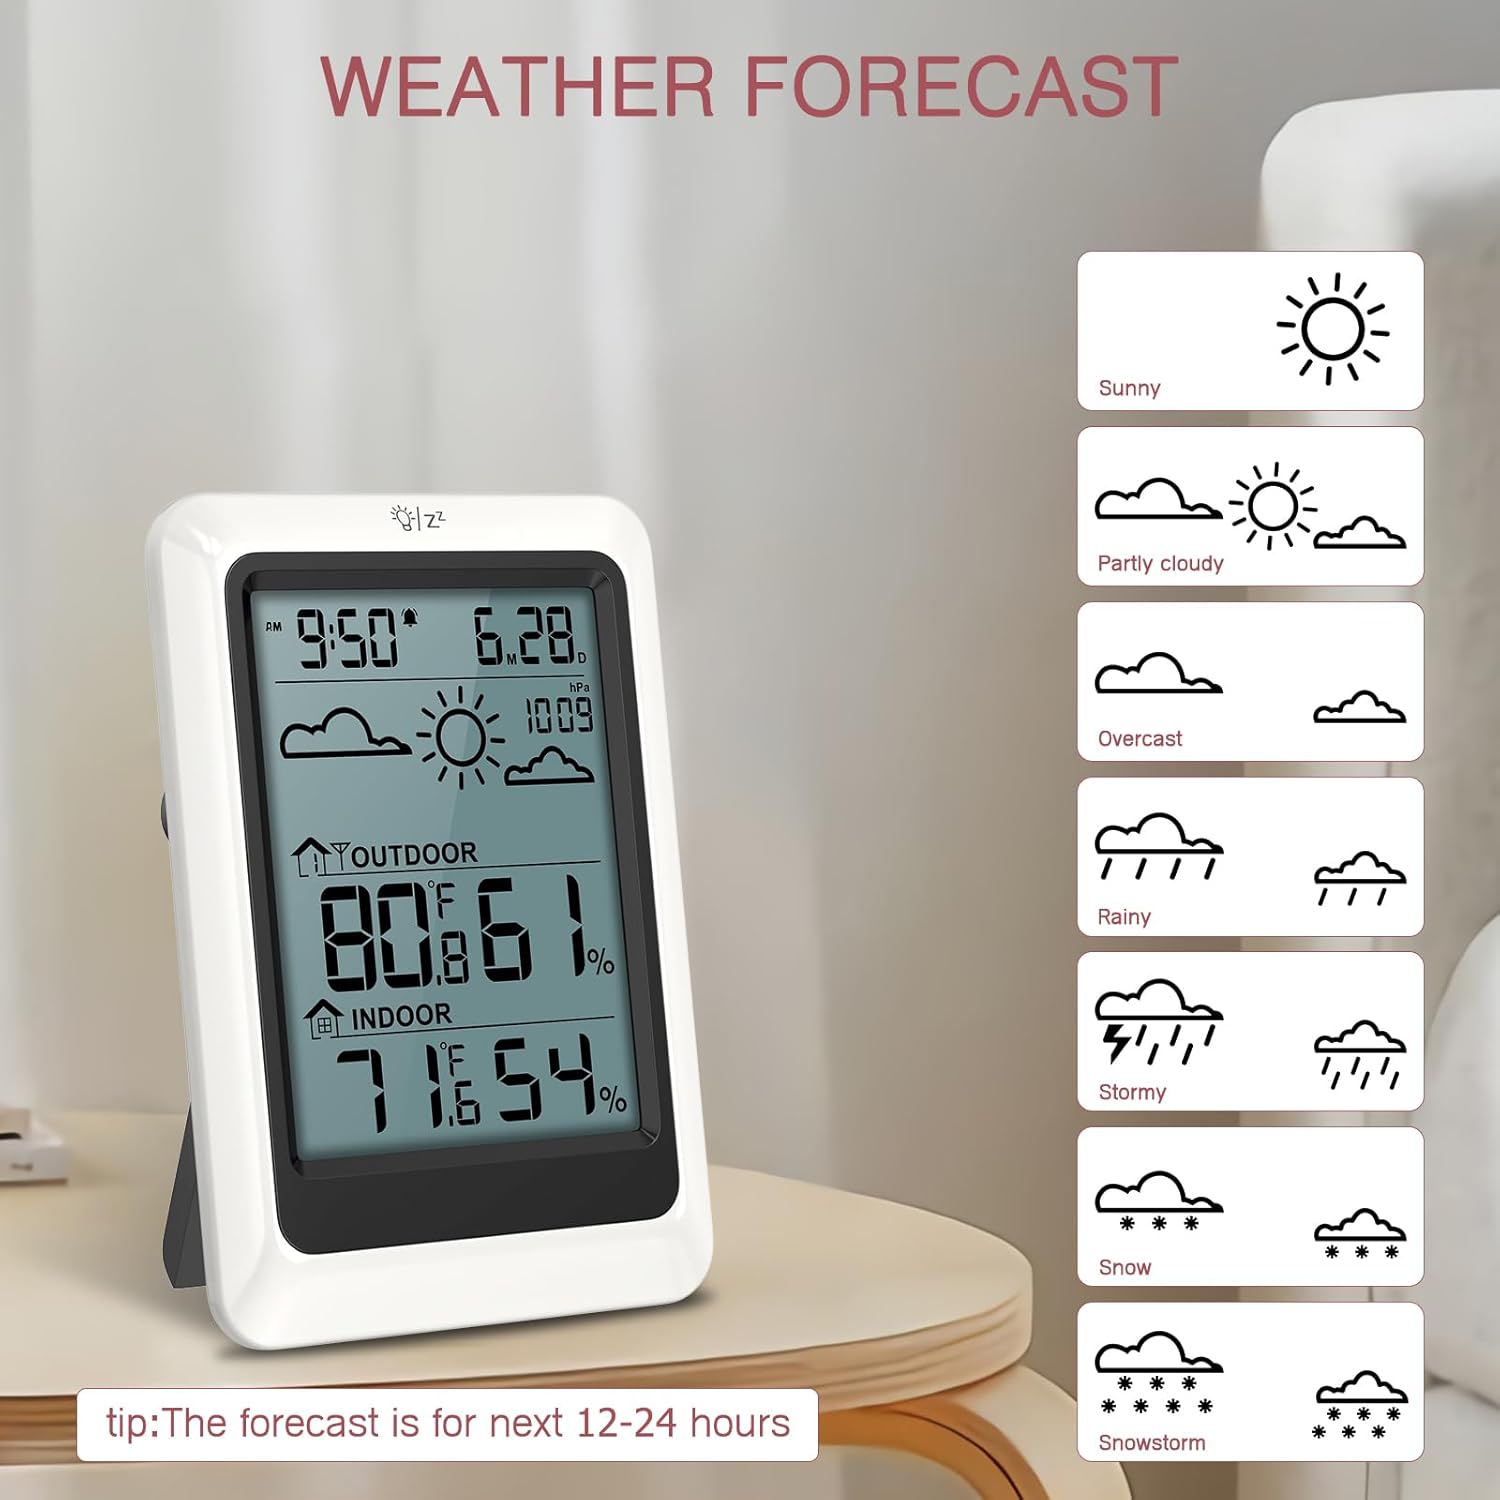
Image 4.3: The weather forecast icons include Sunny, Partly Cloudy, Overcast, Rainy, Stormy, Snow, and Snowstorm, providing a visual prediction for the next 12-24 hours.
4.6 Backlight Activation
To activate the backlight, press the designated touch button (labeled '1' in Image 4.1). The backlight will illuminate for approximately 10 seconds.
5. Maintenance
- Battery Replacement: Replace batteries in both the main unit and remote sensor when the low battery indicator appears on the display. Always replace all batteries at the same time with new ones of the same type.
- Cleaning: Clean the display unit and sensor with a soft, dry cloth. Do not use abrasive cleaners or solvents, as these may damage the plastic components or screen.
- Environmental Considerations: Ensure the outdoor sensor is placed in a location that minimizes exposure to extreme weather conditions (e.g., direct heavy rain, prolonged direct sunlight, extreme cold). While designed for outdoor use, protection can extend its lifespan and accuracy.
6. Troubleshooting
| Problem | Possible Cause | Solution |
|---|---|---|
| No outdoor temperature/humidity reading | 1. Sensor out of range. 2. Low batteries in sensor. 3. Interference. | 1. Move sensor closer to the main unit. 2. Replace sensor batteries. 3. Relocate units away from electronic devices that may cause interference. |
| Inaccurate temperature/humidity readings | 1. Sensor exposed to direct sunlight/rain. 2. Sensor placed near heat/cold sources. 3. Low batteries. | 1. Relocate sensor to a shaded, protected area. 2. Ensure sensor is away from vents, windows, or appliances. 3. Replace batteries in both units. |
| Display is blank or dim | 1. Low batteries in main unit. 2. Incorrect battery installation. | 1. Replace main unit batteries. 2. Check battery polarity. |
| Cannot change °C/°F or set time | Incorrect button sequence or mode. | Refer to the detailed instructions in your physical user manual for specific button functions. |
7. Specifications
| Feature | Detail |
|---|---|
| Model Number | MC05US-WA89 |
| Brand | LOFICOPER |
| Power Source (Main Unit) | 3 x AAA Batteries (not included) |
| Power Source (Sensor) | 2 x AA Batteries (not included) |
| Temperature Measuring Range | -40°C ~ 70°C (-40°F to 158°F) |
| Humidity Measuring Range | 1% ~ 99% |
| Temperature Accuracy | ±2°C (±0.5°F) |
| Humidity Accuracy | ±2% |
| Refresh Rate | Every 30 seconds |
| Wireless Transmission Distance | Up to 328 ft (100m) in open area |
| Connectivity Technology | 433 MHz, 868 MHz |
| Special Features | Alarm, Large Display, Weather Forecast, Calendar |
| Color | White |
| Package Dimensions | 5.79 x 5.67 x 1.46 inches |
| Item Weight | 9.14 ounces |

Image 7.1: Details on the high precision and sensitivity of the LOFICOPER Weather Station, including temperature and humidity ranges and accuracy.
8. Warranty and Support
LOFICOPER is committed to providing quality products and customer satisfaction. This product comes with the following support:
- 1-Year Warranty: Covers manufacturing defects from the date of purchase.
- 30-Day Free Return: For eligible purchases, refer to retailer's return policy.
- 90-Day Free Replacements: For qualifying issues within the first 90 days.
- Lifetime Technical Assistance: Access to technical support for the lifespan of the product.
- 24/7 Customer Support: Available for assistance with product inquiries or issues.
For warranty claims, technical assistance, or customer support, please refer to the contact information provided on the product packaging or the official LOFICOPER website.