1. Introduction
Thank you for choosing the INFANS 2-in-1 Kids Play Kitchen and Restaurant. This double-sided wooden play kitchen is designed to provide an authentic kitchen experience and encourage imaginative role-play for children. It features a cooking side with a stove, sink, microwave, and storage, and a dining room side with seating. This playset helps children learn about food, develop general life skills, and foster good habits from an early age.
Please read this manual carefully before assembly and use to ensure safe and proper operation. Keep this manual for future reference.
2. Safety Information
- Age Recommendation: Suitable for children aged 36 months to 7 years.
- Adult Supervision: Always supervise children during play.
- Assembly: Adult assembly is required. Keep small parts and hardware away from children before and during assembly.
- Material Safety: This kitchen cooking toy is made of quality MDF and is certified to ASTM standards. It is made of food-grade PP, FREE from BPA, PVC, Phthalates, Lead, Latex, and Formaldehyde.
- Hazard Prevention: Ensure all screws are tightened securely. Regularly check for loose parts, sharp edges, or damaged components. Do not allow children to climb on the playset.
- Stability: Ensure the playset is placed on a flat, stable surface to prevent tipping.
- Choking Hazard: Small accessories included with the playset may pose a choking hazard for young children.
3. Parts List
Before assembly, verify that all components and hardware are present. Refer to the assembly video for visual identification of parts.
Included Accessories:
- 1x Water Glass
- 2x Pan (1 pot with lid, 1 pan)
- 3x Stainless Steel Utensils (spoon, slotted spatula, ladle)
- 1x Towel
- 2x Ice Cubes

Figure 3.1: Included Accessories
4. Assembly Instructions
Follow these step-by-step instructions for assembling your INFANS 2-in-1 Kids Play Kitchen. For a visual guide, please refer to the assembly video below.
Video 4.1: How to install INFANS Kids Kitchen. This video provides a detailed visual guide for assembling the play kitchen, demonstrating each step from unboxing to final setup.
- Step 1: Assemble the Base Side Panel
Insert wooden dowels (F) into panel 2. Connect panel 1 and panel 2. Secure with 2 A screws. - Step 2: Attach Bottom Panel
Place panel 4 onto the assembled base. Secure with 2 A screws. - Step 3: Install Middle Shelf
Install panel 5 using 2 A screws. - Step 4: Attach Stove Control Panel
Install stove knobs (K) onto panel 3 using B screws. Insert wooden dowels (F) into panel 3. Connect panel 3 to the main structure. Secure with 1 A screw. - Step 5: Secure Top Base Panel
Insert wooden dowels (F) into the side panels. Place panel 13 on top of the structure. Install panel 13 with 8 A screws. - Step 6: Install Towel Bar
Install panel 18 with 2 A screws (repeat for both sides). Place the towel bar (19) into the designated slots. - Step 7: Assemble Oven Door
Attach clear plastic pieces (G) to the oven door panel (14) using E screws. Install hinges (I) to the oven door panel (14) using E screws. Install the door handle (J) using B screws. - Step 8: Assemble Ice Refrigerator Door
Install the ice refrigerator unit into panel 15. Secure with H screws. Install hinges (I) to panel 15 using E screws. Install the handle (J) using B screws. - Step 9: Assemble Countertop Components
Install the faucet (N) onto the countertop panel. Install the stove burners onto the countertop panel using C screws. - Step 10: Install Countertop Support Bars
Install the support bars (6) onto the countertop panel using A screws. Repeat for both support bars. - Step 11: Assemble Microwave and Clock Unit
Install 3 hooks (M) onto panel 11 using C screws. Install the clock (Q) onto panel 9 using B screws. Connect panel 11 to panel 8 using 2 A screws. Connect panel 9 to panel 8 using 2 A screws. Connect panel 10 to panel 8 using 2 A screws. - Step 12: Attach Microwave Unit to Countertop
Install panel 8 (with attached panels 9, 10, 11) onto the countertop assembly using 2 A screws. - Step 13-15: Assemble Microwave Doors
Insert wooden dowels (F) into panel 12. Install panel 12 into the microwave unit. Attach clear plastic pieces (G) to the microwave door panels (16 and 17) using E screws. Install hinges (L) to the microwave door panels (16 and 17) using E screws. Install door knobs (P) to the microwave door panels (16 and 17) using P screws. - Step 16-17: Install Doors
Install the oven door (from Step 7) onto the main base using E screws. Install the ice refrigerator door (from Step 8) onto the main base using E screws. Install the microwave doors (from Step 13-15) onto the microwave unit using E screws. - Step 18-19: Final Assembly
Connect the upper part (microwave unit) to the bottom part (main kitchen base). Fix with 4 A screws. - Step 20: Place Accessories
Place all included accessories (pans, utensils, towel, water glass, ice cubes) in their designated spots or within the storage areas.

Figure 4.2: Fully Assembled Play Kitchen
5. Operating Instructions
The INFANS 2-in-1 Kids Play Kitchen offers various interactive features for an immersive play experience:
- Stove: Turn the stove knobs to simulate cooking.
- Sink & Faucet: Use the faucet and sink for pretend washing of food and dishes. The sink is removable for easy cleaning.
- Microwave: Open the microwave door and place play food inside. The microwave features a simulated keypad and clock for realistic play.
- Oven: Open the oven door to place play food for baking.
- Ice Dispenser: Press the lever on the ice dispenser to release the included ice cubes for pretend drinks.
- Clock: The vivid clock with movable hands helps children learn time concepts.
- Storage: Utilize the spacious open shelves and closed cabinets for storing play food and accessories.

Figure 5.1: Interactive Play Features
6. Maintenance
Regular maintenance will prolong the life of your play kitchen:
- Cleaning: Wipe surfaces with a damp cloth. The sink can be easily removed for thorough cleaning. Avoid abrasive cleaners or harsh chemicals.
- Inspection: Periodically check all screws and fasteners to ensure they are tight. Tighten any loose hardware.
- Storage: Store the playset in a dry environment away from direct sunlight and extreme temperatures to prevent warping or damage to the wood.
7. Troubleshooting
If you encounter any issues with your play kitchen, refer to the following common solutions:
- Loose Parts: If any parts feel loose, re-tighten the corresponding screws. Do not overtighten.
- Doors Not Closing Properly: Check the hinges for proper alignment and ensure all screws are secure. Adjust if necessary.
- Missing Accessories: Refer to the parts list. If an accessory is genuinely missing, contact customer support.
- Playset Instability: Ensure the playset is on a level surface. Check that all panels are correctly assembled and secured.
8. Specifications
| Product Dimensions | 15 x 17.5 x 37 inches |
| Item Weight | 27 pounds |
| Manufacturer | INFANS |
| Recommended Age | 36 months - 7 years |
| Material | MDF, Pine Wood, Food-grade PP |
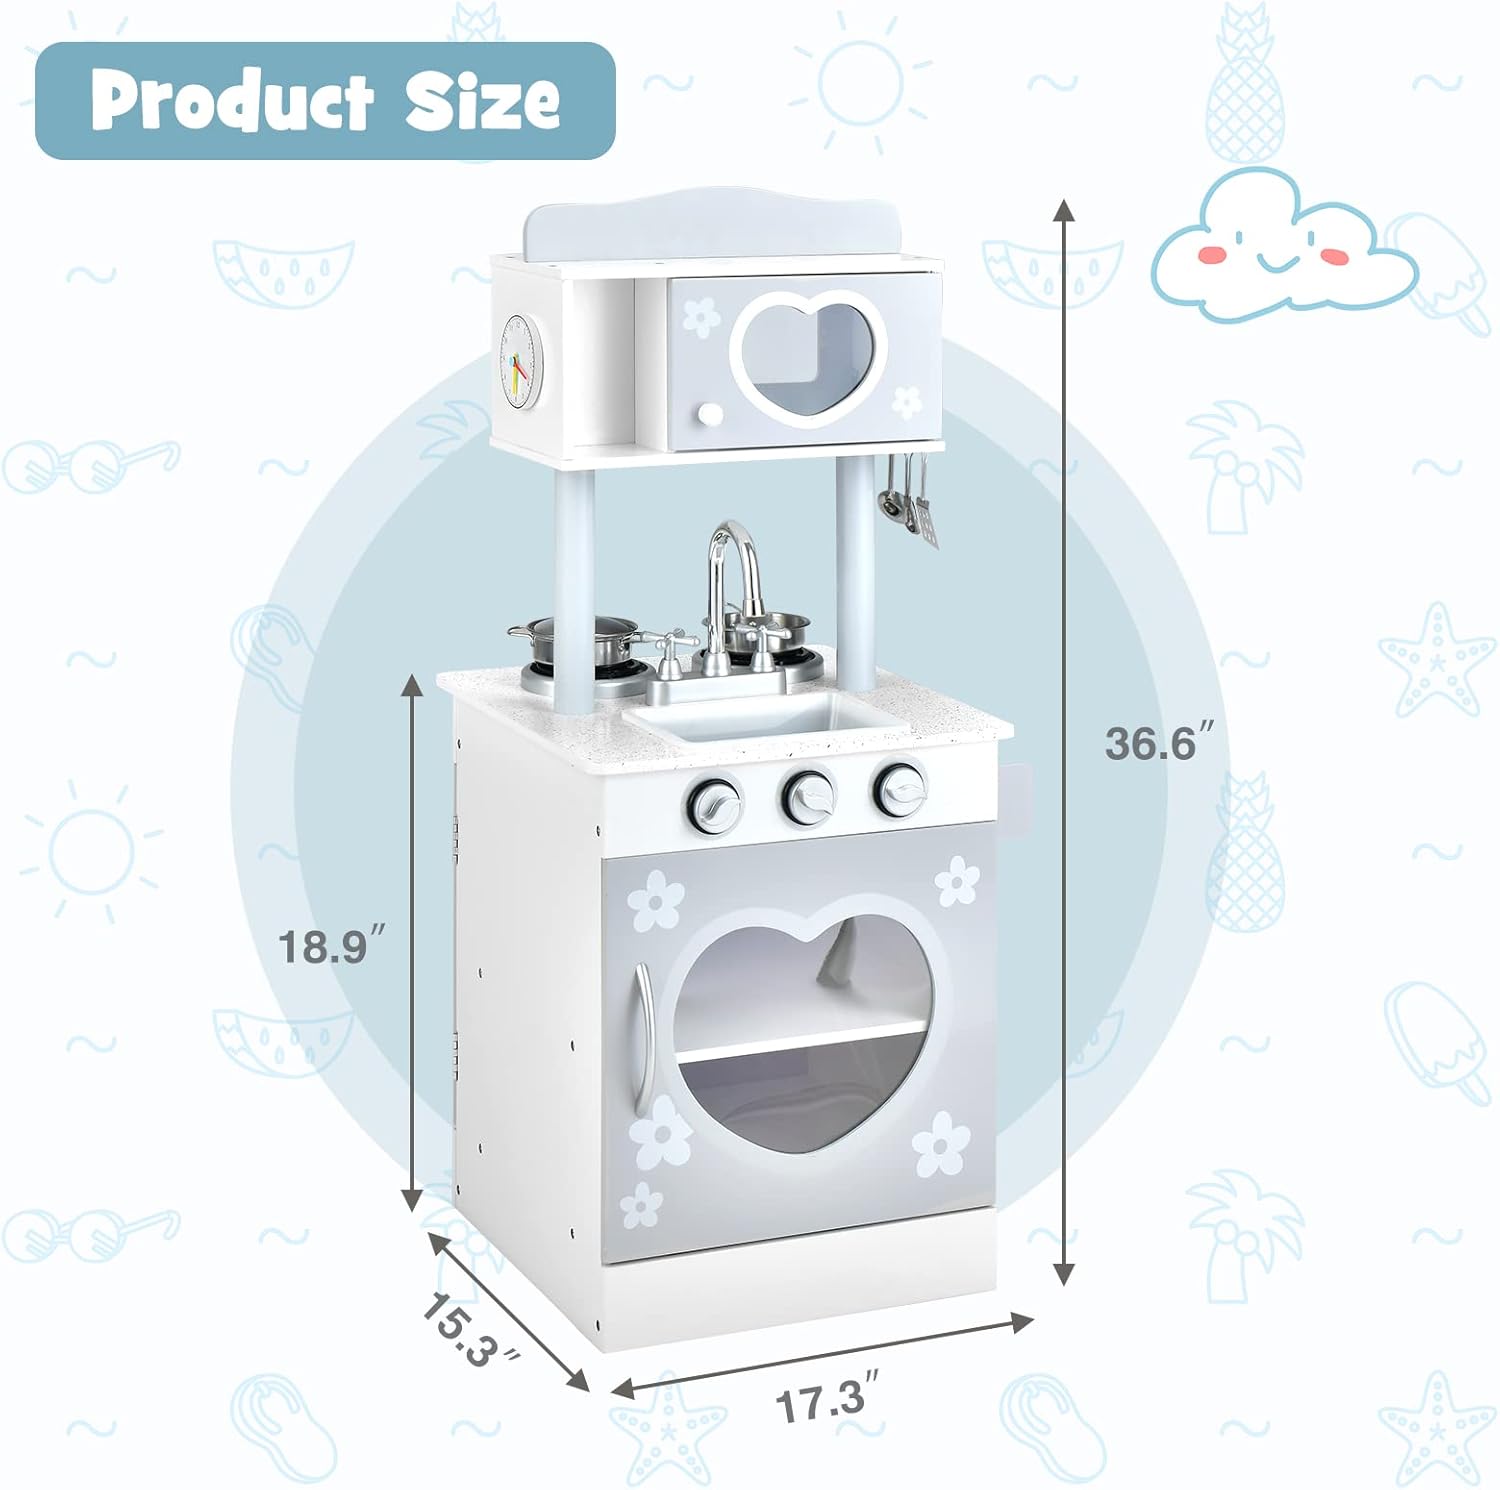
Figure 8.1: Product Dimensions
9. Warranty and Support
For warranty information, product support, or to report missing/damaged parts, please contact INFANS customer service. Refer to your purchase documentation for specific contact details or visit the official INFANS website.
We are committed to providing high-quality products and excellent customer service.