Zapco ST-4X DSP III
ZAPCO ST-X Class AB Series ST-4X DSP III 4-Channel DSP Amplifier
User Instruction Manual
Introduction
This manual provides comprehensive instructions for the installation, operation, and maintenance of your ZAPCO ST-4X DSP III 4-Channel DSP Amplifier. Please read this manual thoroughly before using the product to ensure proper function and to prevent damage.
The ZAPCO ST-4X DSP III is a high-performance Class AB stereo amplifier designed for car audio systems, featuring an integrated 8-channel Digital Signal Processor (DSP). It delivers 4 x 90 Watts RMS at 2 ohms and incorporates advanced signal processing capabilities for precise audio tuning.
Important Safety Information
Always observe the following safety precautions to prevent injury or damage to the amplifier and vehicle:
- Ensure the vehicle's battery is disconnected before beginning any installation.
- Install the amplifier in a dry, well-ventilated location, away from direct sunlight, heat sources, and moisture.
- Use appropriate gauge wiring for power and ground connections to prevent overheating and ensure stable operation.
- Protect all wiring from sharp edges and moving parts.
- Do not attempt to open or modify the amplifier. Refer all servicing to qualified personnel.
- Ensure proper grounding to avoid electrical hazards and noise.
Package Contents
Upon unpacking, please verify that all items listed below are present and in good condition:
- ZAPCO ST-4X DSP III Amplifier
- Mounting Hardware (screws, brackets)
- USB Cable for DSP Connection
- User Manual (this document)
- (Optional) Zapco HD-BT Module (if purchased separately)
Setup and Installation
Proper installation is crucial for optimal performance and safety. It is recommended that installation be performed by a professional car audio installer.
1. Mounting the Amplifier
Select a secure, well-ventilated location in your vehicle, such as under a seat or in the trunk. Ensure there is sufficient airflow around the amplifier for cooling. Use the provided mounting hardware to secure the amplifier firmly to a solid surface.

Figure 1: Angled view of the ZAPCO ST-4X DSP III amplifier, showing its compact design and heat sink fins.
2. Power and Ground Connections
Refer to Figure 2 for the power and ground terminal locations. Ensure all connections are secure and properly insulated.
- GND (Ground): Connect to a clean, unpainted metal surface of the vehicle chassis. Use a wire of the same gauge as the +12V power wire.
- +12V Bat (Battery): Connect directly to the positive terminal of the vehicle's battery. Install an appropriate fuse (2 x 30A fuses are integrated) within 18 inches (45 cm) of the battery.
- REM (Remote Turn-On): Connect to the remote turn-on output of your head unit. This wire turns the amplifier on and off with your head unit.
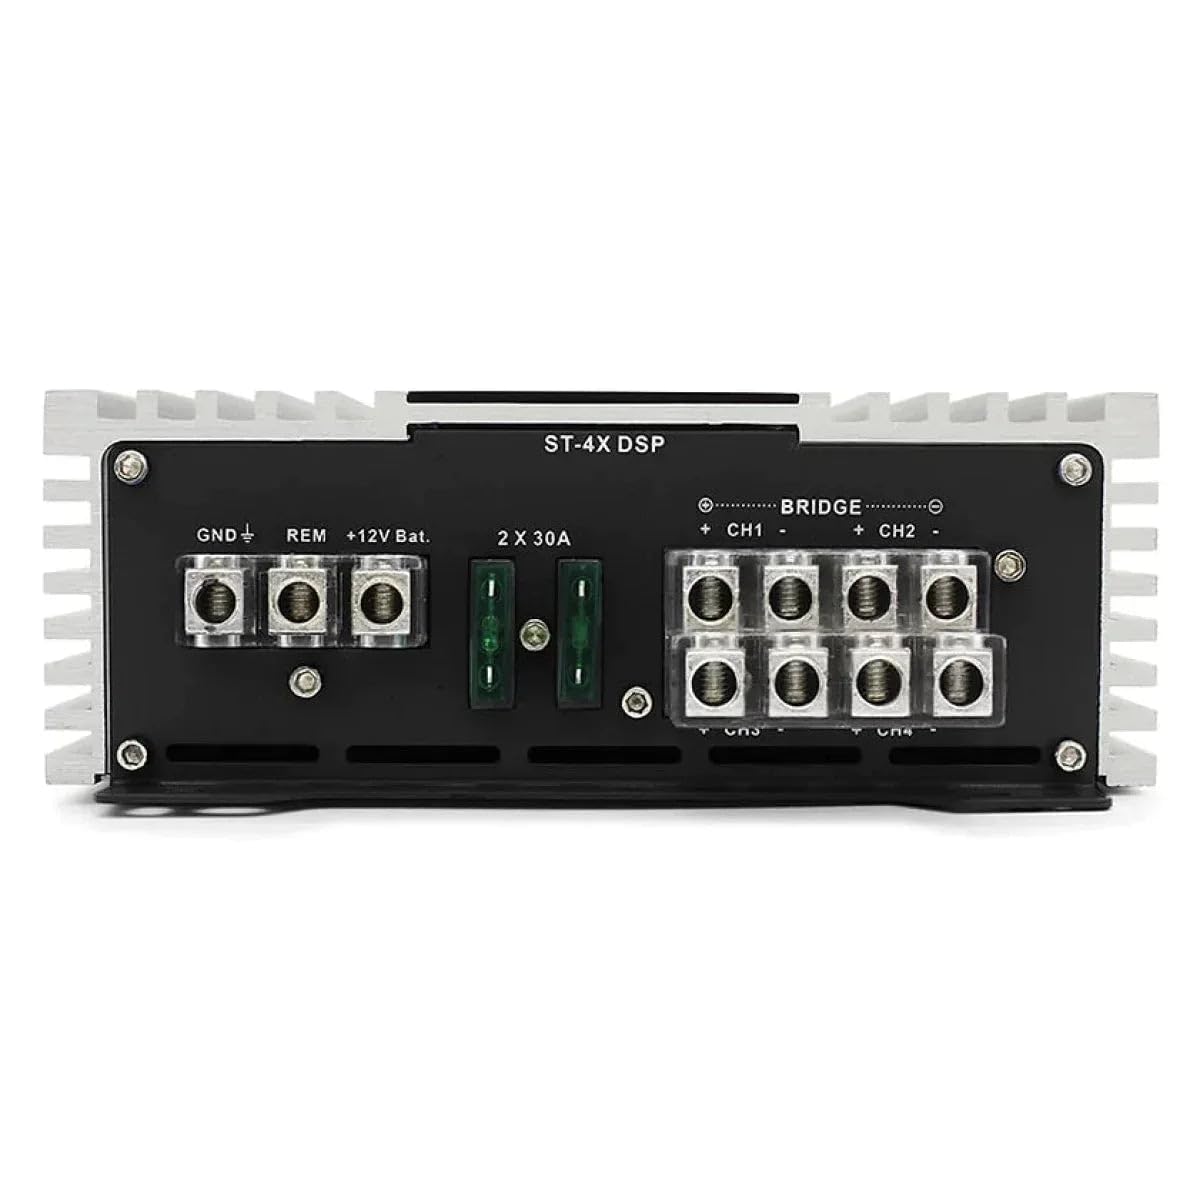
Figure 2: Rear panel of the amplifier showing power (GND, REM, +12V Bat) and speaker output terminals (CH1+, CH1-, CH2+, CH2-, etc.). Two 30A fuses are visible.
3. Speaker Connections
Connect your speakers to the amplifier's speaker output terminals (CH1, CH2, CH3, CH4). Observe correct polarity (+ to + and - to -) for each speaker. The amplifier supports both stereo and bridged configurations.
- Stereo Mode: Connect one speaker per channel (CH1, CH2, CH3, CH4).
- Bridged Mode: For higher power output, channels can be bridged. Refer to the "BRIDGE" markings on the amplifier for correct connections (e.g., CH1+ and CH2- for a bridged output). In bridged mode, the amplifier delivers 2 x 180W RMS at 4 ohms.
4. Input Connections
The ST-4X DSP III offers both high-level and low-level (RCA) inputs, as well as an optical digital input. Refer to Figure 3 for input panel details.
- RCA Inputs (Low Level): Connect RCA cables from your head unit's pre-amp outputs to the amplifier's IN (CH1-CH8) RCA inputs.
- High-Level Inputs: If your head unit does not have RCA outputs, connect speaker-level outputs directly to the high-level input terminals.
- Optical Input: For digital audio sources, connect an SPDIF optical cable to the OPTICAL input.
- PC USB: Connect a USB cable from your computer to this port for DSP software configuration.
- COMM PORT: This port is for connecting the optional Zapco HD-BT module for high-resolution Bluetooth audio streaming.

Figure 3: Front panel of the amplifier showing RCA inputs (CH1-CH8), High-Level inputs, PC USB port, Optical input, COMM PORT, and input gain controls with clip indicators.
Operating Instructions
1. Initial Power-Up and Status Indicators
Once all connections are made, turn on your vehicle's ignition and head unit. The amplifier's PWR (Power) indicator should illuminate, indicating it is receiving power and operating correctly. The PRT (Protection) indicator will light up if the amplifier detects a fault (e.g., short circuit, overheating).
2. Input Gain Adjustment
The amplifier features analog input gain controllers with clip lights for precise level matching. Adjust the input gain for CH1/2 and CH3/4 until the "Normal" LED is lit and the "Clip" LED just begins to flicker at maximum head unit volume. This ensures optimal signal-to-noise ratio without distortion.
3. Auto Turn-On Feature
The "AUTO TURN ON" switch allows you to select the amplifier's turn-on method:
- OFF: Amplifier turns on via the REM (remote) wire.
- DC: Amplifier turns on when it detects a DC offset on the high-level inputs (suitable for head units without a remote output).
- VOX: Amplifier turns on when it detects an audio signal on the inputs.
4. Digital Signal Processor (DSP) Configuration
The integrated 8-channel DSP is configured via a computer using Zapco's DSP control software. Connect your computer to the amplifier's "PC USB" port. The software allows for advanced audio tuning, including:
- Crossovers: High-pass and low-pass filters for each channel.
- Phase Control: Adjust phase for optimal sound staging.
- Signal Delay (Time Alignment): Compensate for speaker distances to the listening position.
- Parametric Equalization: 15-band parametric EQ on each channel for precise frequency response adjustments.
- Output Routing: Route processed signals to the amplifier's 4 channels and additional external amplifiers (via DSP outputs).

Figure 4: Screenshot of the ZAPCO ST-X DSP Digital Control Program software interface, showing speaker delay setup, crossover settings, phase control, and a 15-band graphic equalizer.
For detailed instructions on using the DSP software, please refer to the dedicated DSP software manual available on the Zapco website.
5. Bluetooth Streaming (Optional)
If you have the optional Zapco HD-BT module, connect it to the "COMM PORT". This enables high-resolution AptX Bluetooth audio streaming directly to the amplifier, bypassing the head unit's DAC for superior sound quality.
Maintenance
The ZAPCO ST-4X DSP III amplifier is designed for reliable operation with minimal maintenance. Follow these guidelines to ensure its longevity:
- Keep the amplifier clean and free of dust. Use a soft, dry cloth for cleaning. Do not use liquid cleaners.
- Ensure the cooling fins are not obstructed to allow for proper heat dissipation. The amplifier features a thermally controlled fan for cooling.
- Periodically check all wiring connections for tightness and corrosion.
- If a fuse blows, replace it only with a fuse of the same type and rating (2 x 30A).
Troubleshooting
If you experience issues with your amplifier, consult the table below for common problems and solutions. If the problem persists, contact Zapco customer support or a qualified technician.
| Problem | Possible Cause | Solution |
|---|---|---|
| No Power / Amplifier does not turn on | Blown fuse, loose power/ground connection, no remote signal. | Check fuses (2 x 30A), verify all power and ground connections are secure, ensure head unit is providing a remote turn-on signal or try AUTO TURN ON settings. |
| Protection LED (PRT) is lit | Short circuit in speaker wiring, amplifier overheating, low voltage. | Check speaker wires for shorts, ensure proper ventilation, verify vehicle's battery voltage. Allow amplifier to cool down. |
| No Sound Output | Incorrect input connection, gain set too low, muted channels in DSP, faulty RCA cables. | Verify input source (RCA, High-Level, Optical), check gain settings, ensure channels are not muted in DSP software, test RCA cables. |
| Distorted Sound | Input gain too high (clipping), speaker impedance too low, faulty speakers. | Reduce input gain until clip light no longer flickers, ensure speaker impedance matches amplifier's capabilities, test speakers. |
| Noise (Hiss, Whine) | Poor grounding, signal interference, ground loop. | Ensure amplifier is properly grounded to a clean chassis point, route power and signal cables separately, consider a ground loop isolator if necessary. |
Specifications
| Feature | Detail |
|---|---|
| Amplifier Type | Class A/B, Full-Range |
| Channels | 4-Channel |
| RMS Power @ 4 Ohms | 4 x 65 W |
| RMS Power @ 2 Ohms | 4 x 90 W |
| Bridged Power @ 4 Ohms | 2 x 180 W RMS |
| Digital Signal Processor (DSP) | Integrated 8-Channel, 96 kHz High-Speed Processing |
| DSP Features | High-Pass/Low-Pass Filters, Phase Control, Signal Delay, 15-Band Parametric EQ per channel |
| Inputs | Low-Level (RCA), High-Level, Optical (SPDIF) |
| Optional Connectivity | Zapco Comm Port for HD-BT Module (AptX Bluetooth) |
| Total Harmonic Distortion (THD + Noise) | <0.2% |
| Signal-to-Noise Ratio (SNR) | 90 dB |
| Channel Separation | >60 dB |
| Frequency Response | 15 Hz to 30 kHz ± 1 dB |
| Fuses | 2 x 30A |
| Dimensions (W x H x L) | 160 mm x 57 mm x 309.9 mm (approx. 6.3 in x 2.2 in x 12.2 in) |
| Cooling | Thermally Controlled Fan |
Warranty and Support
ZAPCO products are manufactured to the highest quality standards. For information regarding warranty coverage, terms, and conditions, please refer to the warranty card included with your product or visit the official ZAPCO website.
For technical support, troubleshooting assistance beyond this manual, or service inquiries, please contact your authorized ZAPCO dealer or ZAPCO customer service directly. Contact information can typically be found on the ZAPCO website: www.zapco.com
Ask a question about this manual
Ask about setup, troubleshooting, compatibility, parts, safety, or missing instructions. Manuals+ will review the question and use this page’s manual context to help answer it.