1. Product Overview
The ANDYCINE A6 II is a 5.5-inch high-brightness touchscreen camera monitor designed for DSLR and mirrorless cameras. It features a 1600nits daylight-viewable screen with 1920x1080 resolution and REC-709 color calibration, providing sharp and rich color images. This monitor supports 4K HDMI input and output, 3D LUTs, and advanced monitoring tools for accurate exposure and focus.
Key Features:
- 1600nits High Brightness: Daylight viewable screen without the need for an external sun hood.
- 1920x1080 Touchscreen: Full HD resolution with REC-709 color calibration for accurate image representation.
- Advanced Monitoring Tools: Includes waveform, histogram, focus assist, false color, zebra, and nine-grid for precise exposure and focus control.
- 3D LUT Support: Easily load custom 3D LUT files via the Type-C port for real-time color grading.
- External F970 Power Plate: Built-in F970 plate allows easy attachment of LED lights and wireless transmitters that use F970 batteries, expanding application flexibility.
- 4K HDMI Input and Output: Compatible with DSLR cameras, mirrorless cameras, and camcorders, accepting up to 4K 30fps HDMI signals with loop-out functionality.
- Flexible Power System: Supports DC 12V In, Type-C Power Input, and NP-F series batteries (one included). Features a DC 8.4V power output jack to power select cameras.

Image 1.1: Front and rear view of the ANDYCINE A6 II monitor, highlighting its dimensions (148Lx93Hx20D mm, 245g) and various ports including HDMI In/Out, DC In/Out, 3.5mm Earphone hole, and USB-C. The rear shows the Sony F970 Battery buckle plate and L-Series Dummy Battery Plate.
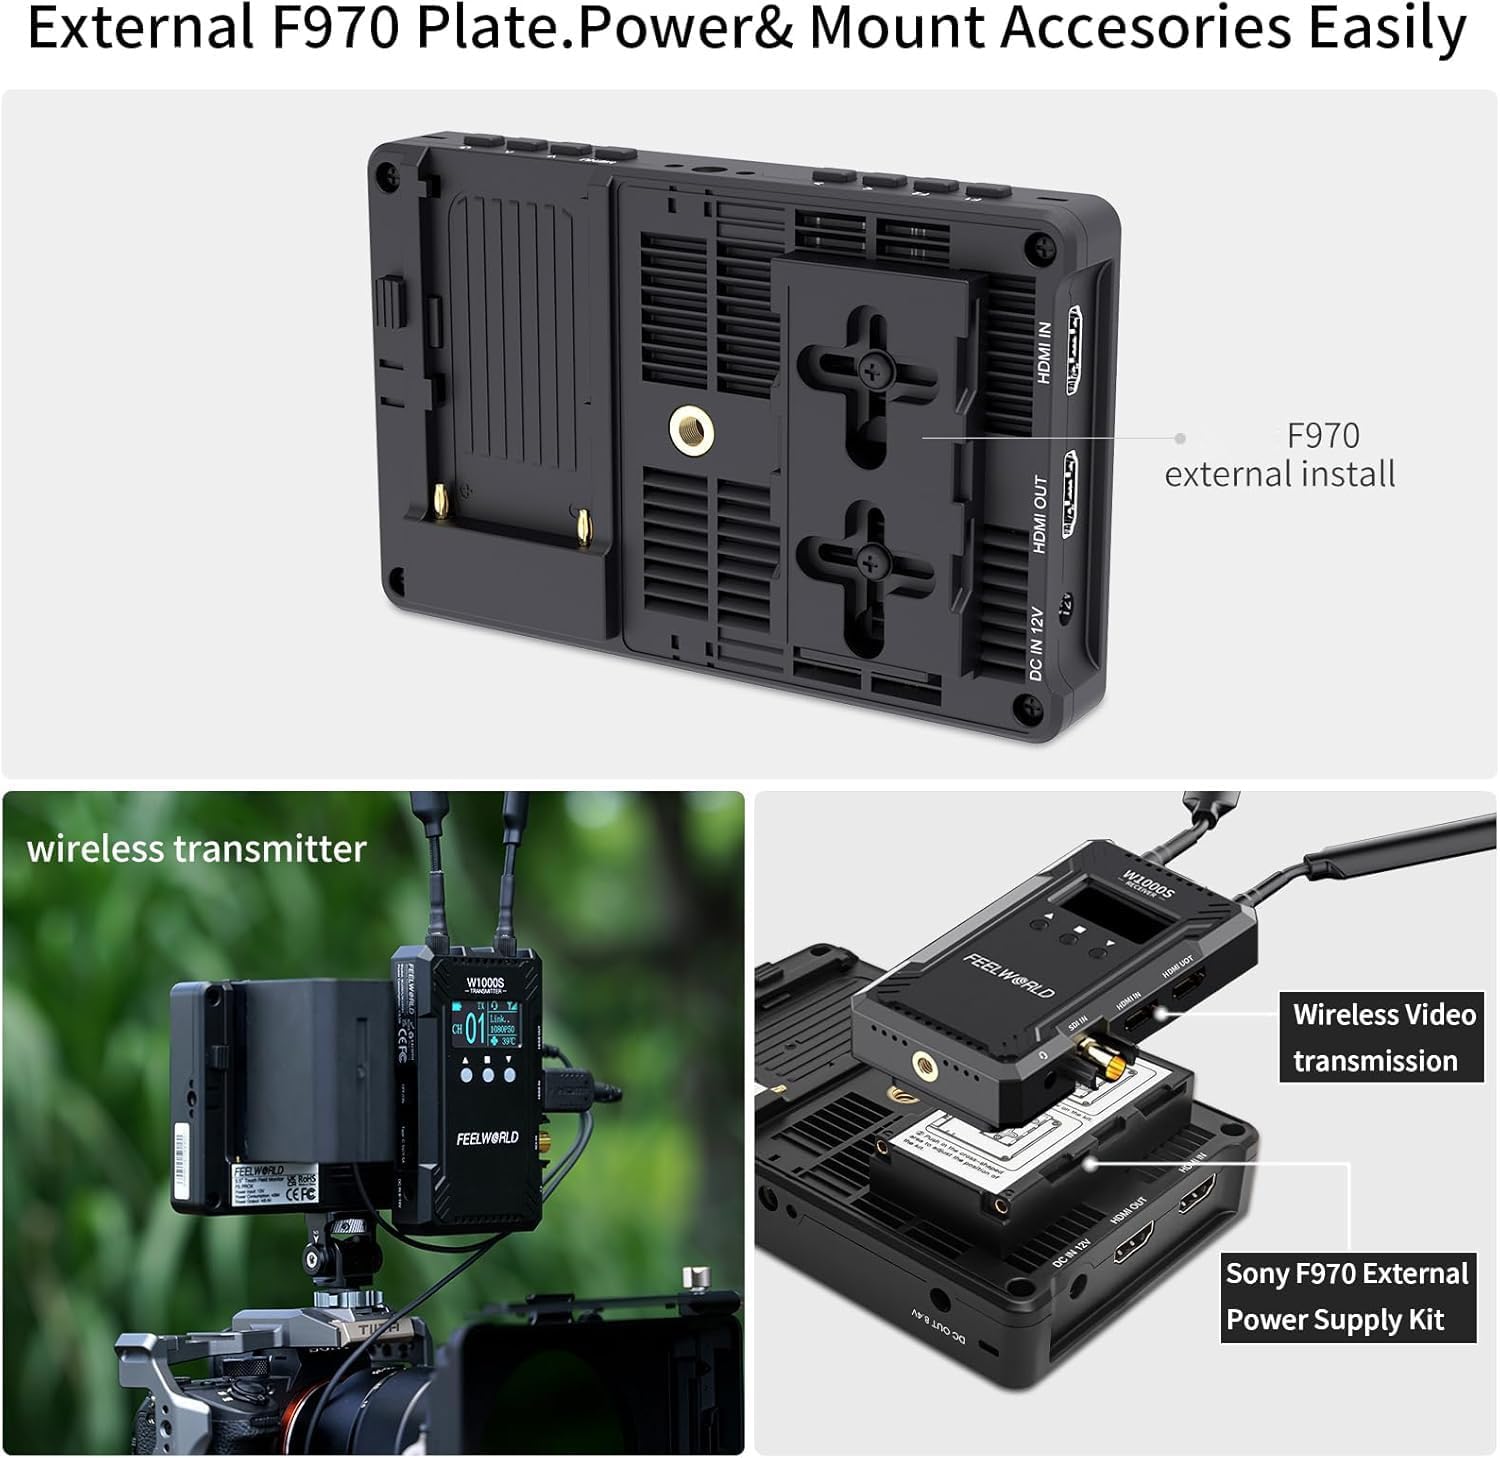
Image 1.2: The ANDYCINE A6 II monitor showcasing its high brightness and color accuracy. Surrounding icons illustrate its features: 1600nits, 5.5" 1920x1080, Touch Screen, 4K HDMI IN/OUT, 3D LUT, All Waves, External Install and Power, 5V Type-C Power Supply, Waveform, Vector, Histogram, Nine Grid, Embedded Audio, Safe Frames, Center Marker, Ratio Marker, Scan Mode, Aspect Ratio, Image Flip, Image Freeze, and P2P.
2. What's in the Box
Your ANDYCINE A6 II package includes the following items:
- ANDYCINE A6 II Monitor
- NP-F Series Battery
- Battery Charging Cable
- Micro HDMI Cable
- Sun Shade
- Carry Case
- Tilt Arm
- Disassemble Wrench
- Type-C to USB-A Adapter
- User Manual
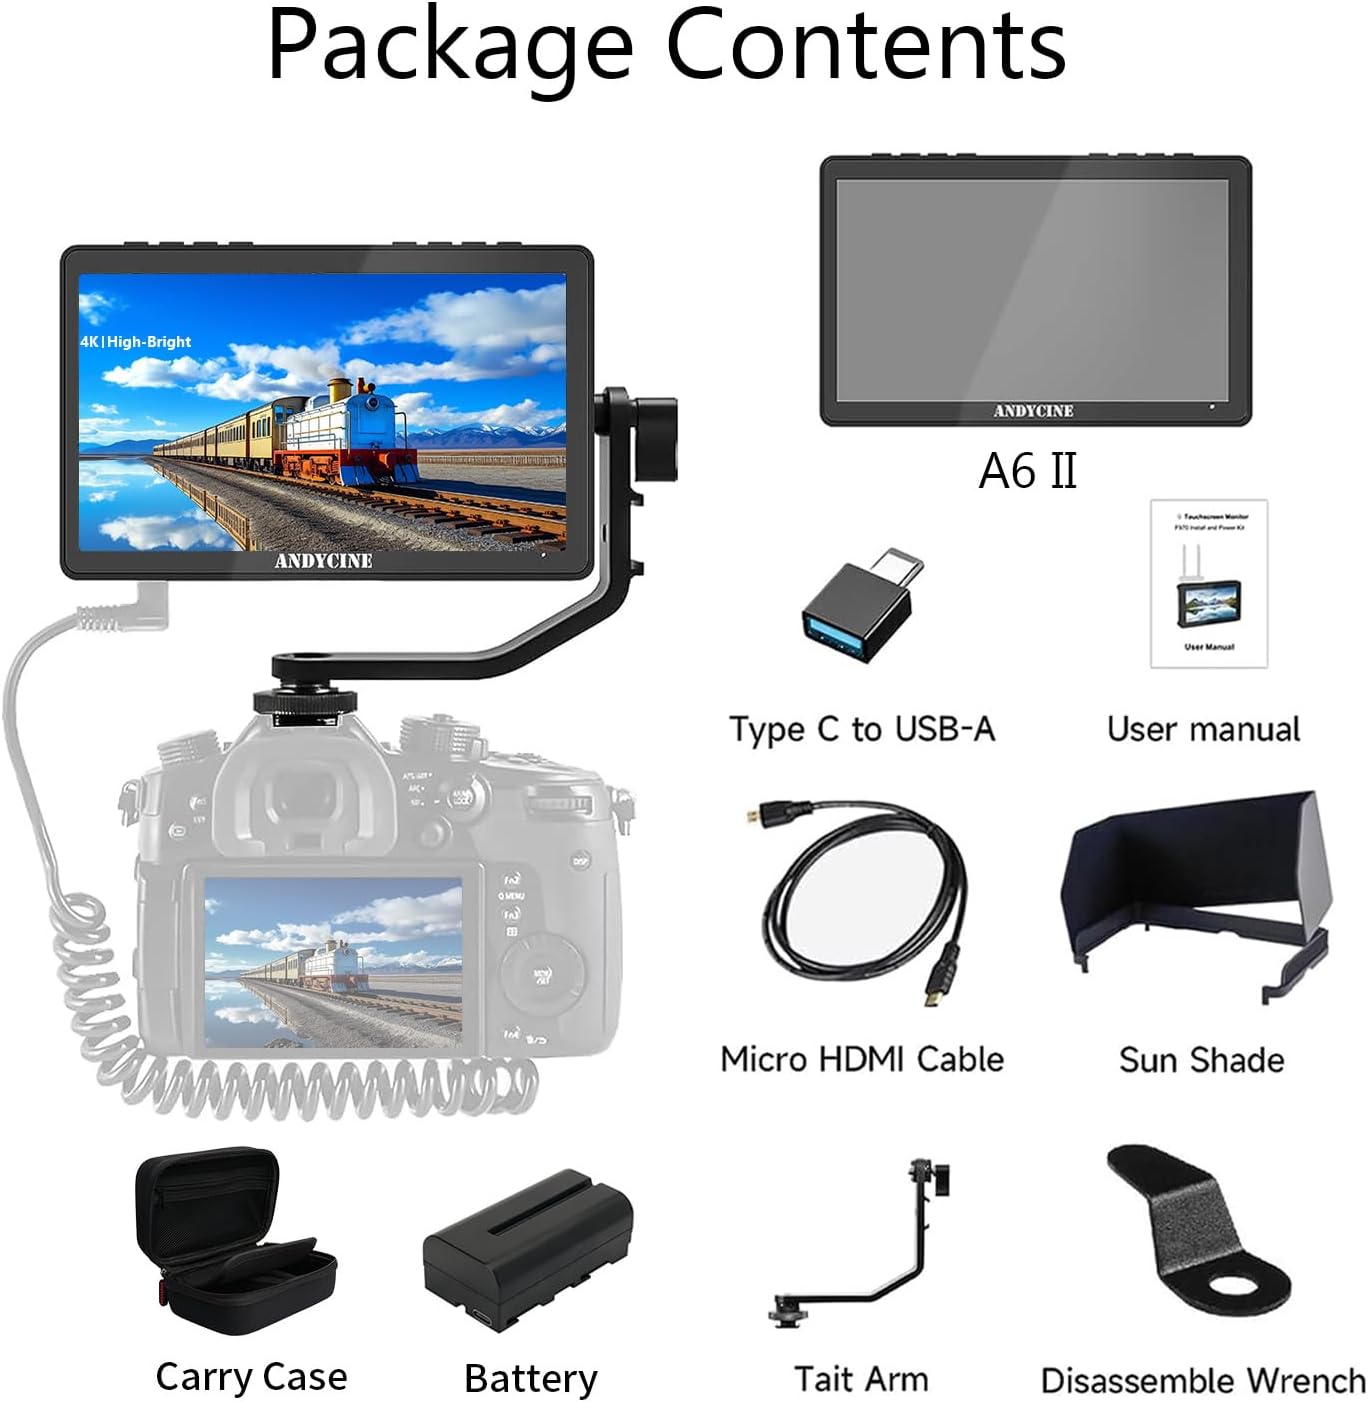
Image 2.1: A visual representation of all items included in the ANDYCINE A6 II package: the monitor, carry case, battery, charging cable, micro HDMI cable, sun shade, tilt arm, disassemble wrench, Type-C to USB-A adapter, and user manual.
3. Setup Guide
3.1 Attaching the Battery
- Locate the F970 battery plate on the back of the monitor.
- Align the NP-F series battery with the plate's contacts.
- Slide the battery into place until it clicks securely.
- To remove, press the release latch and slide the battery off.
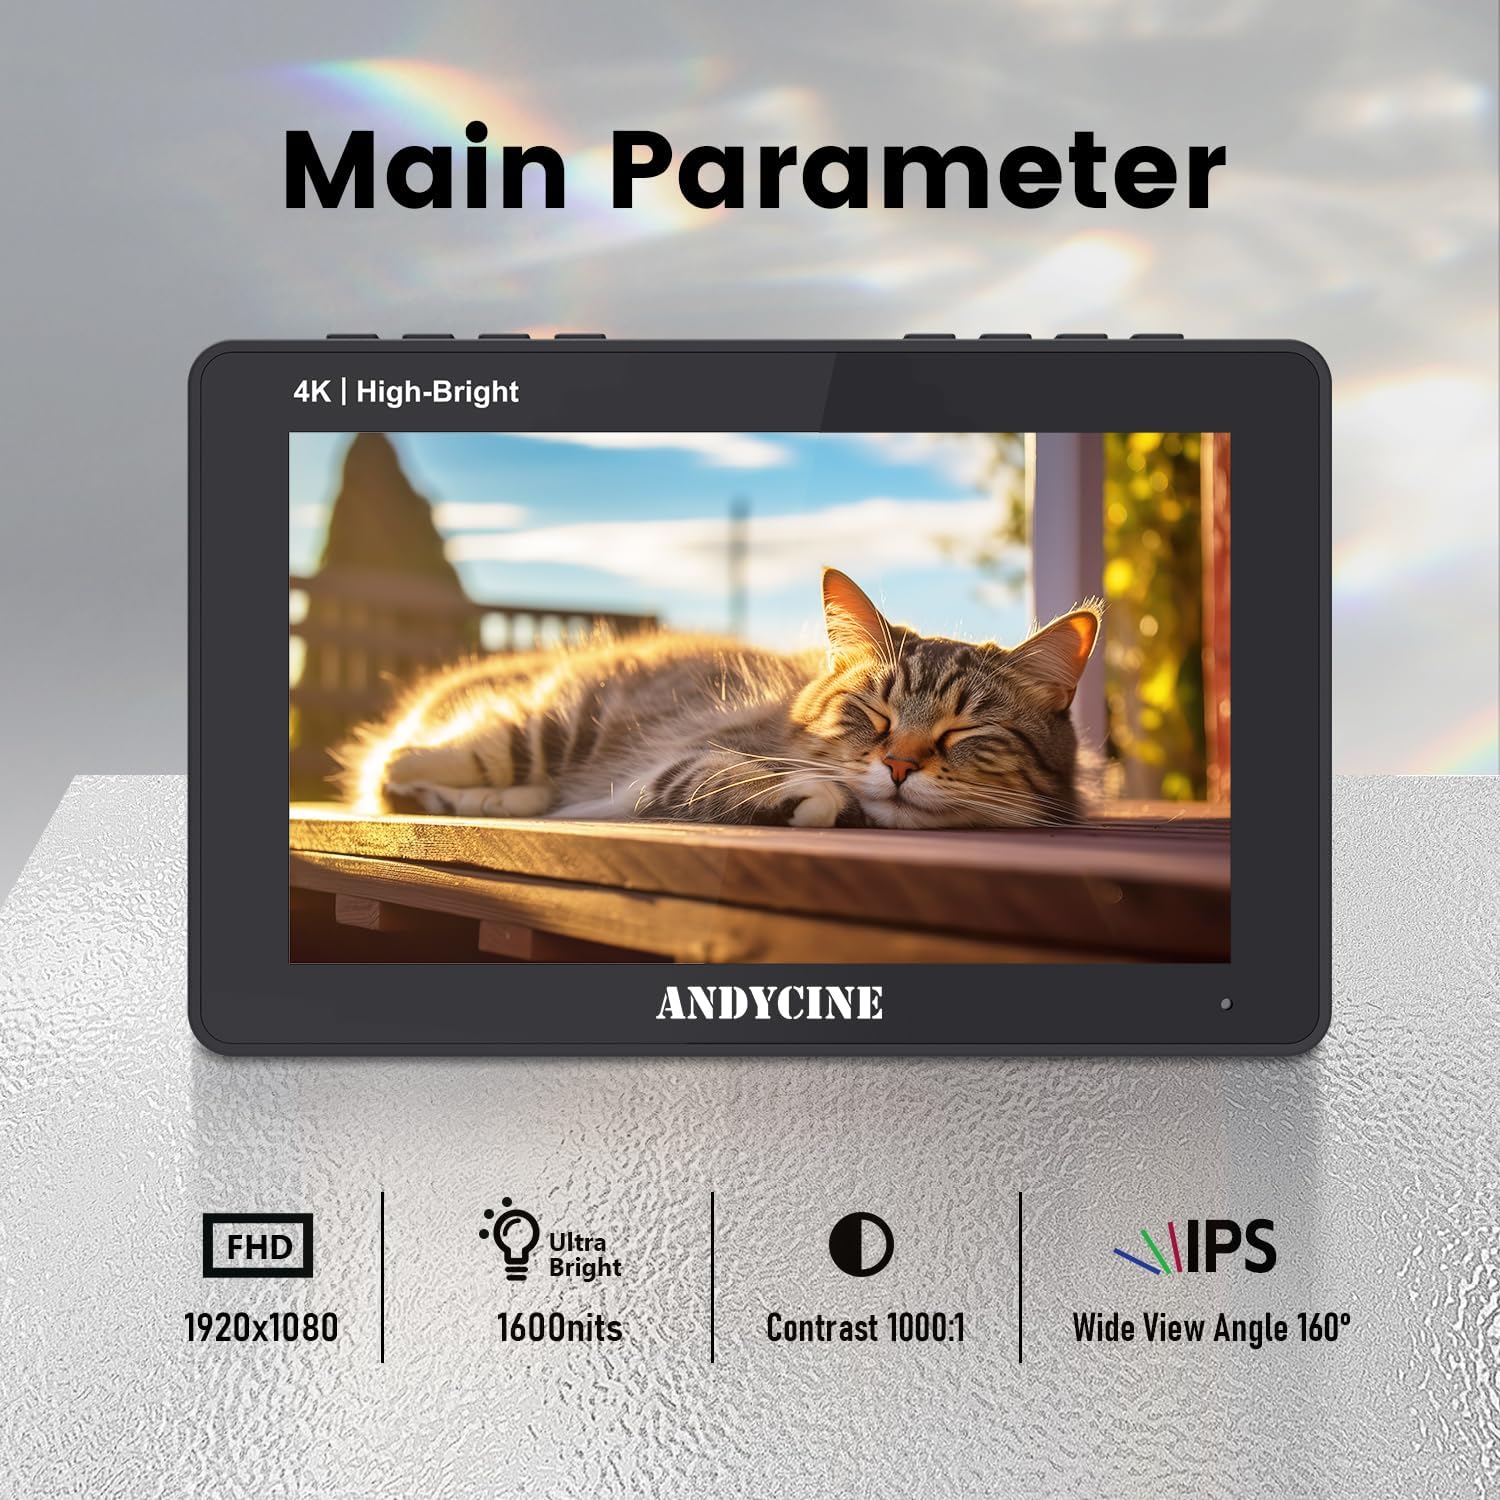
Image 3.1: The back of the ANDYCINE A6 II monitor, detailing the Sony F970 Battery buckle plate and L-Series Dummy Battery Plate for power options.
3.2 Mounting the Monitor
- Attach the provided tilt arm to the 1/4" screw hole on the bottom or side of the monitor.
- Secure the tilt arm to your camera's hot shoe mount or other rigging points.
- Adjust the angle of the monitor for optimal viewing.
3.3 Connecting to a Camera
- Use the Micro HDMI cable to connect your camera's HDMI output to the monitor's HDMI IN port.
- If your camera has a different HDMI port type (e.g., Mini HDMI, Full-size HDMI), you may need an appropriate adapter or cable (not included).
- For HDMI loop-out, connect another HDMI cable from the monitor's HDMI OUT port to an external display or recorder.
Video 3.1: An unboxing video of the ANDYCINE A6 II 1600nits Camera Field Monitor, demonstrating the contents and initial setup.
4. Operating Instructions
4.1 Powering On/Off
Press and hold the power button located on the top right side of the monitor to turn it on or off.
4.2 Touchscreen Navigation
The A6 II features an intuitive touchscreen interface. Swipe from the left edge of the screen to access the main menu. Tap on icons to select functions or adjust settings. Swipe from the right edge to adjust volume, and from the bottom edge to adjust backlight.
Video 4.1: A quick review of the ANDYCINE A6 II 1600nits Camera HDMI Monitor, demonstrating the touchscreen menu navigation and various features.
4.3 Using Custom Function Buttons (F1, F2, F3)
The monitor includes three customizable function buttons (F1, F2, F3) on the top panel. These can be assigned to frequently used features for quick access. To assign a function:
- Access the main menu by swiping from the left.
- Navigate to the "User Option" or "System" settings.
- Select "Shortcut Key" and choose F1, F2, or F3.
- Assign your desired function from the list (e.g., Waveform, False Color, 3D LUT).

Image 4.1: The ANDYCINE A6 II monitor's menu interface, displaying options for various monitoring tools and settings. This image illustrates the depth of customization available through the touchscreen.
5. Advanced Features
5.1 Waveform and Vector Scope
Utilize the waveform and vector scope tools to analyze video signals for accurate exposure and color balance. These graphical representations help ensure your footage is technically sound.
5.2 3D LUT Functionality
The A6 II supports 3D LUTs, allowing you to preview your footage with desired color grades in real-time. Import your custom .cube files via the USB-C port.

Image 5.1: The ANDYCINE A6 II monitor showing accurate waveform monitoring, with RGB Parade, YUV Parade, and vectorscope displays to technically analyze video and audio signals.
5.3 False Color and Zebra
These tools help identify overexposed or underexposed areas in your image, allowing for precise exposure adjustments. False color assigns different colors to specific exposure levels, while zebra patterns highlight areas exceeding a set brightness threshold.
6. Maintenance and Care
- Cleaning: Use a soft, dry cloth to clean the monitor screen and body. For stubborn smudges, use a screen-specific cleaning solution applied to the cloth, not directly to the screen.
- Storage: When not in use, store the monitor in its provided carry case to protect it from dust, scratches, and impacts.
- Battery Care: Charge the battery only with the specified charger. Do not discard in fire or expose to excessive heat. Avoid crushing, puncturing, or short-circuiting contacts.
- Environmental Conditions: Avoid exposing the monitor to extreme temperatures, high humidity, or direct sunlight for prolonged periods.
7. Troubleshooting
| Problem | Possible Cause | Solution |
|---|---|---|
| Monitor does not power on. | Low or depleted battery; power cable not connected. | Charge the battery or connect to an external power source. Ensure power button is pressed firmly. |
| No image displayed. | Incorrect HDMI connection; camera not outputting signal; incorrect input selected. | Check HDMI cable connection. Ensure camera is powered on and set to output HDMI. Verify correct input source on monitor. |
| Touchscreen unresponsive. | Touch function disabled; temporary software glitch. | Check the "TOUCH" switch on the top panel to ensure it's enabled. Restart the monitor. |
| Image quality issues (e.g., color, brightness). | Incorrect display settings; LUTs applied incorrectly. | Adjust brightness, contrast, saturation in "Display Adjustment" menu. Check "LUT" settings. |
8. Technical Specifications
| Feature | Detail |
|---|---|
| Product Dimensions | 3.15 x 4.88 x 7.32 inches |
| Item Weight | 2.23 pounds |
| Item Model Number | A6 II |
| Screen Size | 5.5 inches |
| Brightness | 1600 nits |
| Resolution | 1920x1080 |
| Color Calibration | REC-709 |
| Input/Output | 4K HDMI In/Out (up to 30fps) |
| Power Input | DC 12V In, Type-C Power Input |
| Power Output | DC 8.4V |
| Battery Type | NP-F Series (1 Lithium Ion battery required/included) |
| Manufacturer | ANDYCINE |

Image 8.1: The ANDYCINE A6 II monitor displaying its main technical parameters, including FHD 1920x1080 resolution, 1600nits ultra-brightness, 1000:1 contrast, and a 160-degree IPS wide viewing angle.
9. Warranty and Support
For warranty information and technical support, please refer to the official ANDYCINE website or contact their customer service directly. Keep your purchase receipt as proof of purchase for warranty claims.