1. Introduction
This manual provides essential information for the safe operation, setup, and maintenance of your RIDGID 18 Volt Cordless 1/2 inch Drill/Driver, model R86001. Please read these instructions thoroughly before using the tool to ensure proper function and to prevent injury.
The RIDGID R86001 is a powerful and versatile cordless drill/driver designed for various drilling and driving applications. It features a robust motor, a 2-speed gearbox, and a 1/2 inch single sleeve ratcheting chuck.
2. General Safety Information
WARNING: Read all safety warnings, instructions, illustrations, and specifications provided with this power tool. Failure to follow all instructions listed below may result in electric shock, fire, and/or serious injury.
- Always wear eye protection.
- Keep work area clean and well lit.
- Do not operate power tools in explosive atmospheres, such as in the presence of flammable liquids, gases, or dust.
- Keep children and bystanders away while operating a power tool.
- Use the correct tool for your application.
- Disconnect the battery pack from the power tool before making any adjustments, changing accessories, or storing power tools.
3. Product Components
Familiarize yourself with the key components of your RIDGID R86001 Drill/Driver.

Figure 3.1: Front view of the RIDGID 18V Cordless 1/2 inch Drill/Driver R86001. This image displays the main body of the drill, including the chuck, clutch ring, handle, and battery interface.

Figure 3.2: Side view of the RIDGID 18V Cordless 1/2 inch Drill/Driver R86001. This perspective highlights the ergonomic grip, the trigger, and the forward/reverse selector switch.

Figure 3.3: Top-down view of the chuck, clutch ring, and speed selector switch on the RIDGID R86001. The chuck is a 1/2 inch single sleeve ratcheting type, and the clutch ring has 24 positions for torque adjustment. The speed selector allows switching between two gear settings.
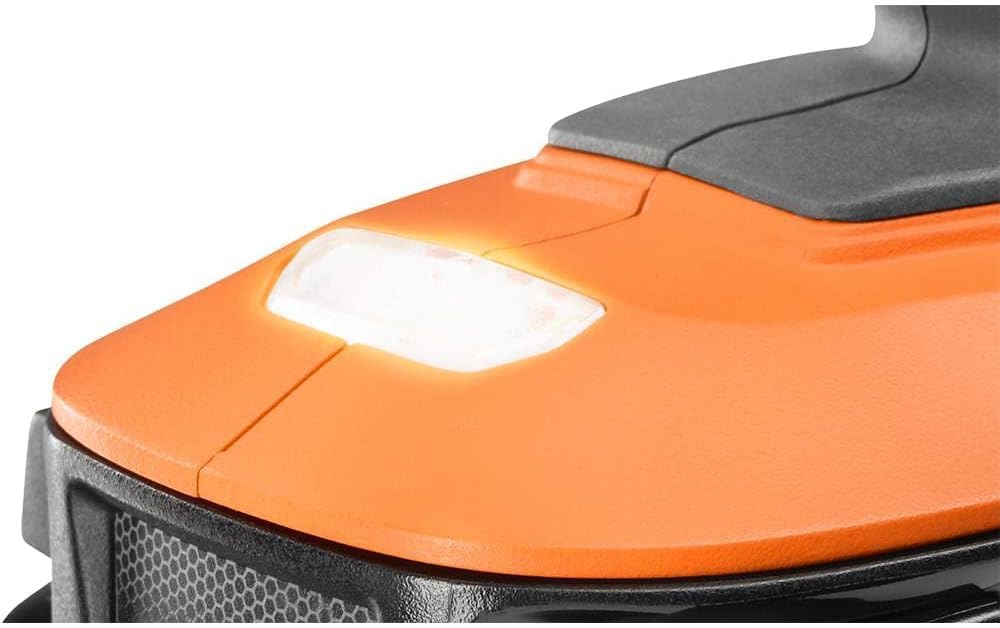
Figure 3.4: Close-up view of the integrated LED work light located at the base of the drill. This light illuminates the work surface for improved visibility.
Key Parts:
- 1/2 in. Single Sleeve Ratcheting Chuck: Holds drill bits and driver bits securely.
- 24-Position Clutch Ring: Adjusts torque output for various applications.
- Speed Selector Switch: Toggles between two speed settings (Low/High).
- Variable Speed Trigger: Controls the rotational speed of the chuck.
- Forward/Reverse Selector: Changes the direction of rotation.
- LED Work Light: Illuminates the work area.
- Battery Interface: Connects to RIDGID 18V battery packs (sold separately).
4. Setup
4.1 Battery Installation
The RIDGID R86001 is a tool-only product; the battery and charger are sold separately. Ensure you use a compatible RIDGID 18V battery pack.
- Align the ribs on the battery pack with the grooves in the drill's battery port.
- Slide the battery pack into the drill until it clicks securely into place.
- To remove, press the release latch on the battery pack and slide it out.
4.2 Bit Installation
- Ensure the drill is off and the forward/reverse selector is in the center (locked) position.
- Grasp the rear portion of the chuck with one hand and rotate the front portion counter-clockwise to open the chuck jaws.
- Insert the desired drill bit or driver bit into the chuck, ensuring it is centered.
- Rotate the front portion of the chuck clockwise to tighten the jaws firmly around the bit. The ratcheting mechanism will provide an audible click when tightened.
5. Operating Instructions
5.1 Powering On/Off and Speed Control
The drill is activated by pressing the variable speed trigger. The speed increases as you press the trigger further. Releasing the trigger turns the drill off.
5.2 Forward/Reverse Operation
The forward/reverse selector switch is located above the trigger. Push it to the left for forward rotation (drilling/driving) and to the right for reverse rotation (removing screws). Position it in the center to lock the trigger and prevent accidental startup.
5.3 Speed Selection
The 2-speed gearbox allows you to select between two operating speeds:
- Speed 1 (0-500 RPM): For high torque applications, such as driving screws or drilling large holes.
- Speed 2 (0-1,800 RPM): For high-speed drilling in wood or metal.
To change speeds, slide the speed selector switch located on top of the drill. Ensure the drill is stopped before changing speeds.
5.4 Clutch Settings
The 24-position clutch ring allows you to adjust the torque output. Rotate the clutch ring to the desired setting. Lower numbers provide less torque, suitable for driving small screws or working with soft materials to prevent overtightening or stripping. Higher numbers provide more torque for larger screws or harder materials. The drill icon setting bypasses the clutch for maximum torque during drilling applications.
5.5 LED Work Light
The integrated LED work light activates automatically when the trigger is pressed, illuminating the work surface for better visibility in dimly lit areas.
6. Maintenance
6.1 Cleaning
Regularly clean the ventilation openings on the drill to prevent overheating. Use a soft, damp cloth to wipe down the exterior. Do not use harsh chemicals or abrasive cleaners. Never immerse the tool in liquid.
6.2 Storage
Store the drill in a dry, secure location out of reach of children. Remove the battery pack before storing for extended periods. Avoid storing in direct sunlight or areas with extreme temperatures.
6.3 Battery Care
Refer to the instruction manual provided with your RIDGID 18V battery pack and charger for specific care and charging instructions. Always use the recommended charger for your battery.
7. Troubleshooting
| Problem | Possible Cause | Solution |
|---|---|---|
| Drill does not start | Battery not charged or improperly installed; Trigger lock engaged; Faulty battery or tool. | Ensure battery is fully charged and properly seated. Disengage trigger lock. Test with a different battery if available. If problem persists, seek service. |
| Bit slips in chuck | Chuck not tightened sufficiently; Bit shank is dirty or damaged. | Retighten chuck firmly. Clean or replace the bit. |
| Reduced power or speed | Low battery charge; Incorrect speed setting for application; Overload. | Recharge battery. Select appropriate speed (Speed 1 for higher torque). Reduce pressure on the tool. |
| Overheating | Blocked ventilation slots; Continuous heavy use. | Clean ventilation slots. Allow tool to cool down. Avoid prolonged heavy use. |
8. Specifications
| Feature | Specification |
|---|---|
| Model Number | R86001 |
| Power Source | 18 Volt Battery Powered (Battery Sold Separately) |
| Chuck Size | 1/2 inch Single Sleeve Ratcheting |
| Maximum Torque | 525 in./lbs. |
| No-Load Speed (Speed 1) | 0-500 RPM |
| No-Load Speed (Speed 2) | 0-1,800 RPM |
| Clutch Settings | 24 Positions + Drill Mode |
| Item Weight | 2.6 Pounds (Tool Only) |
| Product Dimensions | 6"L x 3"W x 10"H |
| Included Components | Drill (Tool Only) |
9. Warranty and Support
This RIDGID R86001 Drill/Driver is not eligible for the Lifetime Service Agreement. For specific warranty information regarding renewed products, please refer to the terms provided by the seller or Amazon Renewed program at the time of purchase.
For technical assistance, replacement parts, or service inquiries, please contact RIDGID customer support or visit the official RIDGID website. Always provide the model number (R86001) when seeking support.


