1. Introduction
Thank you for choosing the QIANMEI 600W 12V Flexible Monocrystalline Solar Panel Kit. This kit is designed to provide reliable solar power for various off-grid applications, including RVs, cabins, vans, sheds, boats, and other mobile or remote setups. This manual provides essential information for the safe and efficient installation, operation, and maintenance of your solar power system. Please read it thoroughly before use.
2. Product Overview
2.1 Components Included
Your QIANMEI 600W Solar Power Kit typically includes the following components:
- Two (2) 300W Flexible Monocrystalline Solar Panels
- One (1) 40A Solar Charge Controller
- Necessary connection cables and MC4 connectors
2.2 Key Features
- High Efficiency: Monocrystalline solar cells offer superior power generation, performing well even in low-light conditions.
- Flexible Design: Ideal for mounting on curved surfaces found on RVs, boats, and other vehicles.
- Durable and Waterproof: Designed to withstand high wind pressure, snow loads, and extreme temperatures. The junction box is IP67 rated for outdoor use in all weather conditions.
- Lightweight and Thin: Utilizes advanced packaging technology for a thinner, lighter, and more secure panel.
- Wide Application: Suitable for various scenarios including home, camping, RV, truck, trailer, yacht, and off-grid solar power stations.

Figure 1: Product features and construction details.
3. Setup and Installation
3.1 General Wiring Diagram
The following diagram illustrates a typical connection setup for the solar panel kit, including the solar panels, charge controller, battery, and an optional inverter for AC loads.
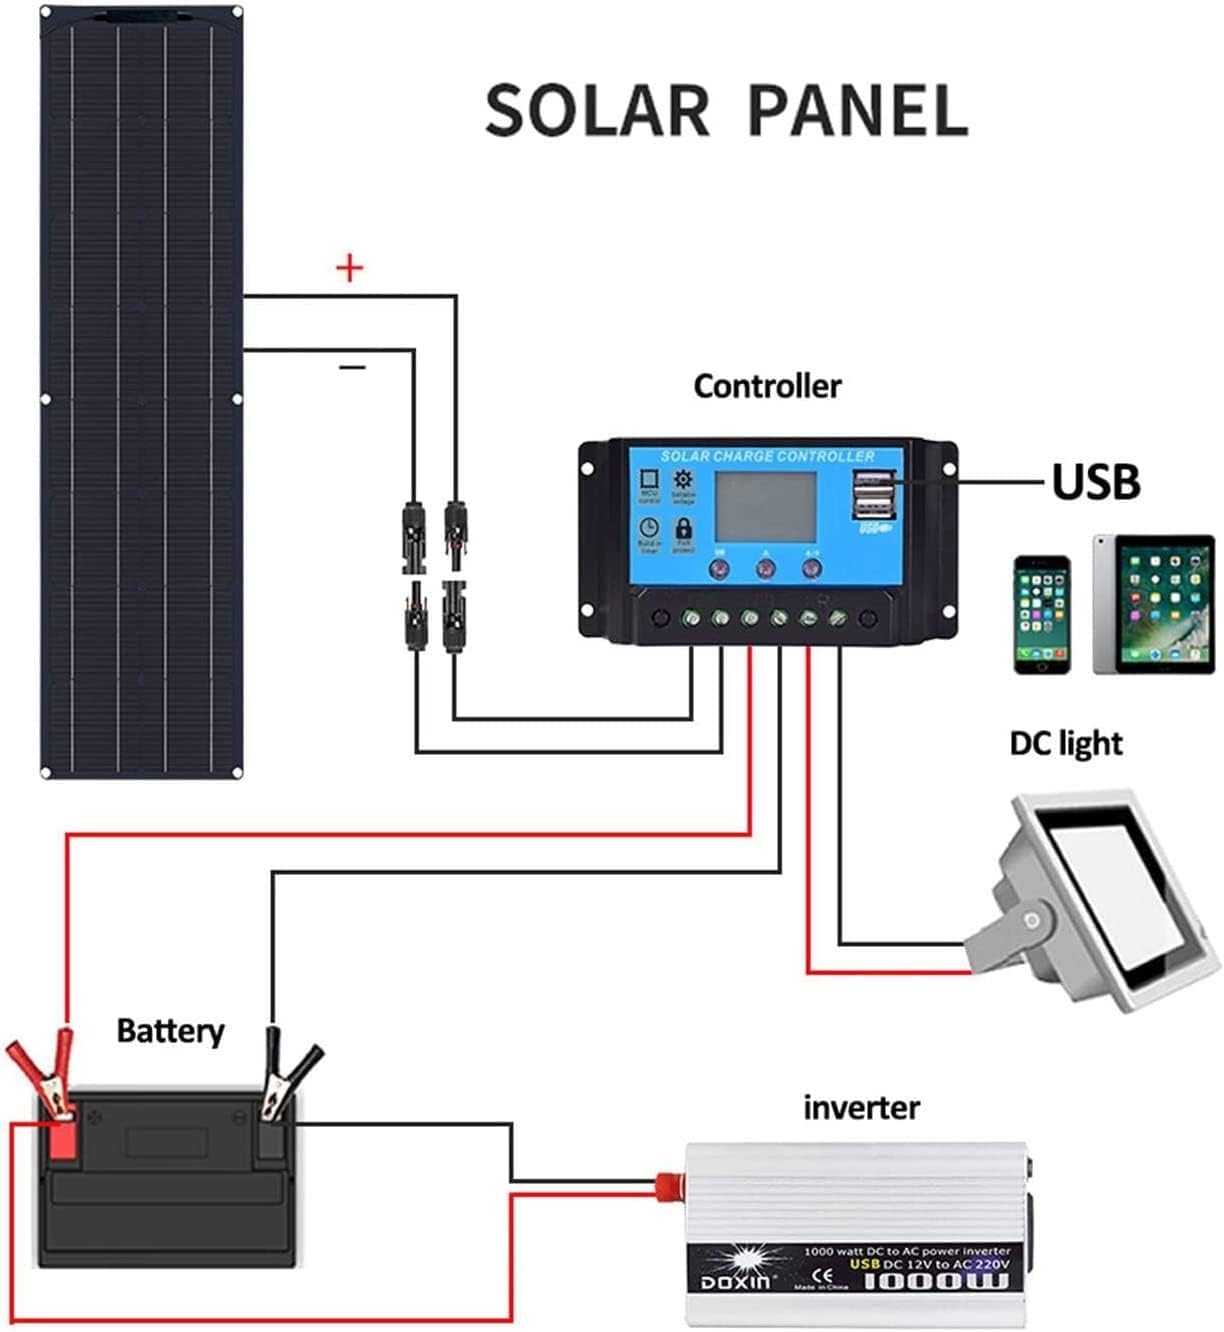
Figure 2: General wiring diagram for the solar power system.
3.2 Installation Steps
Follow these steps for a safe and correct installation:
- Mount the Solar Panels: Securely mount the flexible solar panels in a location that receives maximum direct sunlight throughout the day. Ensure proper ventilation around the panels. For RV installations, consider the curvature of the roof.
- Connect Solar Panels to Controller: Connect the positive (+) and negative (-) cables from the solar panels to the corresponding 'Solar Panel' input terminals on the 40A charge controller. Ensure correct polarity. The kit includes MC4 connectors for secure connections.
- Connect Battery to Controller: Connect the positive (+) and negative (-) cables from your 12V battery to the 'Battery' terminals on the charge controller. Connect the battery first before connecting the solar panels to the controller.
- Connect Load (Optional): If you are powering DC loads directly from the controller, connect them to the 'Load' terminals. For AC loads, connect an inverter to the battery terminals (not the controller's load terminals) and then connect your AC devices to the inverter.
- Verify Connections: Double-check all connections for correct polarity and secure fastening.

Figure 3: Example RV installation guide.

Figure 4: Solar panel dimensions, charge controller, and MC4 connectors.
4. Operating Instructions
Once installed, the solar power system operates automatically. The 40A charge controller manages the power flow from the solar panels to the battery, preventing overcharging and deep discharge. It also provides regulated power to DC loads connected to its load terminals.
- Sunlight Exposure: Ensure the solar panels receive direct sunlight for optimal charging performance.
- Charge Controller Display: Monitor the charge controller's display for information on battery voltage, charging current, and load status. Refer to the charge controller's specific manual for detailed operation and settings.
- USB Charging: The charge controller includes USB ports for charging small electronic devices.
5. Maintenance and Care
Regular maintenance ensures the longevity and optimal performance of your solar power kit.
- Panel Cleaning: Periodically clean the surface of the solar panels with a soft, damp cloth to remove dust, dirt, and debris. Avoid using abrasive materials or harsh chemicals.
- Connection Checks: Annually inspect all electrical connections for tightness and corrosion. Ensure cables are not frayed or damaged.
- Avoid Sharp Objects: Do not scratch the surface of the solar panel with sharp objects, as this can damage the cells and reduce efficiency.
- Weather Protection: While the panels are waterproof, avoid submerging the charge controller or exposing it to heavy rain directly if not rated for such conditions. The panels are designed to withstand high winds and snow loads.

Figure 5: Solar panel durability against high winds, snow, and water.
6. Troubleshooting
If your solar power system is not performing as expected, consider the following common issues:
- No Power Output: Check all cable connections for looseness or incorrect polarity. Ensure the solar panels are receiving direct sunlight and are not shaded. Verify the battery is properly connected and not completely discharged.
- Low Charging Current: Clean the solar panel surfaces. Check for partial shading. Ensure the panels are angled correctly towards the sun.
- Controller Not Functioning: Ensure the battery is connected first and has sufficient voltage to power the controller. Check for any error codes on the controller's display and consult its specific manual.
- Battery Not Charging: Confirm the battery is healthy and capable of accepting a charge. Check battery connections and voltage.
For persistent issues, please contact customer support.
7. Technical Specifications
The following table details the technical specifications for the 300W flexible monocrystalline solar panel (two included in the 600W kit) and general system parameters.
| Parameter | Value |
|---|---|
| Product Name | Flexible Monocrystalline Solar Panel |
| Material | Monocrystalline Silicon |
| Panel Dimensions (each) | 775 x 500 mm (approx. 30.5 x 19.7 inches) |
| Peak Power (each panel) | 300W |
| Open Circuit Voltage (Voc) | 21.6V |
| Short Circuit Current (Isc) | 8.9A |
| Peak Power Voltage (Vmp) | 18V (for 12V battery charging) |
| Peak Current (Imp) | 8.5A |
| Battery Conversion Efficiency | 18% |
| Nominal Operating Cell Temp (NOCT) | -45~80°C |
| Panel Weight (each) | 2 kg (approx. 4.4 lbs) |
| Total Kit Power | 600W (2 x 300W panels) |
| Charge Controller | 40A |
| Recommended Wire Gauge | At least #12 AWG copper wire with 90°C insulation |
| Item Weight (total kit) | 11.02 pounds |
Note: The above data is based on laboratory standard test environments. Performance may vary based on actual environmental conditions.

Figure 6: Solar panel conversion efficiency comparison.
8. Safety Information
Please observe the following safety precautions to prevent injury or damage to the product:
- Always disconnect the solar panels from the charge controller before working on the battery or other components.
- Ensure all wiring is correctly polarized (positive to positive, negative to negative) to avoid damage to the system.
- Use appropriate wire gauges for all connections as specified in the technical specifications.
- Do not attempt to disassemble or modify the solar panels or charge controller.
- Avoid placing the charge controller in direct rain or wet conditions unless it is specifically rated for such exposure.
- The solar panel charger has a built-in countercurrent resistance to prevent reverse current flow to the panels at night.
9. Warranty and Support
For any questions, technical assistance, or warranty claims regarding your QIANMEI Solar Power Kit, please contact the seller or manufacturer directly through your purchase platform. Please provide your order number and a detailed description of the issue for prompt support.